
[nextpage title=”H6 Flow exterior”]
At the beginning of the month, NZXT announced a new case: the H6. Like the H9, it features a compartmentalized design. However, it comes in a more compact, less bulky format. Let’s take a closer look at this model from every angle!

H6 Flow exterior:
This model is indeed a compartmentalized version, and its dimensions speak for themselves. Indeed, this model is particularly wide at 287 mm. However, the depth and height remain contained: 415 (D) x 435 (H) mm. As for weight, we’re in the acceptable range with 9.4 kg on the scales… A far cry from the 16.3 kg of be quiet!’s Dark Base Pro 901, for example.
As always with NZXT, we’re dealing with a sober product with a sophisticated aesthetic. As you can see, the glass of the front panel matches that of the glass… However, there are no visible pillars. As with Hyte cases, the aim is to emphasize the view inside the configuration. Otherwise, the brand logo can be found at the bottom, on the left. In short, a model with clean lines.
As for the price, as you can see, it’s a case that sells for around €110-120, depending on the store. If you want RGB, you’ll have to reckon with an additional cost of around twenty euros.
The control panel:

The control panel is located at the bottom of the front panel. Unlike some of the brand’s other products, this one is rather complete and usable. We find :
- 3.5 mm headphone/microphone jack
- One USB-C 3.2 Gen2
- Two USB-A 3.2 Gen1
- A power button
At least, with this configuration, we’ll be able to connect two USB flash drives simultaneously. This is something that’s not possible on the H5 Elite, for example.
The underside:

A closer look at the underside of the case reveals its compartmentalized design. As you can see, the right-hand side is entirely dedicated to ventilation. It features two fan slots. The left-hand side has no practical use whatsoever.
As for the feet, there are four of them, and they are 2.5 cm high. Such a height is useful in order to let the ventilation that would be present at the bottom of the H6 Flow breathe.
Rear:

The rear of the case is off the beaten track due to its compartmentalized design. So it’s not surprising to find a power supply slot running parallel to the motherboard, as shown here.
On the motherboard, the I/O Shield slot can be seen vertically, followed by seven expansion slots. The latter are honeycombed. Finally, on the far right, there’s a slot for a fan and a large grille that goes all the way down to the bottom: maximum breathability!
The top :

Finally, we come to the top (held in place by a push-pin system) of the case, which features two different textures. On the one hand, the “components” section benefits from a mesh to let the fans breathe as much as possible. On the other side, we have a solid part, where the power supply and storage are located. Likewise, this view reveals a beveled angle – we’ll see what’s behind it next!
[nextpage title=”Inside the H6 Flow”]
Inside the H6 Flow :
The interior is accessed in the classic way by removing the side panels, which are held in place by two captive hand screws backed by a push-pin system. As you can see, after unscrewing the panels, you’ll need to pull on them to remove them.
The chassis :


Internally, we find a spacious case with plenty of room around the motherboard tray. What’s more, this motherboard can be upgraded to ATX format. If we wish, we should be able to go as far as E-ATX, but this could undermine the airflow of the front panel fans… Finally, the bevel.
Cable routing won’t be a problem, as there are so many of them. Above, below and to the sides of the motherboard tray, there are enough. By using them, we should be able to reach the various connectors on our board without difficulty.
As for rear clearance, it’s not a problem, since there’s… Simply the width of a power supply unit!
Storage slots :
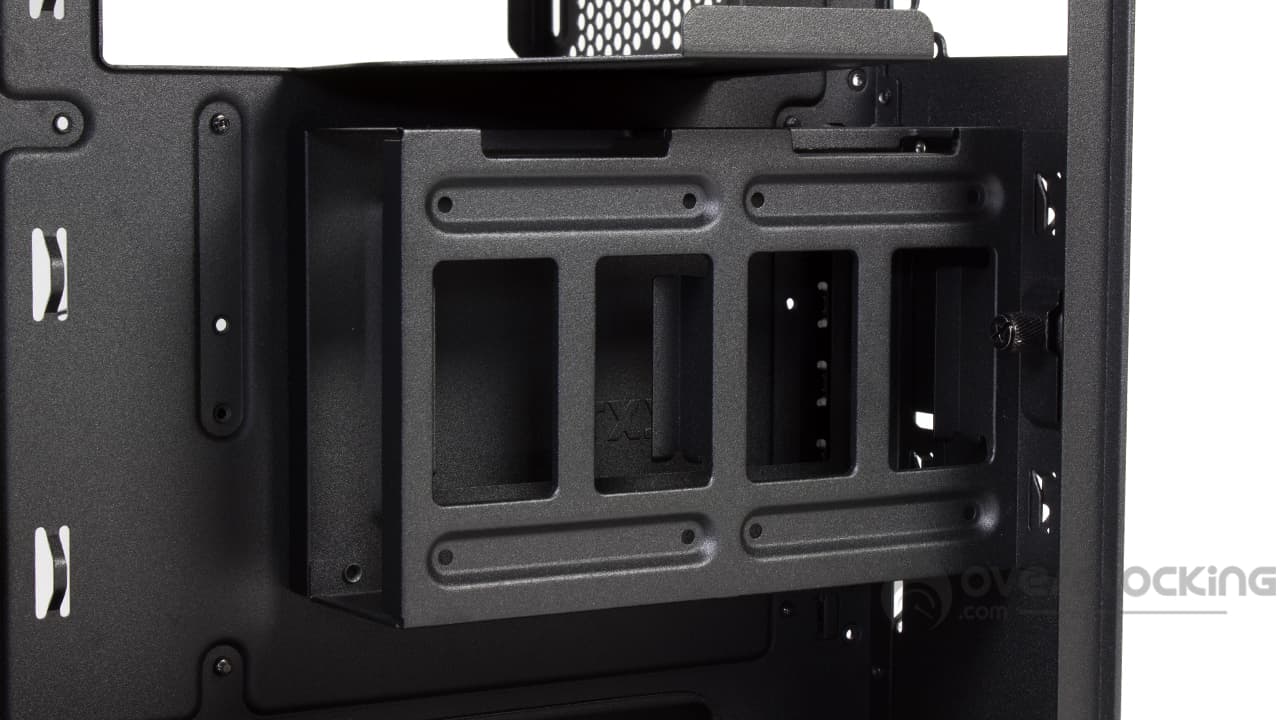
The storage section is as basic as it gets, resting entirely in a steel cage. This is held in place by a hand-tightened screw. It features two 2.5″ slots and a third 3.5″ slot. Once again, there’s no system to dampen parasitic vibrations, especially as it will have to be fully extended to add/remove hard disks/SSDs.
Power supply location:
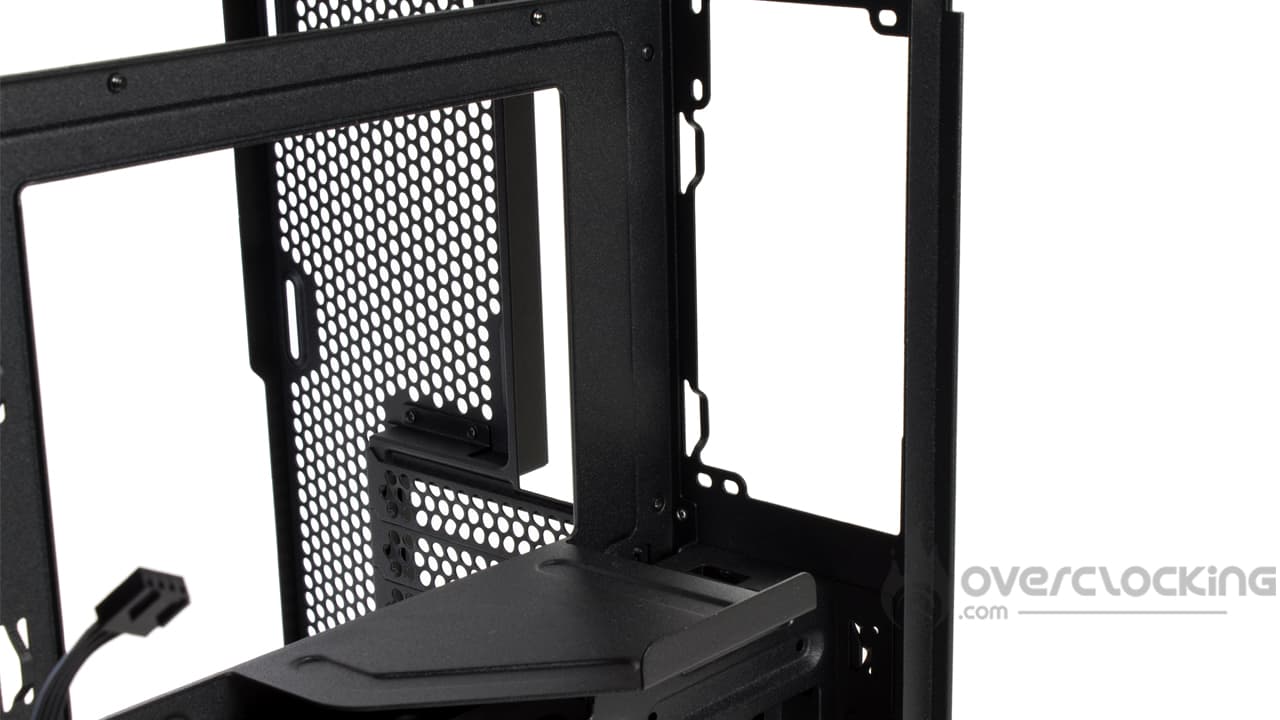
The power supply location remains basic, with a simple steel bracket. Once again, there’s no device to dampen vibrations. Small rubber pads would have been welcome, especially as they cost very little to add.
Cooling options :

By default, the H6 Flow comes with a total of three 120 mm fans. These are installed on the beveled edge of the case and will water the entire motherboard compartment. However, other slots are also available:
- Top: 3x 120 mm – 2x 140 mm
- Bottom: 2x 140 mm
- Rear: 1x 120 mm
As you can see, up to nine fans can be installed in this case. Too bad the bottom is not compatible with 120 mm fans!
As for watercooling, a 360 mm radiator can be installed on the top. But this will be the maximum possible. At the rear, you’ll have to make do with a 120 mm slot.
Finally, if you’re more of anaircooling team , you’ll be pleased to know that the case features 163 mm of space at the top. You’ll have enough to fit an AK620 Digital, but an Assassin IV or MA824 won’t fit.
The bundle:
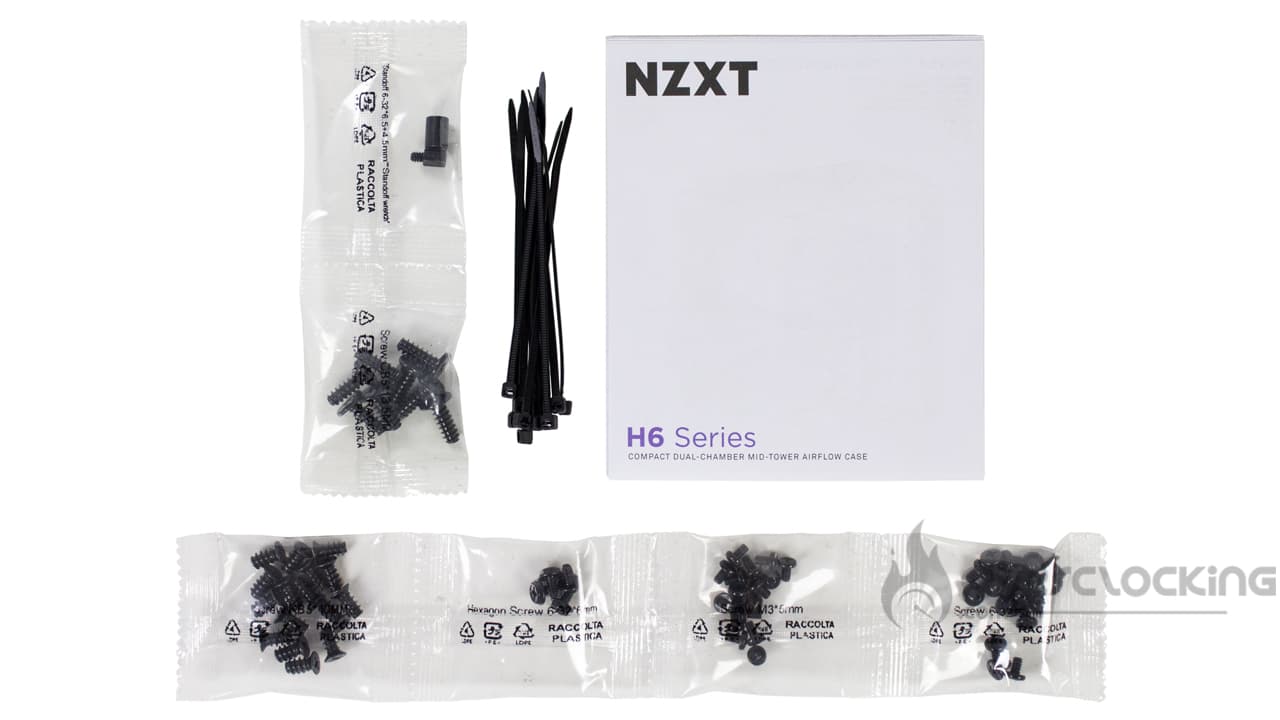
Roughly speaking, the accessory section of this H6 Flow concentrates on the essentials, with :
- Assembly instructions in leaflet form
- Screws and bolts in individual bags
- Nylon collars
In short, the bundle is as simple as can be, and focuses on the essentials. We have no additional accessories to help with assembly.
The little details:


In terms of small details, there’s not much to remember, except that the case features numerous Velcro straps. These are scattered all along the case, in places where they’ll be needed most. However, there are no channels as such, as may be the case with other models such as the H7.
Otherwise, at the bottom of the case, we note that the two 140 mm fan slots are fitted with rubber washers. These are intended to attenuate the parasitic vibrations of said fans once in place.
To sum up :
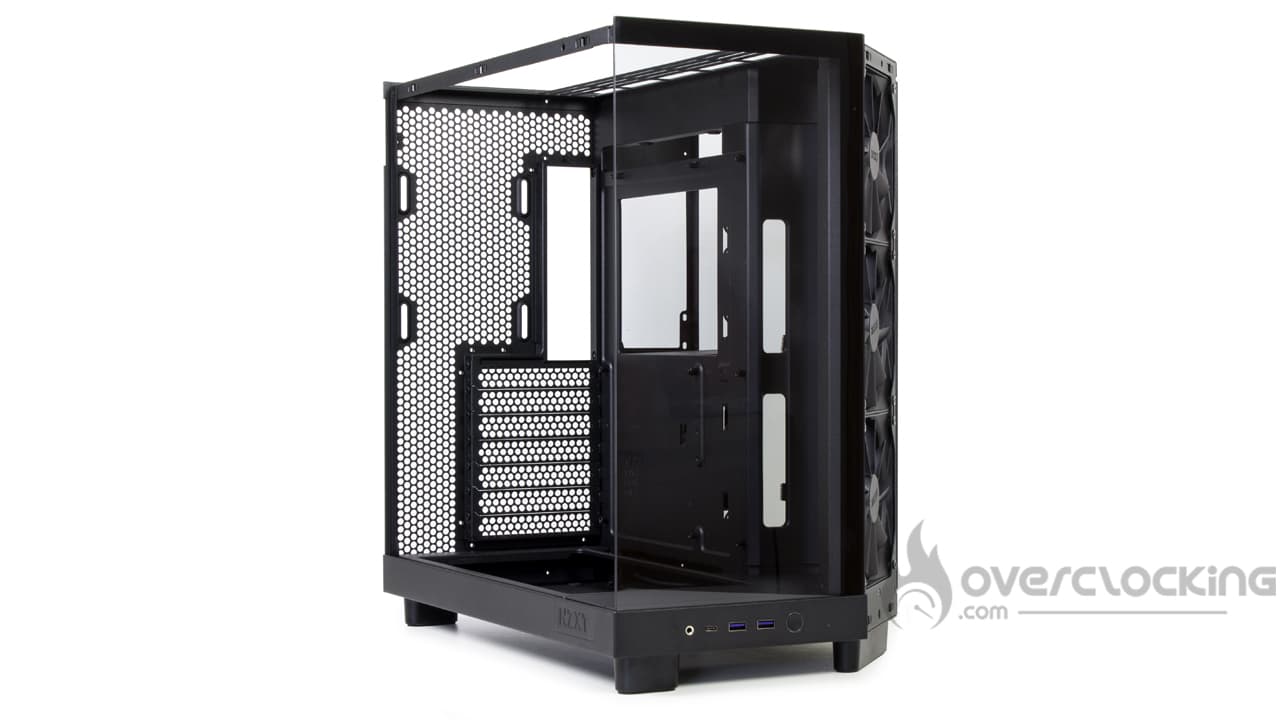
With this model, we find a case that stands out from the crowd thanks to its compartmentalized design. It’s also a case that looks good thanks to its soft design. Now it’s time to see how a configuration is assembled, but we’re not too worried about that.
[nextpage title=”Assembly”]
Assembly
We’re now ready to assemble our configuration inside this H6 Flow from NZXT. Here are the components that will be used for assembly:
- Motherboard: NZXT N7 Z790
- CPU: Intel Core i5 14600KF
- Graphics card: ASUS ROG Strix RTX 3050
- CPU cooler: Noctua NH-U12A chromax.black
- Power supply: NZXT C1000 Gold
Power supply:
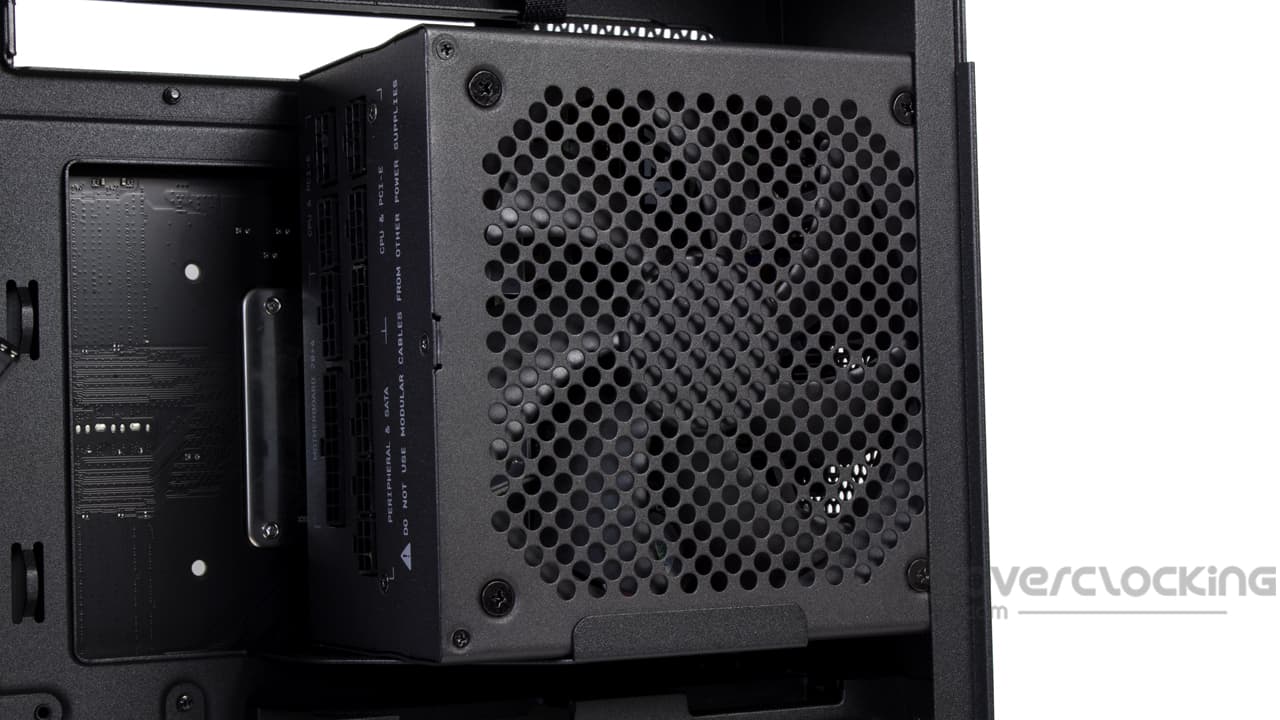
Installing the power supply is far from complicated, since all you have to do is place it in its slot. Then attach it to the back of the case. However, the compartmentalized design of the H6 Flow makes this location particularly accessible. For the rest, small foam or rubber pads would have been welcome.
Installing the motherboard :
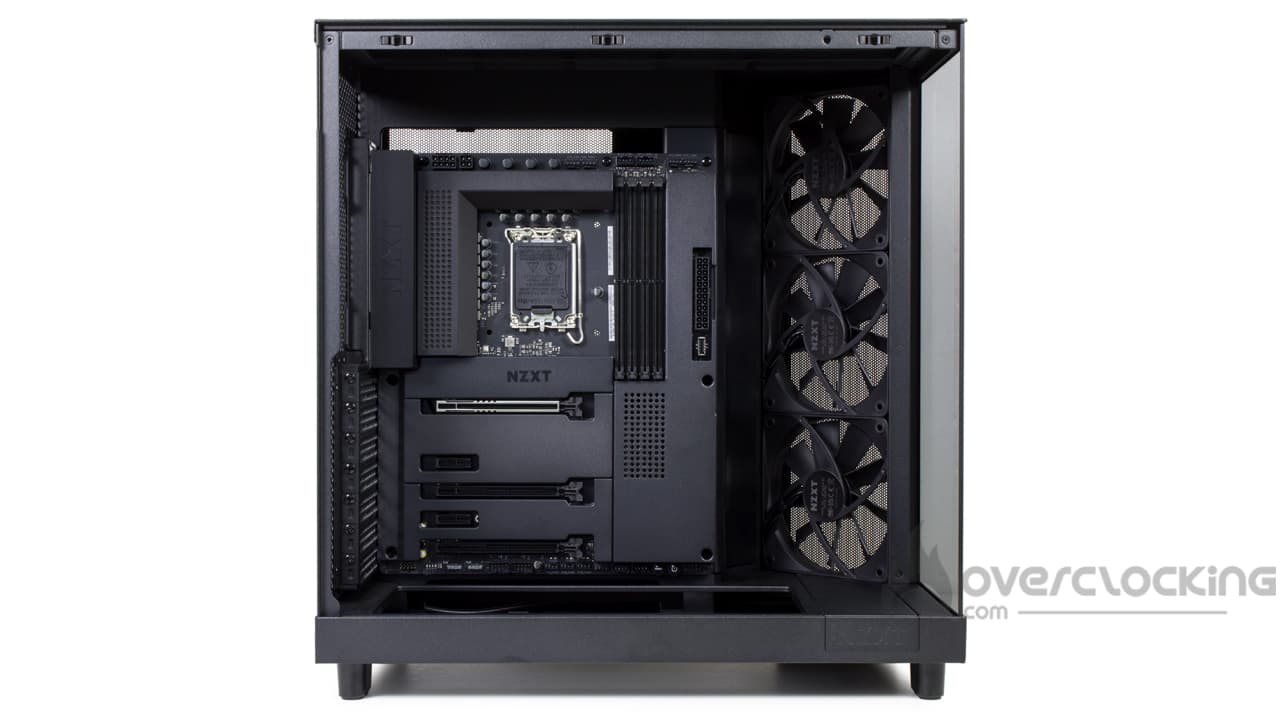
Mounting our motherboard, an N7 Z790, is not particularly difficult, since, as you can see, its slot is particularly unobstructed. There’s plenty of room to manipulate it. What’s more, it’s surrounded by a number of cable passages, which are very practical for the management cable.
Cabling :
The control panel :
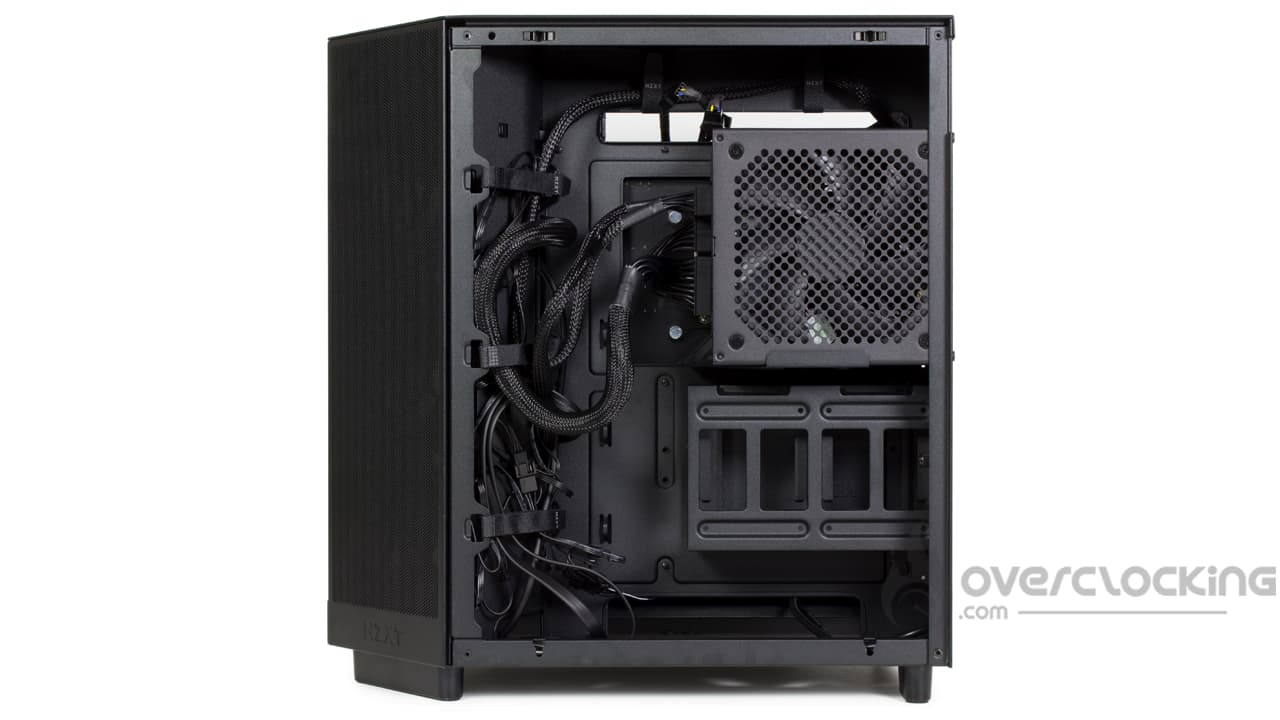
Let’s start with the control panel, to manage all those little cables that make such a mess of the setup. Of course, most of them run along the beveled edge to emerge at the bottom of the motherboard tray. Only the USB type C and USB 3.0 cables go up to the second opening before being connected to the motherboard. Velcro fasteners are used here to hold everything in place!
Motherboard, graphics card :
As for the motherboard, things get a little tense as the 24-pinATX remains a rigid and very thick connector. So we opted to loop it through the top side opening and plug it into our motherboard. As for theEPS12V CPU, it’s the same struggle, but it ends up through the wide top opening.
As for the graphics card’s 8-pin PCIe, this cable follows more or less the same path as the 24-pinATX .
Installing the CPU cooler and graphics card:
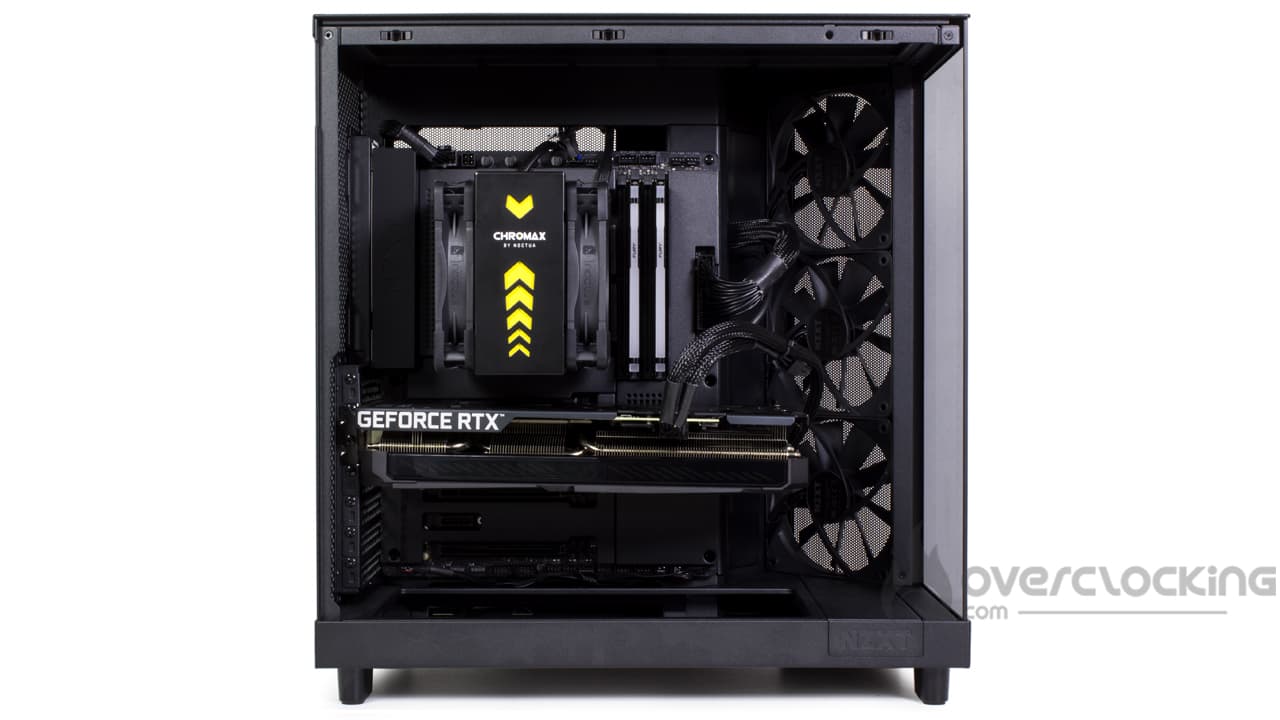
Unfortunately, if you had a backplate to place on the back of your motherboard to mount your CPU cooler or AIO, you’ll need to do this before mounting the PSU. Once the latter is in place, the back of your motherboard is totally obstructed. So you’ll have to remove the PSU to install your cooler, which is a shame.
Otherwise, as far as the graphics card is concerned, we encountered no particular problems. As with most models, we have two PCIe brackets to remove. We then plug our RTX 3050 Strix into its PCIe slot, screw it in through the bracket and that’s it!
However, beware if you have a cinderblock graphics card, as the case has no GPU support.
Overall:

Basically, assembling the configuration inside the case goes off without a hitch. Just bear in mind that, once in place, the power supply will completely obstruct backplate access to the motherboard. So either fit the motherboard and cooler before the power supply, or fit the CPU cooler to the motherboard before fitting everything to the case. Otherwise, the case is spacious, and the Velcro strips will help to secure the cables inside this H6 Flow!
[nextpage title=”Protocol”]
We’ve updated our test protocol in order to test the qualities of our cases. We’ll be assessing the performance of the different models according to three criteria:
- Insulation
- Original ventilation noise
- Air flow
Here, the configuration changes; you’ll find the details below. As for software, the CPU will run on PowerMax, while the graphics card will run on Furmark, both simultaneously. Note that CPU ventilation is forced to 100%, while graphics card ventilation is set to 50%.
In addition, in order to limit temperature variations linked to frequency/consumption variations, we clip the graphics card curve at 1860 MHz, the original boost frequency of the ASUS RTX 3050 Strix.
A warm-up period of 8 to 9 minutes is applied before two 2-minute averaging sessions. The tests are run one after the other, uninterrupted, so as to observe variations in component temperature as a function of case fan speeds. A delta is then applied: component temperature subtracted from ambient temperature.
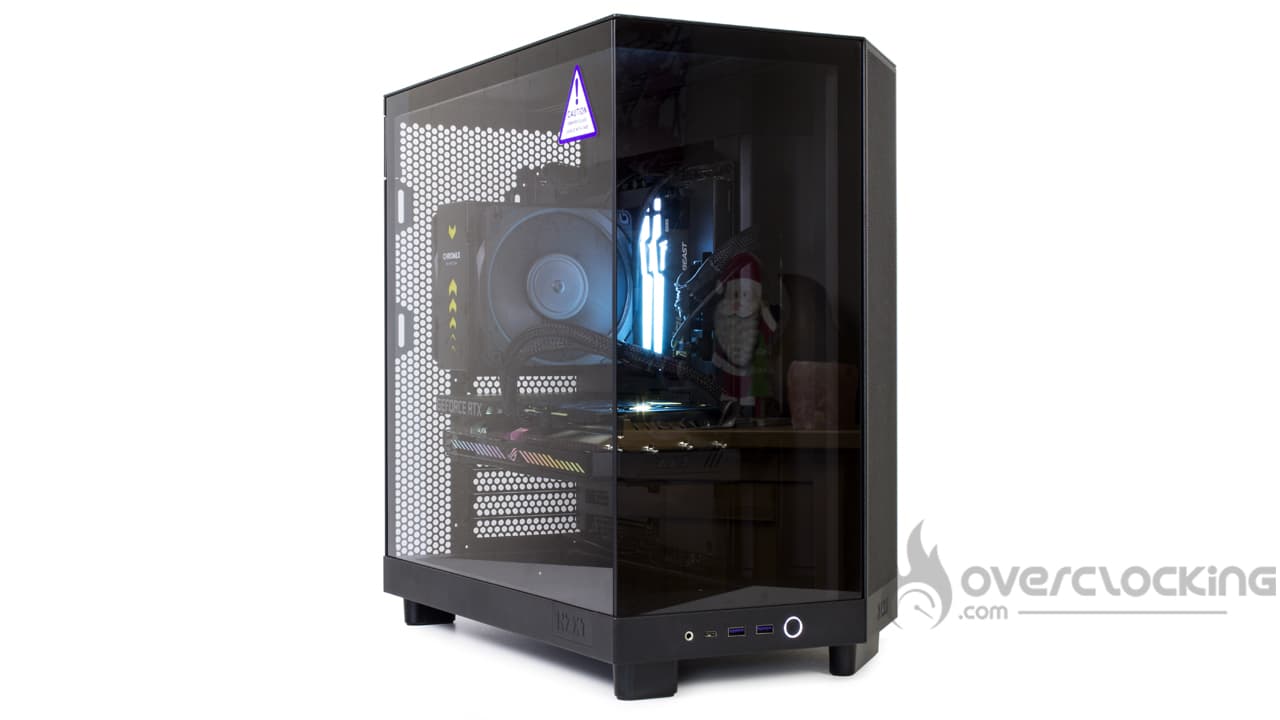
For this test, we took two series of readings, with complete disassembly/reassembly of the config in between… To confirm the temperatures obtained and test different positions of the additional fans. In the first series (#1), we placed the additional fans at the bottom, blowing on the graphics card. In the second series (#2), one fan was mounted at the bottom in suction, the other was positioned at the top in extraction.
Configuration:
- Motherboard: NZXT N7 Z790
- CPU: Intel Core i5 14600KF
- Graphics card: ASUS ROG Strix RTX 3050
- CPU cooler: Noctua NH-U12A chromax.black
- Power supply: NZXT C1000 Gold
[nextpage title=”Tests”]
Tests
Airflow :
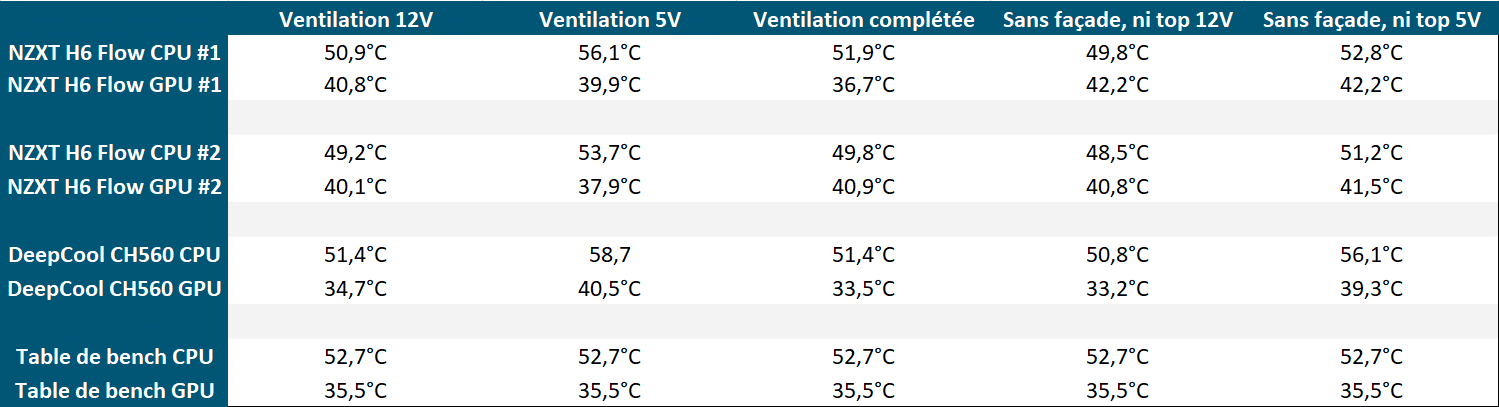
This time, no graph, but a table to summarize the temperatures obtained, which lack coherence… At least for the GPU part.
As you can see, as the airflow inside the case increases, so does the temperature of our graphics card… But this is not logical. If we look at the results obtained inside a DeepCool CH560 Digital, as the airflow increases, the temperature of the GC decreases, but this is not the case here.
The only time temperatures drop with increased airflow is when two fans are placed in suction under the graphics card (survey #1). Otherwise, in the case of the second reading, temperatures rise slightly with one fan at the bottom, the other at the top in extraction.
On the CPU side, overall readings remain consistent, with low temperatures tending to rise as the speed of the three front fans is lowered. Removing the front and top panels also results in lower temperatures. The only inconsistency noted is with ventilation completed, which can be explained by the fact that the fans push the heat emitted by the GC into the processor area.
Insulation :
Here, we’re simply measuring the noise emitted by our configuration when running CPU cooling and GPU cooling at high speed.
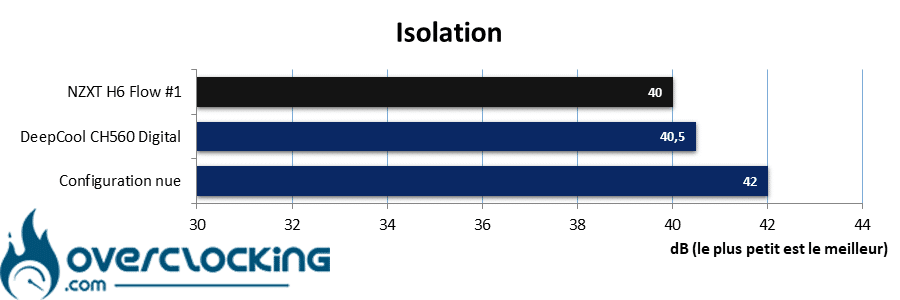
In terms of isolation, there’s no significant difference with DeepCool’s CH560 Digital… Except that it covers the noise emitted by our configuration a little better. We noted a 0.5 dB improvement. However, when compared with a benchtop configuration, the difference is a little more significant!
Original fan noise :
This time, we measure the noise emitted by the case’s original fan. To do this, the configuration is run in idle mode ( CPU and GPU ventilation at minimum), while the readings are taken successively at 33%, 66% and 100% on the case ventilation.
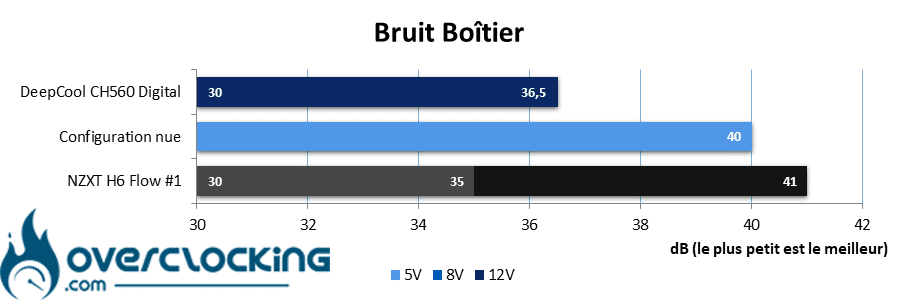
As far as noise levels are concerned, we can see that the trio of mills fitted as standard are particularly noisy, especially when pushed to full speed. If we lower their speed, at 66% PWM signal, we still get 35 dB, while they become inaudible at 33%.
To sum up:
In the end, we find a box that generates very strange thermal dynamics. As we’ve seen, the temperature of our graphics card tends to rise as the airflow increases. What this is due to remains to be seen, since the card’s power consumption and frequency are fixed! However, the CPU behaves well, just be careful not to send hot air from the GPU onto it. On the other hand, it’s a pity that the ventilation is so loud, despite decent insulation, at least when compared with the DeepCool case.
[nextpage title=”Conclusion”]
We’ve now come to the end of our test of the NZXT H6 Flow. So, good case or not? We tell you all about it!
A compact, compartmentalized model:
With this new case, NZXT offers us a compartmentalized reference in a compact format. Unlike other models, it won’t take up much space on your desk.
The aesthetic aspect is well thought-out and particularly successful, thanks in particular to the two glass panels that meet without a central pillar. This gives you a clear view of the components.
A spacious model with simple wiring!
Internally, there’s plenty of room for components and ventilation. However, it’s a pity that only 140 mm mills can be fitted at the bottom… 120 mm compatibility would have been welcome.
As for assembly, you’ll need to proceed in order for certain components. Once in place, the PSU will obstruct the rear of the motherboard tray… So if you have a backplate to install, do so before fitting the power supply.
Otherwise, the cabling part is straightforward, and you’ll be able to make really big cable bundles thanks to the generous rear space. What’s more, velcro straps are provided at strategic points to facilitate organization. No need to worry about this stage.
Strange temperatures, to say the least…
However, the aspect that leaves us dubious is the temperature aspect, and more specifically that of the graphics card. As we’ve seen, as the airflow inside the case increases, so does the temperature of our GPU. Which doesn’t make sense… Once again, it remains to be seen what the reasons are behind this phenomenon… Especially as the CPU behaves normally. Moral: in view of our results, we advise you to run the case ventilation at low speed, or add two blowers under the graphics card, at the sacrifice of a few degrees on the CPU.
Otherwise, despite decent sound insulation, this model’s ventilation proves noisy at full speed. Compared to the CH560 Digital, we’re not in the same league. Fortunately, at low speeds, the three fans are as discreet as a mouse, while at mid-range they start to give voice.
An affordable price :
The price is around €115 or $130, in both black and white. An RGB version is also available, but you’ll need to add an extra €25 for the bright lighting – that’s a bit steep. Clearly, the competition is there, but this is a case with personality!
NZXT H6 Flow:
We liked:
- The sober, neat design, with no pillar on the front, leaving a clear view.
- The functional control panel with two USB-A ports.
- Panels held in place by a push-pin system.
- Good component compatibility.
- Generous rear space.
- Velcro strips for easy wiring.
- The price, which is not exaggerated in its non-RGB version.
We didn’t like :
- The impossibility of mounting 120 mm fans at the bottom.
- A perhaps still basic HDD cage?
- Lack of GPU support, given the size of recent graphics cards.
- Watch out for the mounting direction of components, especially if you have a backplate to mount on your motherboard.
- Strange thermal behavior around the graphics card.
- The ventilation can quickly become noisy at full speed.
 In the end, we’ve decided to give a narrow silver award to NZXT’s H6 Flow. Even though it has undeniable qualities, such as its interior space, design and attractive price, there are a few thermal concerns. Apart from that, the ventilation can be heard quite quickly, and it’s a shame that 120 mm fans can’t be fitted at the bottom.
Many thanks to NZXT !

