

We used an ASUS RTX 4060 Dual OC for the Tweak League, so we were able to play around with it. The one used in this article wasn’t the most powerful, so we can give you some settings that should be reliable with your RTX 4060.
If you’re looking for a simple guide to overclocking your RTX 4060, here are my recommendations with 3 levels of difficulty. All this has been achieved in 2 hours, so there’s more performance to be gained from it, but I wanted to produce a guide that would enable anyone to overclock their card and, above all, to see the concrete effects!
There are surely better methods out there, and don’t hesitate to make your recommendations in the comments 🙂
Let’s start by installing and configuring MSI Afterburner.
Regardless of the brand of your graphics card, the most widely used software for overclocking is the MSI Afterburner. You can download it directly from the manufacturer’s website: www.msi.com/Landing/afterburner/graphics-cards
The RivaTuner part will be useful if you want to display FPS, temperatures and frequencies in game, but installation is not necessary here.

Once installed, go to Settings (gearicon ), where you’ll need to activate :
- Unlock voltage control
- Unlock voltage monitoring
If you want overclocking to be active every time Windows starts up, you’ll also need to activate :
- Start with Windows
- Start minimized

Confirm everything and click on the Windows icon in the top right-hand corner of the main window, which should change color. You’re all set!
Before starting overclocking, we ran 3 benchmarks to calculate the performance gains at each stage.
Here are the results:


| Stock | Easy | Intermediate | Max | ||
| TimeSpy | Score | 11’727 | ? | ? | ? |
| Solar Bay | Score | 50’278 | ? | ? | ? |
| Cyberpunk 2077 | FPS | 108.69 | ? | ? | ? |
[nextpage title=”#1 Overclocking mode : Easy (10 min)”]
The easy way: Undervolting (10 min)
This allows us to increase performance while reducing the voltage and therefore the temperature of the graphics card.
Please follow the stepsbelow:
Open the CURVE EDITOR window at the bottom left of MSI Afterburner. Hold down SHIFT and then LEFT-CLICK on the point above 950 mV. We’ll drag it up +250 Mhz.
Now press SHIFT again and LEFT-CLICK just to the right of the point you’ve just moved (you mustn’t click on a point). By holding SHIFT LEFT CLICK you have selected all the points on the right of the graph. Release SHIFT and CLICK. Now LEFT CLICK on any point within the selected area (to the right of the 950 mV point) and pull it down to 0.
Validate your curve with the button to the right of the Floppy Disk on the main menu. You should obtain the following curve.
 Set your POWER LIMIT to maximum. The same goes for TEMP LIMIT.
In MEMORY CLOCK type 800 then enter.
Re-validate your settings with the icon on the right of the Floppy Disk .
Save the profile by clicking the Floppy Disk and then the “1” on the right of the menu.
Results:


Performance gains:
3.9% on the 3D Mark Time Spy benchmark.
4.3% on the 3D Mark Solar Bay benchmark.
108.69 FPS or 2.4% on Cyberpunk 2077.
| Stock | Easy | Intermediate | Max | ||
| TimeSpy | Score | 11’727 | 12’184 | ? | ? |
| 3.90% | ? | ? | |||
| Solar Bay | Score | 50’278 | 52’437 | ? | ? |
| 4.29% | ? | ? | |||
| Cyberpunk 2077 | FPS | 108.69 | 111.25 | ? | ? |
| 2.36% | ? | ? |
We’ve just lowered the voltages, and therefore the temperature, so you’ll be able to play for hours without any loss of performance.
This undervolting should have no impact on the stability of your graphics card. Launch your favorite games and if ever there’s a crash, simply open MSI Afterburner and use the icon on the left of the Floppy Disk , then the one on the right to validate the changes and return to the default settings.

[nextpage title=”#1 Overclocking mode: Medium (15 min)”]
Intermediate overclocking: safe and powerful (15min)
We’re now going to look for a bigger performance gain, using exactly the same steps as for the previous profile.
Open the CURVE EDITOR window in the bottom left-hand corner of MSI Afterburner. Hold down SHIFT and LEFT-CLICK on the point above 1050 mV. We’ll drag it up to 180 Mhz.
Now press SHIFT again and LEFT-CLICK just to the right of the point you’ve just moved (you mustn’t click on a point). By holding SHIFT LEFT CLICK you have selected all the points on the right of the graph. Release SHIFT and CLICK. Now LEFT CLICK on any point within the selected area (to the right of the 1050 mV point) and pull it down to 0.
Confirm your curve with the button on the right of the floppy disk in the main menu.
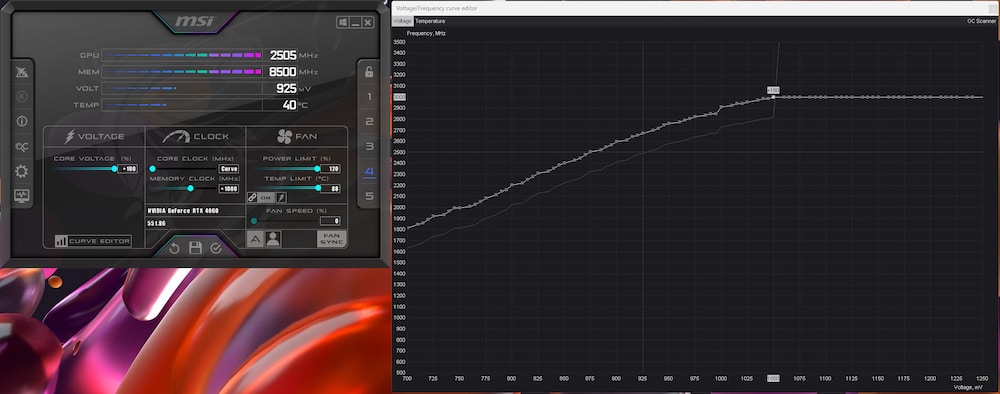 Set your POWER LIMIT to maximum. The same goes for TEMP LIMIT, and in MEMORY CLOCK type +1000.
Re-validate your settings with the icon on the right of the Floppy Disk .
Now it’s time to save the profile by clicking the Floppy Disk and then the “2” on the right of the menu.
Now you should launch a benchmark software like 3DMark TimeSpy to validate your results and stability in 5 minutes.
Results:


Performance gains :
9% on the 3D Mark Time Spy benchmark.
8.2% on the 3D Mark Solar Bay benchmark.
116.3 FPS or 7% on Cyberpunk 2077.
| Stock | Easy | Intermediate | Max | ||
| TimeSpy | Score | 11727 | 12’184 | 12’786 | ? |
| 3.90% | 9.03% | ? | |||
| Solar Bay | Score | 50278 | 52’437 | 54’407 | ? |
| 4.29% | 8.21% | ? | |||
| Cyberpunk 2077 | FPS | 108.69 | 111.25 | 116.3 | ? |
| 2.36% | 7.00% | ? |
We’ve got a big perf gain here that we’ve been able to maintain for hours on our Tweak League config.
If your PC crashes in game, go back to PROFILE 1. Not all graphics cards are created equal, it’s the silicon lottery.
[nextpage title=”#1 Overclocking mode : Advanced (1h30)”]
Overclocking max: it’s up to you (1h30)
Now that we’ve validated the intermediate profile, we can push the card to its limits. This means a loss of stability, so don’t use it for your gaming sessions if you don’t know what you’re doing. That said, you’ll be able to see if your card is up to the task, and that’s always good for the ego.
This time, let’s start with our previous profile.
We start by playing with the memory clock. Increase it by 50Mhz increments. And check for crashes using 3DMark Time Spy, for example. If a crash occurs, return to the previous frequency and increase by 20Mhz.
Onceyou’ve reached the maximum stable memory frequency, lower it by 50Mhz and play with the core clock/voltagecurve .
In CURVE EDITOR, we’ll now play with the 1100 mV point. Gradually raise the whole curve. I recommend 20mV by 20mV.
And here too, we’re aiming to reach the crash point in our benchmarks and goback 1 or 2 steps for stability.

Our ASUS RTX 4060 Dual OC enabled us to go to 210 Mhz Core Clock (i.e. 3075 Mhz from 1100 mV) and 1300Mhz Memory Clock. We remind you that each GPU is different and that no two will have the same results.
Results:


Performance gains:
10.5% on the 3D Mark Time Spy benchmark.
15.8% on the 3D Mark Solar Bay benchmark.
119.57 FPS or 10% on Cyberpunk 2077.
| Stock | Easy | Intermediate | Max | ||
| TimeSpy | Score | 11’727 | 12’184 | 12’786 | 12’954 |
| 3.90% | 9.03% | 10.46% | |||
| Solar Bay | Score | 50’278 | 52’437 | 54’407 | 58’232 |
| 4.29% | 8.21% | 15.82% | |||
| Cyberpunk 2077 | FPS | 108.69 | 111.25 | 116.3 | 119.57 |
| 2.36% | 7.00% | 10.01% |
In 2 hours, I think a 10% performance gain in gaming on an RTX 4060 is simply brilliant. Who says you can’t have fun with an entry-level GPU?
Thank you ASUS for providing the RTX 4060 Dual OC for the Tweak League.