

During our visit to EK at CES 2024, we discovered their new AIO cooling system in the EK-Nucleus AIO CR360 Direct Die D-RGB – 1700 version. Behind this name lies a solution for keeping your delid processor cool. As a reminder, delid means removing the IHS (Integrated Heat Spreader) in contact with the die. The EK-Nucleus AIO CR360 Direct Die therefore directly cools the die to optimize CPU cooling. A few days ago, we received a copy of this EK-Nucleus AIO CR360 Direct Die D-RGB – 1700, which we’re now going to test on an Intel I9-14900K processor, which we’ll have to delid first.
Special thanks to EK for allowing us to be among the first to test this EK-Nucleus AIO CR360 Direct Die D-RGB – 1700, which is currently available for pre-order at a price of 206 euros.
[nextpage title=”Packaging description: “]
Let’s see what’s inside the packaging of this EK-Nucleus AIO CR360 Direct Die D-RGB – 1700. Although we received this kit before it went on sale, this is the commercial version. This is no longer a pre-production model. What we’re about to show you is what you’ll find if you buy this kit. In addition to the kit, we’ve also received a copy of the EK-Quantum Velocity² IHS Removal Tool- 1700, which will enable us to prepare our i9-14900K processor. One page of our article will be dedicated to the delid of the processor.

It’s time to see what’s inside this imposing box. If you’re an EK loyalist, you’ll know that orange is their benchmark color. For the most part, the box is white, to highlight the photo of the EK-Nucleus AIO CR360 cooling system. We can already see that the fans will benefit from RGB backlighting, as will the pump top. The latter is reminiscent of the skull and crossbones that adorned Intel products a few years ago.


On opening the box, we discover a series of instructions to extend the warranty period, the installation manual and a sheet of stickers. Once the protective foam plate has been removed, the cooling system is revealed, along with three 120 mm fans, a replacement top and the liquid metal Conductonaut kit from Thermal Grizzly.
The second cover for the pump top is also part of the bundle, if you’re not a fan of the original one featuring a brushed aluminum skull. Older people, like me, will see a resemblance with the logo Intel used on some of its components. In all cases, customization will be possible via 3D printing.


The three fans in the kit are 120mm models with seven transparent blades. The fan part number is EK-FPT FAN – 120ER D-RGB. These fans have a speed range from 550 to 2300 RPM (72 CFM = 122.33 m³/h), with a maximum noise level of 36 dB.


On the right is an orange box containing everything you’ll need to install this cooling solution. You’ll see that several components are branded with the der8auer logo, since this is a collaboration with the famous German overclocker when it launched the limited-edition direct die EK-Quantum Velocity² waterblock several months ago.
[nextpage title=”Preparatory tests: “]
Before carrying out the delid, it is of course important to have reference measurements that will enable us to judge the gains, in terms of temperatures, that we are going to obtain. We’ve chosen our Intel i9-14900K as our processor, since it gives off the most heat. Since it doesn’t have great overclocking potential, nor a good IMC for memory overclocking, it was the ideal candidate. Once we’ve finished our tests, we’ll make a relid with liquid metal so that we can continue to use it during our tests.
Here are the other components of our test configuration:
- Motherboard: ROG Maximus Z790 APEX ENCORE (BIOS 0080)
- Processor: Intel i9-14900K
- Memory : G.SKill Trident Z5 RGB 8000 MT/s CL40
- Graphics card: MSI GT 710
- SSD: Western Digital SN850 NVMe SSD M.2
- Power supply: be quiet! Dark Power PRO 12 1500w
- Operating system: Windows 10 64-bit (22H2)
As for the liquid cooling loop, it’s also from EK. We have a 480mm EK CoolStream XE radiator, four EK-Meltemi 120ER Black fans and an EK Quantum Kinetic reservoir/pump combo.


[nextpage title=”Delid of our i9-14900K:”]
Delid and direct die, yes, but why?
It’s a fairly logical question to ask, what’s the point of delidding your processor and opting for a direct die solution, especially when you lose your Intel warranty in the process?
The advantage of delid is to improve heat transfer between the die and the IHS, since when these are not soldered, the thermal paste used is not always the most effective. There are two types of delid. The first consists of removing the IHS to replace the thermal paste with liquid metal, which is much more efficient, and then re-bonding the IHS to achieve a temperature gain.
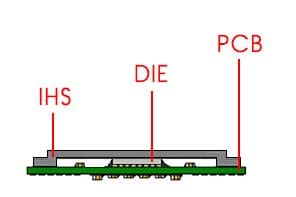 The second, more ultimate solution is not to reuse the IHS and to cool the die directly , using this EK-Nucleus AIO CR360 Direct Die D-RGB for example. This requires extra care to avoid damaging the die by over-tightening. The first solution is still the most common, although some members of our discord are happy to delid your processor and relid it, i.e. replace the thermal paste with liquid metal and then re-glue the IHS.
The tool: the EK-Quantum Velocity² IHS Removal Tool – 1700
As we said in the introduction, we also received a copy of the EK-Quantum Velocity² IHS Removal Tool – 1700. This is a tool that will enable you to delid your processor safely, and is sold separately for 81 euros. It is compatible with 12th, 13th and 14th generation processors. Note that use is slightly different with 12th generation processors. We advise you to refer to the instructions available online or as a bundle.


Inside the box of our EK-Quantum Velocity² IHS Removal Tool, you’ll find both sides of the tool, an Allen key and a nut. We’ll look at how to use them below.
Let’s delid our i9-14900K:
You can find the tool’s EK guide here. The first step is to remove the two M3 screws on one side of the tool, which are only useful when delidding a 12th-generation processor.


The second very important step is to place your processor in the right part, making sure it’s correctly positioned: the little triangle on the corner of the processor next to the one engraved 1, since there’s a similar icon but marked 2.


Of course, you’ll need to start with your processor in position 1 and slide the top part into position 1. Make sure your processor lies flat in the tool before sliding the top part in.


Once this is in place, insert the screw and tighten by hand. The idea of this first tightening is to move the IHS upwards, as there is no resistance on our processor PCB in this area. EK recommends heating the assembly to make the glue holding the IHS to the PCB more flexible. Personally, I used a hair dryer for several minutes.


Now that the processor is in the tool, you’ll need to tighten it to the maximum and hear the first little “clack” when the IHS comes loose the first time. When you’ve tightened it to the maximum, we go the other way and remove the screw. We’ll then be able to see that the IHS has moved upwards.


Reverse operation, placing the processor in position 2, with the upper part also in the second position. The idea is to return the IHS to its original position. Then simply repeat the operation two or three times to weaken the glue. Personally, we had to use a razor blade to facilitate the final separation.


The delid is easy, now it’s time to clean up! A quick video of the operation on our i9-14900K processor.
@cornerjack_occ Delid du processeur i9-14900K avec l’outil EK IHS Removal avant le test de refroidissement du EK-Nucleus AIO CR360 Direct Die ❤️ #delid #IHS #14900k #directdie #lm #EK #cooling #cpu #nucleus #intel #aio #watercooling #pc @ROG France @Intel Corporation @EK Water Blocks
Cleaning the DIE:
This is perhaps the most “complicated” of all. What at first glance looks like thermal paste is actually indium that has solidified. Even if it’s not necessary, you’ll first need to remove the glue residue from the PCB using the plastic tool supplied by EK. Next, remove the indium from the die. You can either put Conductonaut (LM) on the die to soften the indium and scrape it off. Several members of the discord use Flitz, which seems to be the perfect and easiest solution.
[nextpage title=”Installing the EK-Nucleus AIO CR360 Direct Die:”]
Now that our i9-14900K is naked, it’s time to install the EK-Nucleus AIO CR360 Direct Die D-RGB cooling system. As specified, this will keep our 14900K cool when paired with a ROG Maximus Z790 APEX ENCORE motherboard. Still referring to EK’s online instructions, we’re going to start the installation by removing the mechanism that allows your processor to stay in place in the socket. To do this, you’ll need a TX20 tip (not supplied).


The next step is to place your delid processor in the socket. Now that it’s in place, you can use the retention system supplied by EK and designed in collaboration with der8auer. Its role is, of course, to hold the processor in the socket.


The part that will be placed under the PCB has a dual role. It holds the retention system in place, but also secures the four brackets that will hold the waterblockin place.


Place the protective foam on the processor so that it doesn’t touch the die. Its role is to prevent liquid metal (LM), in this case Conductonaut, from leaking onto the PCB. Normally, there’s no risk, since very little liquid metal is needed.


EK recommends applying only a small drop on the die and spreading a small amount on the base of the waterblock. There’s really no point in trying to apply too much. Now that everything’s ready, all you need to do is install the three fans on the radiator and the waterblock/pump combo on the processor.


Let’s get on with our comparative tests. The rendering of the skull is just superb! The upper part allows the D-RGB EK badge to be reoriented, regardless of the direction in which the cooler is installed. Orientation can be changed in 90° increments. So if the cooler is installed upside down, rotate it 180° to display the logo right side up. Regardless of the angle at which the AIO is installed, it will always offer a clean, aligned aesthetic.


[nextpage title=”Comparative tests:”]
So, to make things clear, we compared the temperatures obtained under Cinebench R23 runs with our original 14900K cooled by an EK custom liquid loop with a 480 mm heatsink and our 14900K delid with the AIO EK-Nucleus CR360 Direct Die D-RGB.
In order to reproduce test situations as closely as possible, the P-cores were set at 5.8 GHz, the E-cores at 4.4 GHz and the cache at 4.5 GHz. BIOS voltage was set to 1.325 volts at level 7.
The temperatures of each core are measured using the latest version of Core Temp software. The P-core and E-core temperatures are then averaged to compare the temperatures of the two cooling solutions. Two different set-ups were used to ensure perfect contact. Here are the performances obtained in tabular form.

Let’s take the averages for each run to compare the temperature differences between our two liquid cooling solutions.

As we can see, the gains are very interesting: at P-core level, we save almost 8.5°C, bearing in mind that we’re going from a 60 mm 480 mm radiator to a 360 mm 25 mm radiator. The difference is much smaller for E-cores, with a difference of 3.95°C. In terms of space and noise, the EK-Nucleus CR360 Direct Die D-RGB is also much more attractive.
[nextpage title=”The last word:”]
So, what did we think of this EK-Nucleus AIO CR360 Direct Die? For us, it’s a cooling solution that’s certainly not for beginners. When we use the term “beginner”, we mean those who don’t like to get their hands into their PCs. Using this EK-Nucleus AIO CR360 Direct Die D-RGB kit will first require you to delid your processor. This in itself is a rather delicate operation, and will void your processor’s warranty. Next, you’ll need to install the cooling system, including dismantling the processor’s retention system and applying liquid metal.
But all in all, it’s a very effective solution when you consider how hot an i9-14900K can get! Even if we’re aware that this EK-Nucleus AIO CR360 Direct Die cooling system won’t be one of EK’s biggest sellers, it has the merit of existing and, above all, the merit of being available in the brand’s catalog. Priced at 200 euros, this is an ultra-quality product in every respect. The retention system designed in collaboration with der8auer is effective, and the Nucleus waterblock is perfectly designed to keep your CPU die cool.
Several members of our discord have already resorted to delidding their processor, and this EK-Nucleus AIO CR360 Direct Die kit is an excellent cooling solution for those wishing to take the plunge and give their high-end processor a cool-down.

EK-Nucleus AIO CR360 Direct Die D-RGB – 1700
We liked :
- An excellent price! You get everything you need to make direct die for just 200 euros.
- Excellent performance
- The quality of the kit’s components and accessories
- The association with der8auer
- The top-of-the-line design of the pump, with its skull and crossbones reminiscent of the Intel design
We would have liked :
- The kit’s non-upgradeability with the arrival of future CPU generations
- Simplified fan connectivity
With its AIO EK-Nucleus CR360 Direct Die D-RGB, EK offers a complete cooling solution for delid processors. Although waterblocks are already available for sale, this is the first complete solution available on the market, and at a price that we feel makes perfect sense. We salute EK for setting itself apart from the competition. This is a double award, with a “coup de coeur” for this cooling solution and our innovation award. Thanks to EK for making this test unit available, and for the opportunity to be among the first to review it!

