


The PCB and connectors:
Overclocking tools:
Let’s start with the elements inserted on the PCB / IO shield and which can be interesting tools for overclockers. And it must be said, Gigabyte spoils us with this Tachyon. This is very much a motherboard dedicated to overclocking.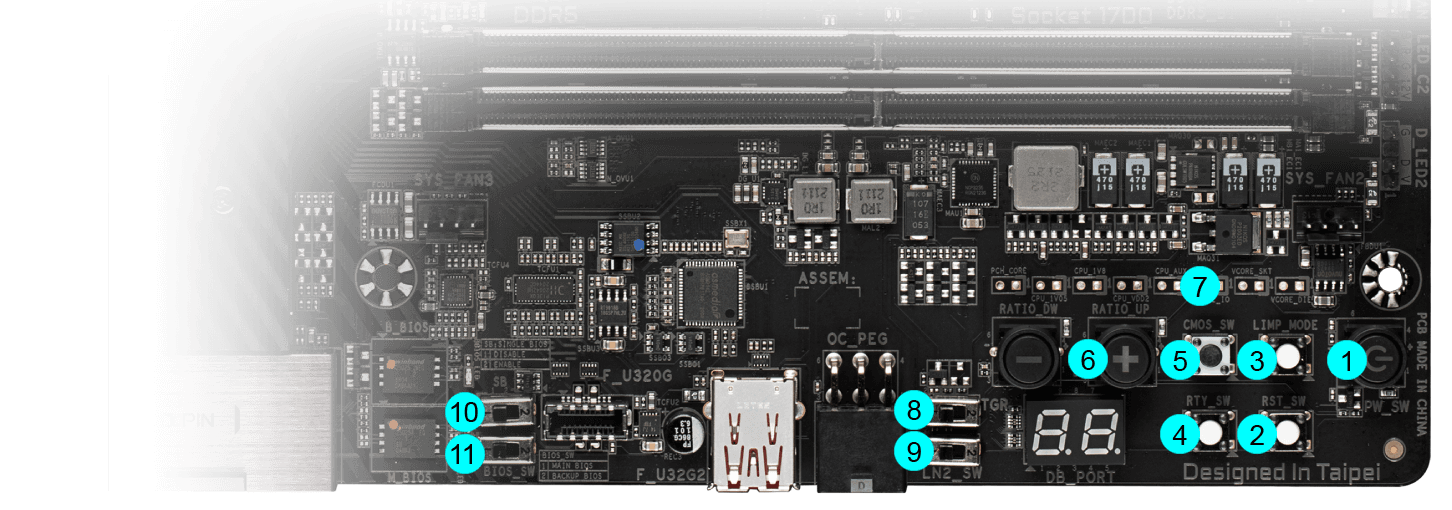
- The power button: to power up the motherboard.
- The reset button: allows the motherboard to be restarted in case of failure.
- The LIMP mode: similar to the “Safe Boot” on Asus, this button allows to restart the board even if the parameters chosen in the BIOS do not allow it to boot. This avoids having to do a CMOS Clear to reboot and thus lose your chosen settings. The board will then reboot with default settings.
- The Cold Reset button: this button allows you to force a reboot and is more efficient than the reset button, it can be compared to the “ReTry” button on Asus. It is often used to force a boot when the memory is overclocked and reaches its limits. During cold tests, sometimes the OS freezes and a reset does not allow the motherboard to restart: the only solution is to hold down the START button for 6 or 7 seconds. With this button, it restarts immediately.
- The Clear CMOS: allows you to erase the BIOS parameters in order to return to the default ones.
- CPU Ratio Switch: allows you to directly increase or decrease the multiplier of your processor as well as the BCLK.
- Voltage points: allows you to measure voltages with a multimeter directly on the PCB.
- The OC Trigger Switch: a button similar to “slow mode”, it will allow you to decrease the processor frequency and thus lower the CPU temperature before launching a benchmark and thus increase the chances that it will pass. You turn it on, the temperature drops, you put it back in its original position just before running your benchmark.
- The Enhanced LN2 mode switch: allows the CPU to boot at the lowest possible temperature. This is a feature to be used when testing under LN2 to avoid cold boot problems.
- The SB switch: allows you to disable or enable the Dual BIOS function.
- The BIOS switch: allows you to switch between the two bios. You can thus choose to have an “overclocking” bios and a more stable bios for a daily configuration.

The PCB :
Let’s move on to the PCB, which is built in 10 layers. This Z690 Tachyon is based on a 15+1+2 phase power supply (VCORE + VCCGT + VCCAUX). The first controller used is a Renesas RAA2291131 which directly drives the 15 phases dedicated to the CPU. The 15 CPU mosfets are all 105A Renesas RAA220105. The GT part is managed by 1 Renesas RAA220105 of 105A. The IMC and PCIe part is managed by 2 MPS MP87992 of 70Aeach.
Connectors:
The rear panel has the following elements. Firstly, the Clear CMOS and the button to flash the bios from a USB stick. As with all XOC motherboards, there are PS/2 keyboard and mouse slots. But why are we still using this type of connector in 2022? Simply because some benchmarks perform better under XP (e.g. SuperPi) and using non-USB devices makes the OS installation much easier. Then, in terms of USB ports, this Z690 Tachyon has two USB 2.0, three USB 3.2 gen 2 type A, four USB 3.2 gen 1 type A and one USB 3.2 Gen 2×2 type C. Then there’s the networking part with antenna support, dual band WI-FI and Intel 2.5GbE Ethernet socket.
The audio part is managed by a Realtek ALC1220-VB chip with an optical output and 5 jacks. The interesting thing about this motherboard is the HDMI socket which allows the use of the Intel Alder Lake UHD 770 CPU IGP. In our trio of XOC Z690 motherboards, this is the only one with a video output. We’ll come back to this in a sub-ambient IGP OC session.

