
[nextpage title=”Introduction:”]
After reviewing the ROG Crosshair X870E Dark Hero in our test of the AMD Ryzen 7 9850X3D processor, we’ve just received a copy of the ROG Crosshair X870E Glacial. Please note: the model we have in our hands today, the ROG Crosshair X870E Glacial, is not the white version of the “Dark Hero”!
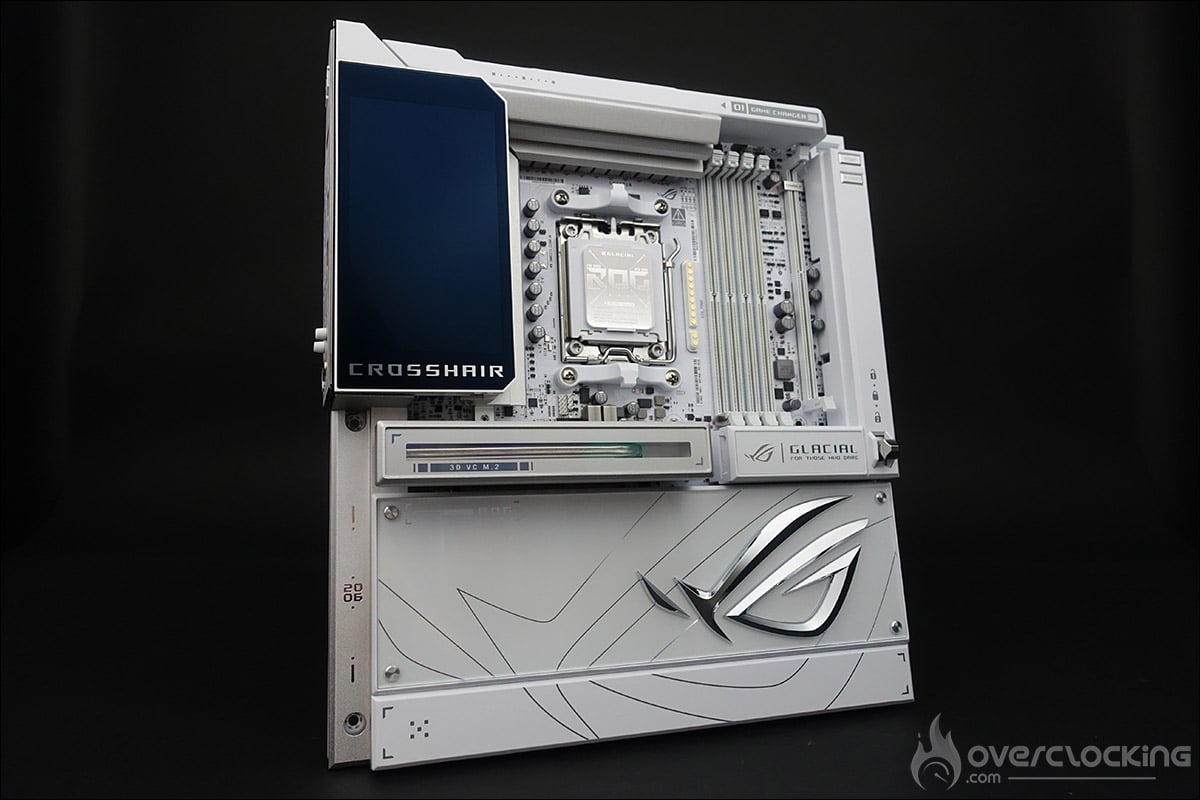
In the past, ROG’s “Glacial” series has often featured an integrated liquid cooling system. This is not the case here, but we find all the other codes of the series. The PCB and board are predominantly white (icy), the heat sinks are impressive and, as you’ll see in our test, there are a number of technological innovations. We can already tell you that what we have here in the lab is certainly the most beautiful and extreme AMD board ever produced.
Thanks to ASUS France for providing the ROG Crosshair X870E Glacial motherboard and the AIO ROG Ryuo IV 360 ARGB white cooling system.
[nextpage title=”The ROG Crosshair X870E Glacial:”]
ASUS has once again expanded its range of AMD Crosshair motherboards with two new models: the ROG Crosshair X870E Dark Hero and the ROG Crosshair X870E Glacial. As a reminder, we’ve already had the opportunity to review two other models: the ROG Crosshair X870E Hero and the ROG Crosshair X870E Apex.
Until now, the “Glacial” series has been confined to Intel chipsets, but this is the first motherboard to be built around an AMD chipset! ASUS thus proves the current appeal of AMD motherboards with the popularity of the AMD Ryzen 9000X3D processor series. And if further proof were needed, ASUS has also, for the first time, offered its “Apex” series on an AMD chipset, with the ROG Crosshair X870E Apex.
Architecture:
This new ROG Crosshair X870E Glacial, announced at CES 2026, is architected around the new X870E chipset. It was unveiled at the launch of the new AMD Ryzen 9000 processors. As you may have guessed, the X870E chipset, which powers our sample of the day, is of course AMD’s top-of-the-range model.
The bundle:
The box takes up a design that we’re already familiar with, and which doesn’t deviate from what we’re used to seeing for motherboards in the ROG ” Republic Of Gamers ” series. The front panel features a white finish with some of the lettering in glossy black, giving it a raised, premium look.


The box is opened from the top to reveal this ROG Crosshair X870E Glacial. Two imposing foam blocks protect it from shifting during transport.
As soon as the box is opened, ROG highlights the new technologies on board the PCB of this Crosshair X870E Glacial: “M.2 Q-Release”, “M.2 Q-slide”, “M.2 Q-Latch” and “Q-Release”. ASUS has simplified the installation of NVMe drives with these features. These innovations allow the NVMe and its heatsink to be clipped in without the need for screws. This eliminates the difficulty of positioning heatsinks on screw threads. We’ll look at these technologies in more detail later in this article.


A slight change in the bundle ‘s location . It’s a drawer under the motherboard that you’ll have to pull out to reveal the various zones that house the accessories. And there are plenty of them! Let’s take a look at what we think are the most unusual in a motherboard bundle.


ROG has included a ROG Hyper M.2 card in its Glacial bundle, which can accommodate two M.2 Gen 5 SSDs that can operate at maximum specification without having to do without certain GPU channels. This card has already been included in some of ROG’s accessories, but only on Extreme versions.


As usual, ROG also offers a Q-DIMM 2 module with two M.2 Gen 4 SSD slots, each with its own dedicated slot right next to the four memory slots. Finally, and this is a new feature, there’s a fan to keep your memory kit cool, with no need for a power cable. We’ll explain everything a little further down.
The AM5 socket is still present:
There’s no change as far as the AM5 socket is concerned: AMD is continuing to use it, and has announced that it will remain compatible until at least 2027. Farewell to the AM4 PGA(Pin Grid Array) socket into which you used to clip your processor, and make way for the LGA(Land Grid Array) socket. This change has taken place since the AMD Ryzen 7000 processors, due to the larger number of pins on the Ryzen 7000 (1718).


AMD, with socket AM5, retains a backplate already present for socket AM4. The 4 external holes that hold the retention system to secure your cooling system are still present. The center-to-center distance between these four holes is identical to that of socket AM4, so you’ll still be able to use your cooling system.
AMD goes one step further and adds four additional holes to hold socket AM5 in place, but also to hold the backplate in place. This means that the backplate can no longer be removed, as was the case with the previous generation. The locking mechanism features a reinforcement frame, a force frame and a latch. Once your Ryzen 7000/9000 has been positioned correctly, simply close the latch to hold it in place.


A new connector can be seen to the right of the socket. This will be combined with your AIO to drastically reduce the number of cables. Please note that only one kit is currently compatible with this “AIO Q-Connector” technology: the ROG Strix LC IV.
The different heat sinks :
The board dimensions are 305 mm x 330 mm, corresponding to the E-ATX format. The dominant color on the PCB is white, with touches of silver. The presence of an “armor” on the rear of the PCB, whose purpose is to optimize cooling with thermal pads placed in particular at the level of the power supply stage.


Let’s begin the owner’s tour with the radiators, of which there are three!
First of all, the two radiators located on the top of the motherboard and covering the power supply stage. These two heat sinks are connected by not one, but two heat pipes. The cover features a five-inch color LCD screen, the largest we’ve seen to date. It can slide to the right so as not to be “hidden” if you have a fan on the back of your case.
You can customize the rendering via the “Aura Sync” application. We’re talking here about an entirely passive system, i.e. one that uses no pre-installed fans on the motherboard.
And it’s from this point on that you’ll understand the whole design of this ROG Crosshair X870E Glacial. You won’t need a screwdriver, as it features numerous magnetized panels that can be easily removed. Below, you can see the cover that has been removed to reveal the two CPU power connectors, the voltage measurement points and the fan connectors.


The third heat sink is the one that covers the two chipsets and some SSD slots. A first plate embossed with the ROG logo covers this heatsink, giving you access to the PCIe port at the same time. The height is low, simply to accommodate graphics cards. The following photos and the video on the first page will give you a better understanding of the principle.
DDR5 support and higher frequencies :
While DDR5 support has been assured since the arrival of the AM5 motherboards, it’s now getting better: thanks to the new BIOS, ROG has announced support for memory kits of up to 8,600 MT/s (OC) for the Ryzen 8000 and up to 192 GB. We’ll have a chance to evaluate this in our tests. The Crosshair X870E Dark Hero features four memory slots that benefit from the new “Nitropath DRAM” technology. This technology involves a physical modification of the RAM slot. The gold pins are shorter than those traditionally used, reducing signal noise on the slots. According to ASUS, this modification enables a 400 MHz gain in RAM overclocking. It would also considerably increase slot resistance during repeated RAM module changes.

We had already seen the arrival of “EXPO” technology on the previous generation. This is an alternative to the XMP profile on INTEL models. As a reminder, this profile allows you, via the BIOS, to automatically activate the characteristics of your memory kit: frequency, timings and voltage.


We were talking about the fan available in the bundle. To use it, all you have to do is remove the magnetic plate and clip it on. Based on the same principle as the “AIO Q-Connector” for powering the AIO ROG Strix LC IV, it will automatically be operational when the motherboard is powered up. It can be set either via BIOS or ROG software.
PCIe 5.0 support and three M.2 SSD slots :
Let’s start with the first memory slot, which benefits from “M.2 Q-Release” technology, enabling the heatsink to be removed with just a touch of the finger. Beneath this is the first slot for a PCIe 5.0 x4-compatible M.2 SSD, type 2242/2260/2280. The heatsink is very imposing, with an integrated 3D steam chamber.


If you’re a keen observer, you’ll have noticed that no PCIe slot is visible. In fact, you’ll have to remove the main magnet plate to reveal the first of the two available ports. These are wired in PCIe 5.0 x16 (x16 or x8/x8) and compatible with the Q-Release Switch.


This “switch” lets you lock and unlock the graphics card in its slot. It’s located right next to the memory fan slot. The central position is the locking position, while the other two allow you to release the PCIe slot into which your graphics card is inserted.

To discover the rest, let’s remove the second plate, which can also be removed with a simple press of the fingers. It reveals the second PCIe port, the two chipsets and two new storage slots.


The two M.2 SSD ports are 2242/2260/2280 PCIe 4.0 x4 compatible. As you can see, ROG has pushed the detail right down to the design of the two imposing heat sinks responsible for keeping the chipsets cool.
[nextpage title=”PCB and connectors: “]
Clocker tools:
Why is the ROG Crosshair X870E Dark Hero an excellent overclocking board? First of all, because it’s packed with tools directly on the PCB that will make your life a whole lot easier.
- The power button: turns on the motherboard.
- FlexKEY (reset): restarts the motherboard in the event of failure. The button can now be assigned to another task via the BIOS.
- Safe Boot: enables the board to be rebooted even if the parameters selected in the BIOS do not allow boot. This avoids the need to perform a CMOS Clear to reboot and thus lose your encoded parameters.
- ReTry Button: during cold tests, sometimes the OS freezes and a reset doesn’t allow the motherboard to restart: the only solution is to hold down the START button for 6 or 7 seconds. With the ReTry button, it restarts immediately.


- Switch BIOS: switches between the two bios. You can choose between an overclocking BIOS and a more stable BIOS for H24 configuration.
- Slow Mode: allows you to boot with a 16x coefficient and, once in the OS, return to the BIOS coefficient. Mainly for max screens.
- RSVD: when activated under cold conditions (-120°C), prevents cold boot bugs.
- LN2 Mode: activates LN2 profiles in the BIOS.
- Debug LED: 4 LEDs (CPU – DRAM – VGA – BOOT) to diagnose errors during board boot . If one of them remains lit, the corresponding component has a problem.


- Q-Led: displays a code corresponding to the component responsible for the boot error.
- CMOS CLR: clears BIOS parameters to return to default settings.
- ProbeIT : allows you to measure voltages with a multimeter directly on the PCB.
The PCB of this ROG Crosshair X870E Glacial :
The ROG Crosshair X870 Glacial is based on a 24-phase VCORE (110A) + 2-phase SoC (110A) + 2-phase MSIC (80A) power supply. The part in charge of the CPU is made up of 24 phases, and this model has no doubler, but the phases are placed in parallel, so there are really 12 of them. The two controllers are a Richtek RT3672JE and an ASP2205 DIGI+. The mosfets for the VCORE and the SoC are Infineon PMC41430s, and those for the MSIC are PMC41420s.
As you can see, there’s no need to worry about accommodating any processor in the Ryzen 9000 range.
[nextpage title=”The BIOS:”]
As far as the BIOS of our ROG Crosshair X870E Glacial is concerned, at first glance we can see that we’re with ASUS, so there’s no change here. Those familiar with the brand will have no trouble finding their way around. As a reminder, the tab of greatest interest to us is “Extreme Tweaker”. The BIOS is virtually identical to that of the ROG Crosshair X870E APEX, yes, that’s right.
Before we start, we’d like to remind you that it’s essential to update your BIOS regularly. The advantage of a ROG card is that the team of engineers and overclockers behind it is very active. But it had to happen, so before starting our tests, we updated the BIOS to the latest available: 0703 dated March 16, 2026. The BIOS never allowed us to activate the memory profile, even with several memory kits. So we switched back to 0606 dated February 10th.
BIOS flash of this ROG Crosshair X870E Glacial :
As we said, the first thing to avoid unpleasant surprises is to update your BIOS. We’d like to remind you of the simple procedure for flashing your BIOS, which is essential if you want to keep your configuration perfectly stable.
Go to the ASUS website and your motherboard page to download the latest BIOS, place it on a key and insert it into a USB port on the motherboard. Restart the PC, press and hold the “DEL” or “Suppr” key to access the BIOS parameters. Go to the “Tool” tab and click on “ASUS EZ Flash 3 Utility”. When the flash interface appears, choose the BIOS location on your key, and off you go to flash. With AMD, the motherboard will reboot before starting the flash and restart several times afterwards to last an average of five minutes.
The EXPO profile:
Now that our BIOS is up to date, let’s start with our memory kit parameters, which are essential and should be activated as a matter of priority. As you can see, there are several profiles available: EXPO I, EXPO II, EXPO Tweaked and EXPO on the fly. It’s difficult to generalize, but sometimes EXPO Tweaked offers slightly better performance.


By activating the EXPO profile, the parameters for frequency, timings and voltages are automatically set, so you don’t need to do anything else. The BIOS also offers a series of memory profiles up to 8,400 MT/s. You’ll need to know the make and model of the on-board chips to choose the right profile(s).


Note the arrival of a very interesting option, eCLK mode, which allows you to desynchronize the PCIe CPU frequency. It will now be possible to push the frequency of your processor via BCLK.
Other BIOS options :
By default, the BIOS opens to the condensed BIOS section. This part is mainly aimed at beginners or those who don’t want to get their hands dirty with overly complex options. From here, you can activate your memory kit’s EXPO profile, control your fan management, flash the BIOS, manage the backlighting, and set the boot sequence priority.


To access the full BIOS, in advanced mode, simply press F7. Several tabs are at your disposal, and personally, it’s in the ” Extreme Tweaker ” tab that we’ll be spending the most time. As we saw above, you can activate EXPO, set the various tweaks and act on the different voltages.

Of course, the BIOS also offers a series of options for overclocking your AMD processor, either via PBO mode or manually. Personally, we prefer to overclock under OS via AMD Ryzen Master. In a few weeks’ time, we’ll be back with a tutorial on overclocking Ryzen 9000 processors.


Loadline calibration is in auto mode for comparison tests, but we’ll come back to its function when overclocking the Ryzen 9 9950X. By default, it is in “AUTO” mode.


New since the previous chipset, the BIOS now indicates an SP for your processor, but also for each core and for the CCDs. The SP is an indication of your processor’s overclocking potential. The higher the value, the better it should perform, requiring less voltage to operate, for example. Our Ryzen 9 9950X3D is rated at SP 120.


There’s also a section called “Q-Dashboard” where you’ll have access to a detailed view of your motherboard and all the components connected to it. You can choose to have a global view, or select only USB, only SATA, only M.2 disks, only PCIe or only FAN.
Don’t forget to save your profiles:
Finally, saving profiles is highly recommended when performing tests. It saves time. You can also save them on a USB key. Finally, there’s a LN2 mode, which must be activated via a jumper on the PCB. Please note that this mode is really dedicated to cold tests, so don’t activate it for air/water tests, as certain safeties will be automatically deactivated. Once it’s activated, you’ll find an LN2 CPU profile.
An ultra-complete BIOS, like that of the ROG Crosshair X870E APEX. Don’t hesitate to ask for advice on our forum and discord if you have any problems setting up your BIOS.
[nextpage title=”Configuration and frequencies reached:”]
Here’s the configuration I’ll be using to test this ROG Crosshair X870E APEX. For the publication of these tests, I’ve used the latest BIOS received, although new versions will certainly be available in the coming days, given ASUS’s responsiveness. In the coming weeks, we’ll also be offering several overclocking guides for your processor and memory kit. We’ve decided to use the biggest processor currently available in the Ryzen 9000 range, so as to best test the power stages when overclocking.
- Motherboard: ROG Crosshair X870E Glacial
- Processor : AMD Ryzen 9 9950X3D
- Memory: 32 GB G.SKILL Trident Z5 NEO RGB 6000 MT/s CL26
- Graphics card: NVIDIA RTX 5090
- Cooling system: AIO ROG Ryuo IV 360 ARGB
- SSD: WD Black SN770 500 GB PCIe 4.0
- Power supply: MSI AX1600
- Operating system: Windows 11 64-bit


A quick tour of CPU-Z to make sure everything’s in perfect order before we start our tests. Frequency and voltage are not fixed, but change continuously. We’ll see in the tests below whether they are respected.
Frequencies respected for our Ryzen 9 9950X3D?
As we begin this first series of tests, we can’t do without thinking about the Ryzen 9 7950X3D and its operating frequencies. It reached a frequency of 5,725 MHz on single-core tasks. With our Ryzen 9 9950X3D, a frequency of 5,725 MHz is reached on core #9, which works alternately with core #10.

As far as multi-core tasks are concerned, when the 16 cores of the Ryzen 9 9950X3D were called upon, the frequency varied between 4,800 and 4,900 MHz.

So we can indeed see that frequencies have improved, whether on single-core or multi-core tasks. Now that we know that our Ryzen 9 9950X3D is fully operational, let’s move on to our various tests on this ROG Crosshair X870E Glacial.
[nextpage title=”CPU overclocking: “]
Currently, to overclock an AMD processor, you can either do so directly via the BIOS or via the AMD Ryzen Master software. We chose the latter solution for our first tests. Our processor is usually cooled by ourAlphacool Eiszeit 2000 chiller . So we won’t be under the same cooling conditions as in our previous tests with this Ryzen 9 9950X3D. We’ll see what can be achieved with the AIO ROG Ryuo IV 360 ARGB cooling system.
Protocol:
Before getting started, you need to have one or more reference scores with your processor at original frequencies. It’s also very important to have a sheet of paper handy, so you can keep a record of all the tests you’re going to carry out, as well as any results or failures. Personally, I have hundreds of test sheets to which I sometimes return to find out how the processor behaved on a particular motherboard or under a particular test condition. My own little bible.
For H24 overclocking, you’ll need to take more time to fine-tune the voltage to the minimum necessary, but you’ll also need to set each core independently if you want the best performance.
The Ryzen 9 9950X3D has two CCDs. Each CCD has a single CCX with 8 cores. In the case of our 9950X3D, none of the CCX cores are disabled, so that each CCD has 8 cores, for a total of 16. The idea is to see how the CCDs behave when all the cores are activated. We saw in the frequency check that CCD0 performed better than CCD1. It will therefore be possible, via Ryzen Master, to try to push this one higher than the other.

Finally, you can also decide to vary the frequency of each core. To overclock, go to profile 1 and select manual overclocking. This allows you to control either each CCX or each core independently.
Overclocking our Ryzen 9 9950X3D :
As we explained when we analyzed the PCB of this ROG Crosshair X870E Glacial, the design of the power supply stages is more than sufficient to handle the overclocking of our Ryzen 9 9950X3D. So, logically, there will be no difference in terms of CPU overclocking compared with our APEX per example.
Of course, we’ve already tested our Ryzen 9 9950X3D to see what it can do. So the idea is to check that we’re capable of achieving the same overclocking performance on this Glacial. On the left, you can see the original score of 43,420 points, and on the right, the score obtained when our 16 cores are clocked at 5,450 MHz. We then reach 47,771 points, a gain of 10%!


We plan to try out this processor under cold conditions in the coming weeks. If you’re interested, we’ve been delidging a copy of the Ryzen 9 9900X with tools from Thermal Grizzly.
[nextpage title=”Memory overclocking: “]
Installation of the G.SKILL 6000 MT/s CL26 kit:
For this series of tests, we decided to use the best kit currently available to us, the G.SKILL Trident Z5 NEO RGB 6000 MT/s CL26 kit. We’d like to digress for a moment before beginning our tests. To get the best results, two other components are equally important. Your processor must have a good IMC to support high frequencies, and a memory kit with excellent chips. These three elements therefore play an equally important role when it comes to overclocking!
Logically,overclocking did not prove as docile as with our X870E APEX and its two slots. Here, we’ve activated one of the profiles available in the BIOS, so you can see how easy it is to activate. Go to the BIOS and select the “Hynix 7600MHz 1.45v 2x16GB SR” profile. This is a 7,600 MT/s profile for a kit equipped with Hynix Single Rank chips, and will raise the voltage to 1.45 volts.


Simply click on it to validate, but that’s not all! If timings and voltages are automatically modified, you must manually change the memory frequency. Here, we’ve gone from 6,000 MT/s to 7,600 MT/s.
Aida 64:
This software can provide you with a wealth of information about your configuration, but above all it features a memory benchmark. This calculates the read, write and copy speeds, as well as the latency, of your memory kit. It is often used to compare memory kits. It’s an excellent tool if you want to compare the performance of your memory kit with those we’ve already had the opportunity to test.


As you can see, throughput has improved significantly. We’ll now evaluate performance under Geekbench 3. As a reminder, only the memory kit has been overclocked, while the processor is still at its original frequencies.


We can thus see a gain in both single and multi-score. The memory score has also improved. It would still be possible to optimize this score, but that wasn’t the primary objective of this test.
[nextpage title=”The final word:”]
What do we think of this ROG Crosshair X870E Glacial?
First of all, there’s a strong demand for AMD processors, and ASUS has understood this, offering two new motherboards in quick succession, two new models based on the X870E chipset. AMD’s undeniable trump card is, of course, the longevity of its socket! AM5 will still host the next generation of AMD processors, and why not other processors in the future? In fact, that’s what’s lacking in the new Core Ultra 200S Plus we’ve just reviewed.
Without doubt the most beautiful and extreme X870E motherboard we’ve ever had in our hands. As well as being a top-of-the-range board, it features all the latest ROG technologies (cable-free memory fan, magnetic plates, AIO Q-Connector system, etc.). Aesthetically, the ROG Crosshair X870E Glacial may appear “wise” at first glance, but once a few magnetized panels have been removed, it can be transformed into a motherboard dedicated to overclocking. Just take another look at this page to list all the tools available on this model.
The BIOS is ultra-complete, and options present on the X870 APEX are also included. Aesthetically, some will regret that it doesn’t come in black, but for others, it will be extremely pleasing to see the top of the range in white. And let’s not forget the substantial bundle, worthy of this model.
 Finally, we’d like to point out that the situation has changed considerably in recent months, with the arrival of the first AMD APEX. And here, one after the other, ROG is launching two new cards based on the X870E chipset. Suffice to say, AMD is on a roll! For us, this ROG Crosshair X870E Glacial is undoubtedly becoming a benchmark for this chipset: it’s a huge “coup de coeur”! Of course, a card of this level comes with a hefty price tag. It should therefore be reserved for those who can afford it and want to treat themselves to ROG’s top-of-the-range X870E chipset.
The Crosshair X870E Dark Hero:
During our test of the AMD Ryzen 9850X3D processor, we had the opportunity to test it on the new Crosshair X870E Dark Hero. Since we didn’t take the time to review this model in our CPU test, we thought it appropriate to do so now that we’ve had our hands on both new Crosshairs. Remember, these are two different motherboards, not an identical model in two colors. One thing we can say straight away is that the design of this Dark Hero is a perfect success! It doesn’t have the extravagance of the Glacial, but it does feature many ROG technologies to justify its price.
 There’s a physical button to unlock your graphics card, a fan to keep your memory kit cool, an additional USB Type-C and the “AIO Q-Connector” system. If you’re a regular ROG motherboard user, you’ll find everything that makes these cards so famous on this Dark Hero. If the Crosshair X870E Glacial is a bit of a UFO, the Crosshair X870E Dark Hero will have to stand up to its own internal competition. ROG’s range of X870E motherboards includes the Crosshair X870E Hero (€579), Crosshair X870E APEX (€635) and Crosshair X870E Extreme (€990). Each of these models has its own strengths, and our sample of the day priced at €709 will have to fit into this “Crosshair” range.
As we specified on our page dedicated to overclocking, all the above models will enable you to achieve equivalent air/water performance with your processor. The major difference lies in memory, where the APEX’s two slots remain an undeniable asset. Depending on your needs – a large number of M2 slots, the need for 10 Gbps Ethernet – your choice will be one or the other.
A word about the AIO ROG Ryuo IV 360 ARGB cooling system, which we used on two occasions. We were very satisfied with its cooling performance during our overclocking tests . Aesthetically, but that’s a matter of taste, the screen is really superb, but a little too imposing. The possibility of shifting it to the right and placing it above your memory sticks will enable you to take full advantage of the Glacial’s screen.
Thanks to ROG France and AMD, for making available this copy of the ROG Crosshair X870E Dark Hero, the ROG Crosshair X870E Glacial, the AIO ROG Ryuo IV 360 ARGB and for the Ryzen 9 9950X3D.

