

So, yes, we have to be careful not to get lost in all the current NDAs concerning the refresh of the Z790 chipset and 14th-generation processors. Some motherboards were still under NDA, such as our copy of the ROG Maximus Z790 APEX Encore. Its NDA ends this Monday, October 16 at 3 p.m., so we’ve been able to test a few of Intel’s 13th-generation processors, in order to compare them with the 14th generation, which arrives at 3 p.m. tomorrow. Today, we’ll be presenting the new ROG Maximus Z790 APEX Encore motherboard, which replaces the ROG Maximus Z790 APEX, as well as a series of benchmarks with the i9-13900KS, i7-13700K and i5-13600KF.

By following this link, you can discover the Intel press kit we received for the launch of the 14th generation. See you tomorrow at 3 p.m. for a full review of these new processors.
[nextpage title=”ROG Maximus Z790 APEX Encore: “]
But why a refresh of the Z790 chipset? As you may have noticed in recent weeks, we announced the arrival of new Z790 motherboards at the ASUS Gamescom event. These new boards feature Wi-Fi 7 support. As far as the Z790 APEX in particular is concerned, ASUS had decided to stop production, announcing the imminent arrival of a V2, which will ultimately be this ROG Maximus Z790 APEX Encore. We’ll try to highlight the differences between these two versions.
The APEX Encore bundle:
The least we can say is that the V1 bundle, if we can call it that, was quite substantial, notably with the presence of a PCIe card featuring an M.2 5.0 SSD, as well as the “fake” six-digit padlock. Here, we have a more traditional bundle, although a new accessory has been added: the ROG Memory Fan Kit. There’s also a USB key containing the various drivers, the usual cables and the Wi-Fi antenna.


Returning to the ROG Memory Fan Kit it attaches directly to your motherboard to keep your memory sticks cool. A new option has been added to the BIOS, which will affect the temperature of your Hynix chips. We’ll come back to this later in this article when we discuss the BIOS of this ROG Maximus Z790 APEX Encore.
Architecture :
Before getting started, a quick word about the box, which uses the same color code as the “ROG” series motherboards. It’s a pity, because we really appreciated the black box of the V1, which for the first time gave the APEX version its own identity . This new model comes with the reference “Encore”, which has so far only been used once by ASUS for the ROG Rampage VI Extreme Encore motherboard for socket LGA-2066. In our opinion, this is obviously to distinguish the two models and perhaps refer to a high-end model.


The second major change, which has already caused quite a stir on social networks, is the return of a black PCB, whereas the majority of people had fallen under the spell of the white adopted for the ROG Maximus Z790 APEX. This ROG Maximus Z790 APEX Encore is, of course, built around Intel’s Z790 chipset, and retains the previous-generation LGA-1700 socket, as the processor has grown in size since Rocket Lake.


The Z790 chipset supports PCIe 5.0, offering higher storage performance than the previous generation, as well as DDR5 support. We should also benefit from better overclocking potential with this refresh combined with the 14th generation, but we’ll have to wait a little.
The various heat sinks :
The board’s dimensions are 305 mm x 244 mm, corresponding to the ATX format. The dominant colors on the PCB are dark gray and black. A return to the dark PCB of the ROG series. The design is always distinctive, but on this version, the PCB returns to its rectangular shape. Aesthetically, it bears a strong resemblance to the previous version of the APEX model, the Z690, as well as to the V1 APEX Z790, with the same PCB cut-outs.


Let’s start with the radiators, of which there are four!
First of all, the three radiators located on top of the motherboard and surrounding the socket. The two largest cover the power supply stage. These two radiators are connected by a heat pipe.


A third, smaller radiator, also connected via a heat pipe, is responsible for keeping part of the supply stage cool. This is an entirely passive system. The “APEX” heatsink is in two parts, and hides a slot for a PCIe 4.0 M2 SSD under the upper part.
The fourth part covers the chipset and boasts a fairly large surface area, but low height to allow easy insertion of graphics cards. The ROG logo is engraved or printed in matt black.
The presence of an M.2 5.0 SSD port on the PCB:
Whereas the V1 didn’t have one, this ROG Maximus Z790 APEX Encore benefits from an M.2 5.0 SSD slot beneath the processor. Two black aluminum plates, whose cut-outs perfectly match those on the chipset, cover two M.2 SSD slots on the PCB. That’s one more than on the first APEX version. As you can see, the SSD is sandwiched between two thermal pads.


You can also use the vertical support (ROG DIMM2) included in the bundle, which can also accommodate two M.2 SSDs. This brings the total number of M.2 SSDs to five, four of which are PCIe 4.0 x4.
The socket and PCIe :
The space around the socket is fairly clear and will be easy enough to isolate with rubber for LN2 testing. What’s more, ASUS offers two mounting holes on ROG models. One is compatible with both LGA-1700 and LGA-115x coolers! A very good point for the brand.

On this refresh, you’ll of course be able to use 13th-generation processors. In other words, you’ll be able to use an i9-12900K on the Z790 chipset, and conversely, an i9-13900K on the Z690 chipset. Intel will continue to support DDR4 on this chipset, but this should be the last time, since the switchover will be definitive to DDR5 in 2024.
Our ROG Maximus Z790 APEX Encore features a Q-Release button. When a card is inserted into the first PCIe slot, pressing this button opens the retention system and releases your graphics card. This was a problem we’d noticed on the previous generation when a heat sink was too close to the first PCIe slot.


This Maximus Z790 APEX Encore can accommodate a maximum of two DDR5 memory modules, and supports dual-channel memory kits up to 8400 MHz (OC) and a maximum of 96 GB. There are two PCIe 5.0 16x slots, which will work in x8/x8 mode if you opt for SLI or CrossfireX. Two PCIe 4.0 x4 slots are also available. To power all this, the board has a 24-pin flat connector and two 8-pin connectors next to the power supply stages.
[nextpage title=”PCB and connectors: “]
Clocker tools :
Let’s start with the elements inserted on the PCB, which can prove to be interesting tools for overclockers. There are plenty of them on this model, which has become a habit with Asus at the top end of the market. This confirms its position as a dedicated overclocking board.
- Power button: powers up the motherboard.
- FlexKEY (reset): restarts the motherboard in the event of failure. The button can now be assigned to another task via the BIOS.
- Safe Boot: allows the motherboard to be rebooted even if the parameters selected in the BIOS do not allow boot. This avoids the need to perform a CMOS Clear to reboot and thus lose your encoded parameters.
- ReTry Button: during cold tests, sometimes the OS freezes and a reset doesn’t allow the motherboard to restart: the only solution is to hold down the START button for 6 or 7 seconds. With the ReTry button, it restarts immediately.
- Switch bios: switches between the two bios. You can choose to have an ” overclocking ” bios and a more stable bios for H24 configuration.
- Slow Mode: allows you to boot with a coefficient of 16x and, once in the OS, return to the coefficient chosen in the bios. Mainly for max screens.
- RSVD: when activated under cold conditions (-120°C), prevents cold boot bugs.
- LN2 Mode: enables LN2 profiles in the bios.
- Debug LED: 4 LEDs (CPU – DRAM – VGA – BOOT) to diagnose errors during board boot . If one of them remains lit, the corresponding component is in trouble.
- Q-Led: displays a code corresponding to the component responsible for the boot error.
- CMOS CLR: clears BIOS parameters to return to default settings.
- ProbeIT : allows you to measure voltages using a multimeter directly on the PCB.
The PCB :
Our ROG Maximus Z790 APEX was based on a 24 2-phase power supply. What about our version 2 APEX Encore? Well, it’s the same, with 24 phases placed in parallel: so there really are 12. The controller is a RAA229131 chip(X Y=20), one of the best currently available, if not the best.


As for the 24 mosfets, they’re all 105A 22010540 AARs grouped in parallel by phase, enabling them to be duplicated without the need for a doubler. The mosfets in the power stages generate the most heat, as they are responsible for voltage conversion and delivery to the CPU from the 12-volt EPS connector.
Connectors :
The rear panel features the following elements. First of all, the Clear CMOS and the button for flashing the bios from a USB key. One of the board’s special features is its two PS/2 slots for connecting a keyboard and mouse. But why are we still using this type of connector in 2021? Quite simply because some benchmarks perform better under XP (Super Pi), and using non-USB peripherals makes OS installation much easier.


In terms of USB ports, this ROG Maximus Z690 APEX features four USB 3.2 Gen 1, five USB 3.2 Gen 2 and one USB 3.2 Gen 2 Type-C. Then there are the antenna mounts for dual-band Wi-Fi 7. Finally, we find the various audio outputs and the network port (2.5G).
[nextpage title=”The BIOS:”]
Unsurprisingly, the BIOS is virtually identical to the one we have on our Z790 APEX, although a few options have been added, which we’ll talk about at the bottom of this page. As far as the BIOS is concerned, at first glance you’ll recognize that this is ASUS. Those familiar with the brand will have no trouble finding their way around. As a reminder, the tab we’re most interested in is “Extreme Tweaker”.
Before getting started, we’d like to remind you that it’s essential to regularly update your BIOS. What’s more, the Asus team regularly offers patches that we’d be remiss not to take advantage of. The advantage of a board like this APEX is that it comes with two BIOSes. So you can test a new one while keeping the previous one. For those who like to tinker, this is a real plus! You can also save your BIOS on a USB key. You can then reload them after updating your BIOS.


The BIOS captures were taken with the XMP profile of our Teamgroup Delta RGB 7200 MT/s CL34 kit enabled. The other new option is ” Memory controller: DRAM Frequency Ratio “, which arrived with Rocket Lake. You can choose between Gear 1, Gear 2 and Gear 4. In most cases, it will be the Gear 2. The Gear 4 solution is there for kits > 9000 MHz.


Loadline calibration ” is in auto mode for comparative tests, but we’ll come back to its function when overclocking the i9-13900KS. The other sections have been present since previous generations and allow you to flash your motherboard, control fan speed and create test profiles, among other things.
The different voltages :
In the ” overclocking ” section, we’ll look at the most important voltages for the CPU and for boosting DDR5 memory. Please note that it is possible to deactivate the E-core, but this will seriously affect your processor’s performance. We’ll tell you all about it in the rest of this article.


Finally, saving profiles is highly recommended when you’re running tests. It saves time. You can also save them on a USB key.


With the arrival of memory kits featuring A-Die chips, ASUS has added new memory profiles that can reach 8800 MT/s. We’ll be sure to test it out during memory overclocking.
LN2 mode:
There’s also an LN2 mode, which must be activated via a jumper on the PCB. Please note that this mode is really dedicated to cold tests, so don’t activate it for air/water tests, as certain safeties will be automatically deactivated. Once activated, a LN2 CPU profile is displayed.
A BIOS that continues to evolve:
ASUS innovates once again by adding a new option in conjunction with the accessory included in the bundle, the “ROG Memory Fan Kit”. This option is called “DIMM Flex” and must be activated in order to have access to other parameters linked to the temperature of your memory modules, but with Hynix chips, as these are currently the best for reaching high frequencies. Now we know that temperature has a major influence on memory stability.


DIMM Flex uses a thermal sensor installed on the back of the PCB under the memory modules, and a controller to monitor temperatures. Depending on the temperature, you can pre-define three profiles. As the temperature rises, you’ll switch from profile 1 to profile 2, or even to profile 3 if necessary. If your kit is compatible, this option will be available in the BIOS. You can already take a look at the video posted by the ASUS team on this new option.


We’ll be coming back to this option in greater detail during our overclocking tests with this ROG Maximus Z790 APEX Encore. Finally, there’s one more option that we can’t talk about yet, as it’s particularly related to 14th-generation processors. Just a little more patience.
[nextpage title=”The test configuration:”]
So here are the various components that make up our test platform. For the publication of these tests, I used the latest BIOS received, although new versions will certainly be available in the coming days. ASUS is very reactive when it comes to updating its BIOSes. We’re going to run our three 13th-generation processors through this refresh again, so we can compare the gains with the new generation tomorrow.
- Motherboard: ROG Maximus Z790 APEX Encore (BIOS 0502)
- Processor: Intel i9 13900KS – i7 13700K – i5 13600KS
- Memory: 32 GB Teamgroup Delta RGB 7200 MT/s CL34
- Graphics card: Galax GT 710 Fish
- Cooling system : Alphacool Core 1 CPU 480 mm EK radiator
- SSD: Western Digital SN850 NVMe SSD M.2
- Power supply: be quiet! Dark Power PRO 12 1500w
- Operating system: Windows 11 64-bit 2H2 ????
- Display: ROG PG27UQ
A quick tour of CPU-Z to make sure everything’s in perfect order before starting our tests. We note that with this version 2.08.0, our i9-13900KS is perfectly recognized, as is the DDR5 memory. Now that our configuration is ready, let’s see if the BIOS is correct with regard to the frequencies of our i9-13900KS.
[nextpage title=”Actual frequencies:”]
As with every new processor or motherboard test, our first idea is to check that the advertised frequencies are actually reached, so as not to falsify our tests. To do this, we’re going to use the Cinebench R23 benchmark. Two scenarios will be used: a single-core benchmark and a multi-core benchmark. The idea is to be able to judge the frequency reached and compare it with what Intel has announced in its slides.
It’s worth remembering that the Boost frequency in the bench is different for each processor. As Intel points out, Max Turbo frequency refers to the maximum frequency attainable by one of the processor cores running a single-core workload. This frequency varies according to several factors: the load, the cooling system and therefore the temperature of your processor. It’s important to keep this in mind. Here are the frequencies we expect to reach on a single core during our run under Cinebench R23.
First step: we leave everything in AUTO in the BIOS except the XMP profile, which we load in order to have a frequency of 7200 MT/s for our memory kit. We make no other changes to the BIOS.
Testing with the i9-13900KS :
Here we go with the strongest processor, the i9-13900KS. As you can see, we opened several windows to check frequency and temperature. The options in our BIOS were left in AUTO, but we’ll come back to this in the power consumption section, as it has a significant impact on consumption.
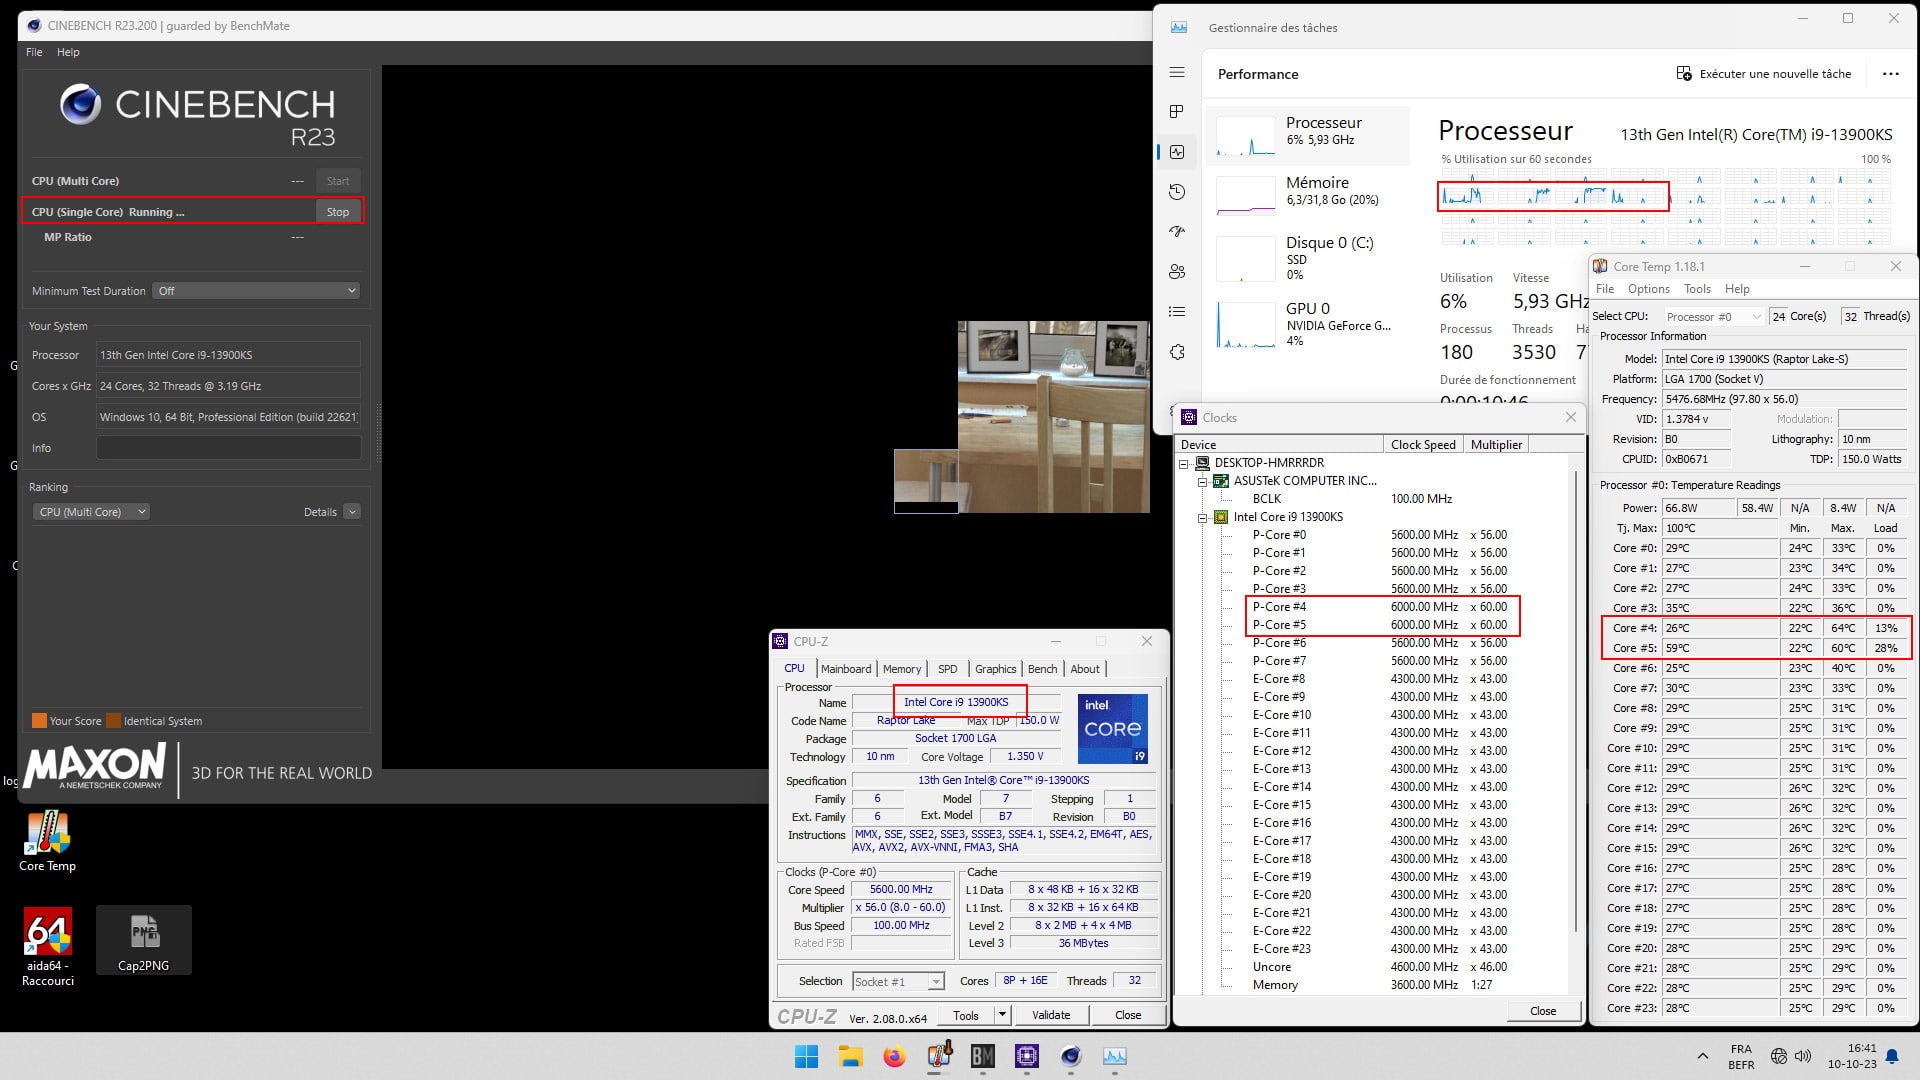
In single-core mode, we can see that cores #4 and #5 reach a frequency of 6000 MHz, which is in line with Intel’s claims. The temperature of the two cores alternating at 6 GHz is 60 and 64°C, while the others are not used.
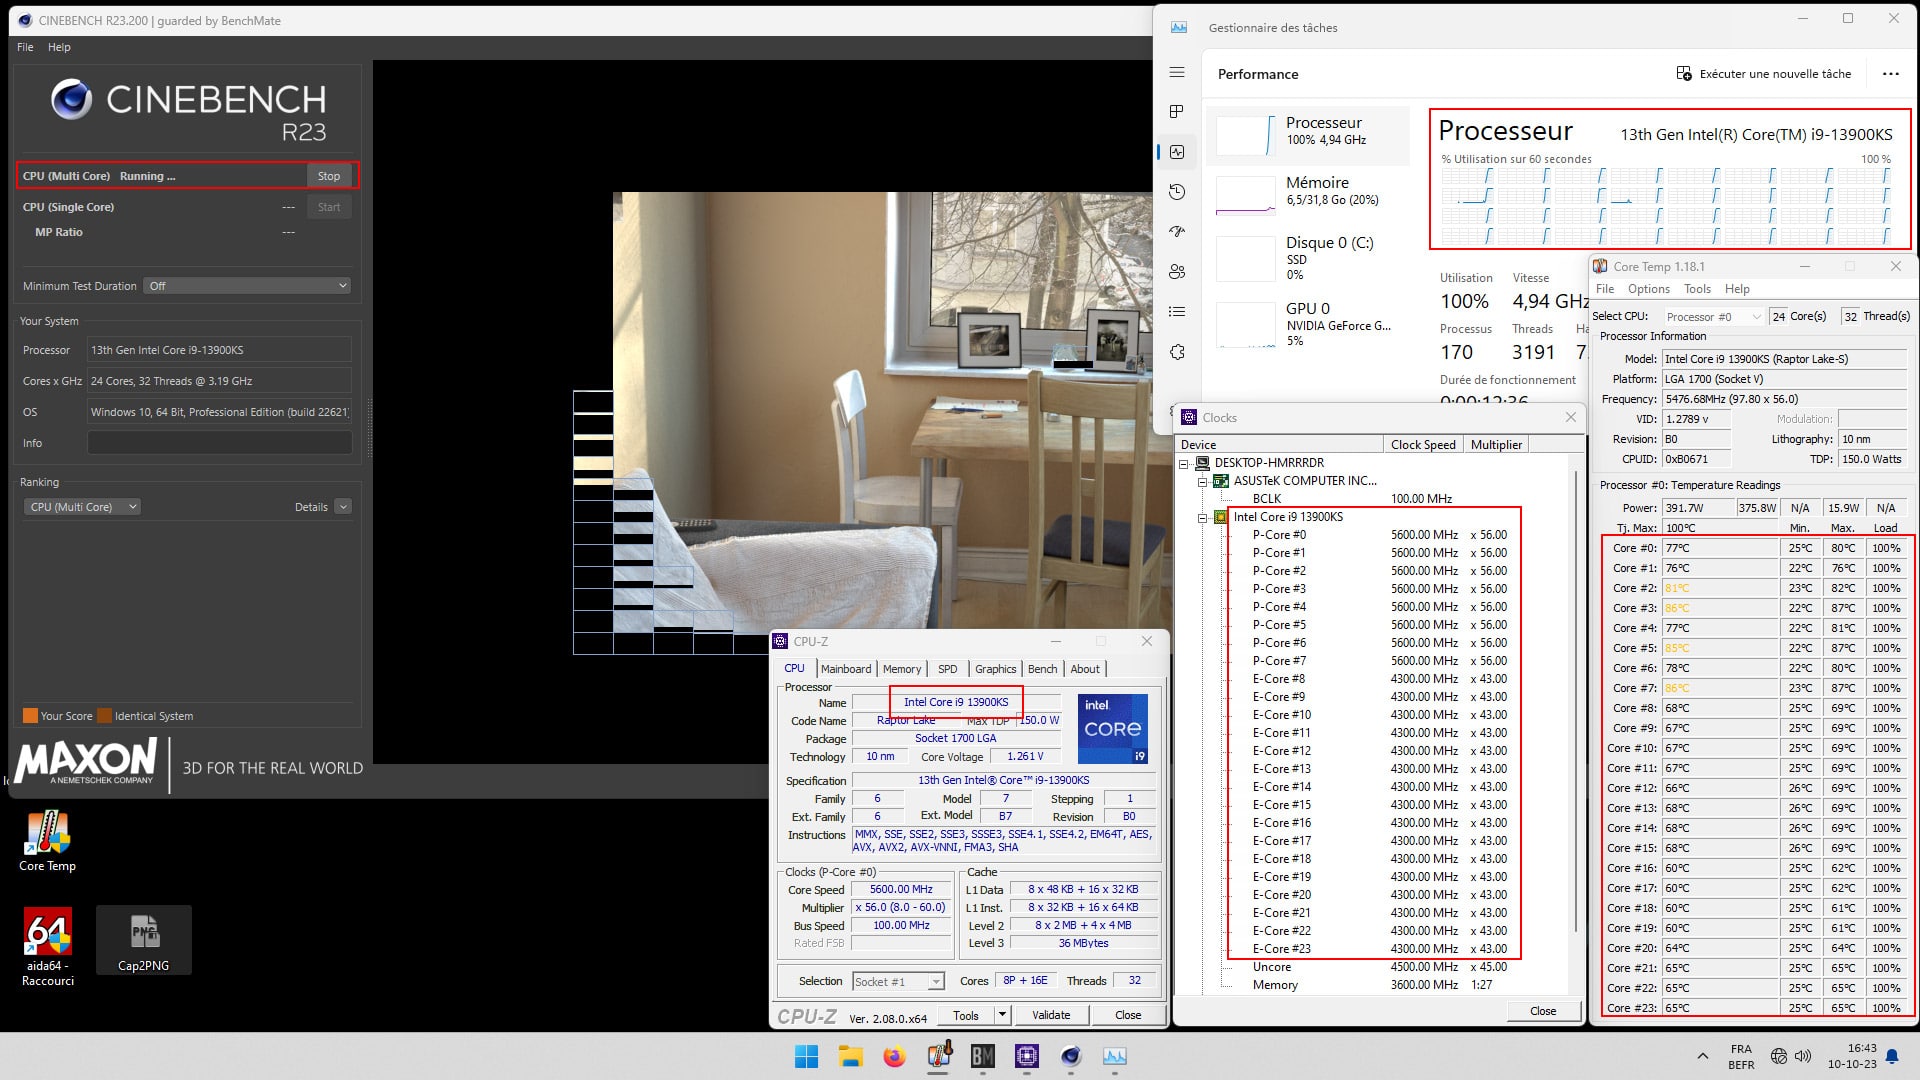
When the 24 cores of our i9-13900K are called upon, the frequency is fixed at 5.5 GHz on the P-Core and 4.3 GHz on the E-Core. The temperature of the hottest P-Core is 87°C, while that of the E-Core is 69°C. Let’s not forget that we’re equipped with a 480 mm custom cooling loop. In other words, if you opt for this processor, you’ll need at least a high-performance 280/360 mm AIO.
[nextpage title=”Testing with 13th generation Intel:”]
As we had the opportunity to present this ROG Maximus Z790 APEX Encore and test it with 13th-generation processors, we’d have thought it a shame not to take advantage. Here are our various readings, which may not make much sense today, but which will be used tomorrow to compare it with 14th-generation processors. We ran the tests with the BIOS supplied by ASUS, but in our humble opinion, some scores should be slightly higher. We’ll see what happens in the coming days. We’ve just received (yet again) a new BIOS.
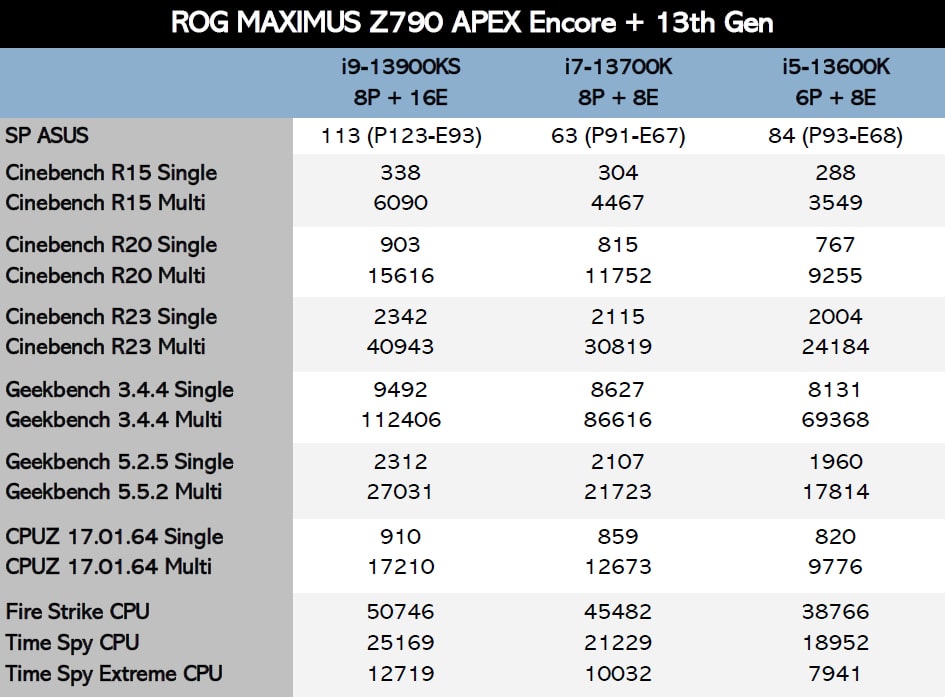
Rendezvous tomorrow at 3pm to discover the 14th generation of Intel processors, and we’ll be back with a full review of this ROG Maximus Z790 APEX Encore over the next few days, while we test the new BIOS options. Many thanks to ASUS France for making this new revision of the APEX available.