

We resume our DDR5 memory kits tests with a kit that we must admit we forgot about when our Hynix A-die DDR5 kits arrived. So we’re going to make up for that mistake by offering you today the GSKill Trident Z5 RGB 6400 MT/s CL32 kit. At the time of writing this article, this kit was available for $189 or 265 euros on Amazon. It is certainly one of the memory kits equipped with Hynix M-die chips that have the highest frequency. Beyond 6400 MT/s, most of the memory kits are equipped with Hynix A-die chips. These allow for an easier frequency rise and have excellent overclocking potential, as you can see in our test of the GSKill Trident Z5 RGB 6800 MT/s CL34 kit.

Don’t hesitate to ask us your questions if you have any problems with the settings either in comments or on our social networks. You can also join our community on the discord. We would also like to thank GSKill for their support and the availability of this Trident Z5 RGB 6400 MT/s CL32 kit.
So, a little comment on the choice of unit for the memory frequency. For several months, manufacturers and many of our colleagues have not used MHz to talk about the frequency of the memory. Either some use MT/s or Mbps. On our side, we will pass on MT/s at the moment while waiting to see what will become the new standard.
[nextpage title=”Packaging description:”]
The G.SKill kit is delivered in a cardboard box with the usual color code, in the spirit of the brand. One of the two grey bars can be seen on the front of the box thanks to the cut-out. We can see that they are enclosed and protected in a transparent plastic protection. On the back of the box is also a label that informs the future buyer of the characteristics of his memory kit. Two cut-outs, at the level of the labels, allow to have the confirmation of this information.
Once the box is opened, we find our two modules perfectly protected in a transparent plastic shell. This “Trident Z5” series arrived with the arrival of the DDR5 memory kits.


The Trident Z5 kit is available in either gray or black. In addition, you will have the choice to choose a version with or without RGB backlighting. Our sample of the day is grey and has RGB backlighting.


Features and cooling:
Our kit is clocked at 6400 MT/s, has timings of 32-39-39-102 and requires 1.40 volts to operate. It is composed of two 16 GB modules for a total of 32 GB. We are here on a mix between gray and black.


The heatspreaders are made of aluminum. They are responsible for dissipating the heat generated by the eight-layer PCB and the memory chips. If you have already had a GSKill Trident kit in your hands, you will quickly notice that GKSill has kept the same spirit in the design of the heatspreader.


On both sides, we find the name of the series. A label includes some of the characteristics of our kit. Regarding the price, this kit is currently available for $189 or 265 euros on Amazon. It is possible to find it even cheaper elsewhere but the difficulty is also to find it in stock. On the upper part, we find the RGB backlight with the inscription GSkill.
To finish this presentation, you should know that the kit is XMP 3.0(Extreme Memory Profile) compatible. So do not forget to activate the profile directly via the bios of our motherboards.
[nextpage title=”What’s new in DDR5: “]
The arrival of the Z690 chipset coincides with the arrival of new DDR5 memory modules. The main change is an increase in frequency and a higher capacity. Be careful, let’s make things clear straight away, it is not possible to use DDR5 modules on a DDR4 motherboard and vice versa. Even though DDR5 also has 288 pins, the notches do not match and this is voluntary in order not to have disasters.
The arrival of the PMIC module:
The great novelty of DDR5 memory sticks is the presence of a PMIC module(Power Manager Integrated Circuit). Its role is to regulate the power supply of the memory stick. There is therefore one per strip. This one will use the 5 volts of your motherboard and convert it to provide the necessary voltage to your kit. For example, if your kit needs 1.1 volts, each chip will receive 1.1 volts.

Previously, it was the motherboard that was in charge of doing this. In reality, this has an advantage but also a disadvantage. The advantage is that manufacturers no longer have to provide this control on the motherboard PCB. So, a financial gain.
But unfortunately, there are two types of PMIC. One is locked and will only accept the default values of your kit, it is called secure mode. The other type of PMIC is modifiable and will therefore allow you to increase the voltage beyond 2 volts. Fortunately, Asus on its Z690 APEX, has already begun to circumvent the restriction of the secure mode to reach 1.435 volts.


The other issue is the heat release of this chip as well as the additional cost for a DDR5 kit. Personally, we did not notice any additional heat release during our testing. As far as pricing is concerned, it will be higher and it will also depend on availability.
Higher frequencies and lower voltage:
So what’s changing? First of all, the manufacturers seem to favor 16 GB strips and thus dual channel kits in 2 x 16 or 2 x 32 GB whereas we are used to 2 x 8 GB for DDR4. The frequencies are also on the rise with kits that start at 4800 MT/s while the standard seems to be at 3200 MHz in DDR4 and which can currently reach 6600 MT/s. Finally, who says high frequencies says (much) more relaxed timings.


The voltage is also improved since it will be able to decrease to 1.1 volt for DDR5 against 1.2 volt for DDR4. We are talking about a voltage of 1.1 volt for DDR5 kits at 4800 MT/s. The voltage will be higher if the frequency increases as you will see below.
The ECC (Error Correcting Code) compatible with DDR5 :
DDR5 chipsets will be able to integrate ECC(Error Correcting Code). Uh, yes? The idea of this module is to detect possible errors and analyze them before sending them to the CPU. Now, this module won’t be available on all boards since it will increase the price of the kit. While we are on the subject of prices, these should unfortunately be (much) higher.


XMP 2.0 (DDR4) and XMP 3.0 (DDR5) changes:
We go from XMP 2.0 for DDR4 to XMP 3.0 for DDR5. What changes at first is the possibility for a manufacturer to propose three different XMP for its memory kit. These must be activated in the BIOS.

The other big evolution is the possibility to register your own XMP. To put it simply, you can optimize timings and tensions and then write your own XMP. Once “burned” on your memory stick, you will have the possibility to choose this XMP within the BIOS. This is of course a function that we will come back to in detail in a dedicated article since it is something that is possible with iCUE.
[nextpage title=”How to identify your memory kit: “]
Basic features:
You will tell me that it is quite easy since you just have to look at the references announced by the manufacturer. Yes, but this is not enough, especially if you plan to overclock it! Some information is given by the manufacturer, but you’ll have to search or even remove the heat sinks to find out the others.
On one side of the heatsink you will find the inscription “Trident Z5 RGB” and on the other, a label with the technical specifications of our example. This is what we will look at in detail. For example, in the case of our example of the day, this is the information we know.
- The brand : GSkill
- The model: Trident Z5 RGB
- The capacity: 2 x 16 GB
- The frequency: 6400 MT/s
- Timings: 32-39-39-102
- Voltage : 1.40 volts
- Revision: September 2022
In order to get an idea of the overclocking potential of your kit, this information is not enough and you will have to go further. Indeed, it is also very important to know the revision of the PCB as well as the model of the chips that equip your memory kit. Depending on this information, the overclocking performance of the kit will be very different.

To find this information, there is currently only one solution, dismantle the heat sinks. The Taiphoon Burner software does not currently support DDR5 kits. Moreover, there is no indication that this will be the case in the coming weeks.
CPU-Z still present:
Fortunately, our trusty CPU-Z software is still around and allows us to check this information, especially about the type of chips that equip our kit. Currently, there are three types of chips: Samsung, Hynix and Micron. Be careful, since from now on on the DDR5 kits, we can have either Hynix M-die or Hynix A-die.

Our kit is perfectly recognized under Windows 10 and the different timings perfectly read. The memory chips that equip our kit are Hynix. They are the chips with the best potential in overclocking. It remains to be seen whether they are M-die or A-die. The latter still having a better potential.
The PCB of our memory kit :
We are going to disassemble the heatsinks in order to be able to observe the PCB and identify the chips. Be careful not to accidentally detach any chips from the PCB! The best technique is to heat the heatsink with a hair dryer before gently prying it off and being patient.

As a reminder, the design of DDR5 modules will also be different from DDR4 with the presence of a PMIC (power management integrated circuit) chip on board. The idea is to allow a better management of the power supply and thus the stability of the system.
Our kit therefore benefits from the Hynix M-die chips, of which there are 8. We are on a kit known as “SR” for single rank, meaning that all the chips are on a single side. On the other hand, we can find “DR” kits for dual rank with chips on both sides of the PCB. The Hynix chips have the reference “H5CG48MEBD 220A” and are 2GB versions.
[nextpage title=”The importance of the XMP profile: “]
Setup within the BIOS:
We can’t say it enough, but the settings of your memory kit are not set automatically after installing it. If this is the case for your processor, it is not the case for your memory kit and a passage through the BIOS will be mandatory! You will be able to configure it manually, by choosing the right frequency, the timings as well as the voltage corresponding to your kit. For more convenience, we advise you to activate the XMP (Intel) or DOCP (AMD) mode in “AI Overclock Tuner” in order to set it up automatically.
Without this, your performance will be impacted in all areas and you will end up with a kit that does not exceed 4800 MHz in CL40. So we will activate our XMP profile directly in the BIOS. Many of you have asked us about the difference between the XMP I and XMP II profiles. The XMP I profile loads the default profile, the XMP II profile sometimes optimizes some subtimings more.


The Asus BIOS, both on the APEX and on the Crosshair models, benefit from memory profiles. They are good bases to overclock your memory kit. We will first use them in our overclocking tests. Our kit is now set up in the BIOS and will work with the manufacturer’s specifications.


As you have seen in the above captures, once the XMP profile is activated, the settings are automatically detected. The frequency goes up to 6400 MT/s, the timings are activated and the voltage goes up to 1.40 volt on the VDD and VDDQ.
[nextpage title=”Testing the Intel configuration: “]
Of course, this kit will only be tested on an Intel platform since our comparisons are made on this configuration from the beginning. However, you can find our articles on the EXPO kits which are tested on AMD cards.
- Motherboard : ROG Maximus Z690 APEX edition 2022 and Z790 APEX for the OC
- Processor : Intel i9-12900K Alder Lake and i9-13900K Rocket Lake for the OC
- Memory : 32 GB GSKill Trident Z5 RGB 6800 MT/s CL34
- Graphics Card: MSI GT 710
- Cooling system : Optimus Foundation + 480 mm EK radiator
- SSD : Western Digital SN850 NVMe SSD M.2
- Power supply : be quiet! Dark Power PRO 12 1500w
- Operating system : Windows 10 64 bits
Aida 64 :
 It is a software able to provide you with a lot of information about your configuration but it has the particularity to have a memory benchmark. It will calculate the speed of reading, writing, copying and the latency of your memory kit. It is very often used to compare memory kits between them. It is an excellent tool if you want to compare the performance of your memory kit with those we have already had the opportunity to test.
The version used for the tests is 6.50.2812 beta and we have taken the performance of the previously tested kits.

The performance of this first test seems totally logical to us, with a sixth place obtained. The throughput is unquestionable with an average of 102140 MB/s. This is quite logical since this GSKill Trident Z5 kit combines high frequency with tight timings. The best scores also combine high frequency with tight timings. As a reminder, our best score in DDR4 was 61325 MB/s with the Corsair Dominator Platinum at 4800 MT/s CL19. So, as usual on an Intel platform, you have to focus on frequency and tight timings.

In writing, same observation with speeds which are very good to reach 88423 MB/s. The logic of the graphic remains identical to the previous one. The Corsair Dominator Platinum 4800 MT/s CL19 in DDR4 obtained 67251 MB/s. Once again, we note a logical progression between the different frequencies. The score is better than the Corsair kit since the frequency is identical but the timings are more relaxed.

The findings are identical in copy with again a sixth place for our copy of the day clocked at 6400 MT/s in CL32. The Corsair Dominator Platinum 4800 MT/s CL19 in DDR4 had a copy speed of 57330 MB/s. As you can see, it is in reading and copying that DDR5 takes a very large lead over DDR4.

Finally, the latency. This is the value that all eyes are on because DDR5 is a bit behind. Our best DDR4 kit at this little game was the G.SKill Trident Z Royal Elite 4000 MT/S CL14 which obtained 41.4 ns. You’ll notice that the higher the DDR5 frequency, the narrower this gap becomes. Note that a DDR4 kit in 3200 MT/S CL16 has a latency of 50.3 ns. Here it will be 60.2 ns for our GSKill Trident Z5 RGB 6400 MT/s CL32.
Geekbench 3.4.4:
 This is a benchmark available in several revisions, version 5 having just been released a few weeks ago. It allows you to obtain two scores: one in single and the other in multi. Using this benchmark, we will focus on the performance obtained on the ” Memory Multi-Core ” score which allows to differentiate the memory performance.
The version used for the tests is 3.4.4.

For the Geekbench 3 benchmark, despite the fact that in single core the frequency of our i9-12900K is 5.2 GHz, we note a difference in score between the different memory kits. Once again, it’s a fourth place for this GSKill kit, behind the 6600 and 7200 MT/s kits. For information, in DDR4, our best kit was the G.SKill Trident Z Royal 4400 MT/S CL16 with 5617 points.

In multi core, the gap between our kits is less important. For your information, in DDR4, our best score was 48800. Of course, we have to take into account the DDR5 but also the performance brought by the Alder Lake CPU.

As soon as we isolate the memory score, real differences are visible between the kits. Our kit of the day gets a score of 11134 points! In DDR4, our best kit obtained only a score of 7748 points. Once again, the huge advantage of DDR5 in combination with the Alder Lake processor can be seen.
Geekbench 5.2.5:
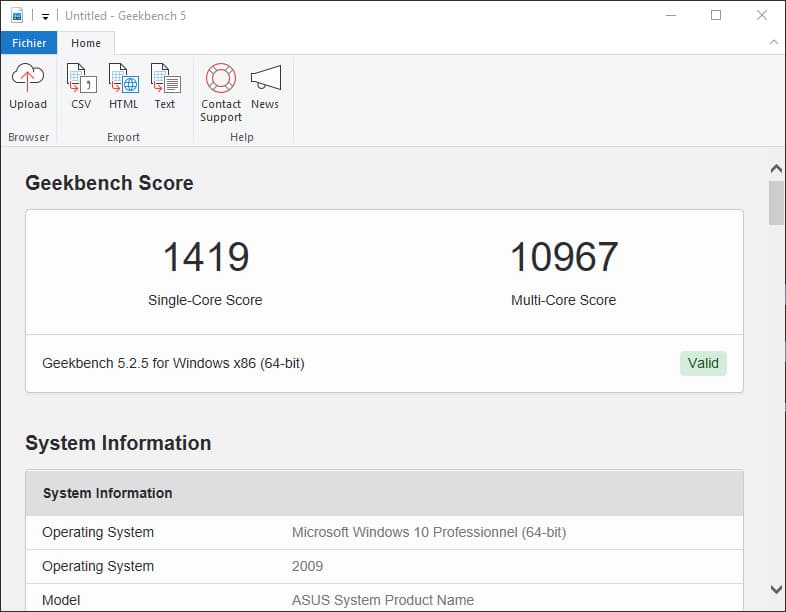 We decided to add this extra benchmark but why? The CPU benchmark uses new tests that more accurately simulate the tasks that processors face in recent applications. Geekbench 5 also increases the memory used in the benchmark to better reflect the impact of this parameter in the CPU results. For now, we will keep both since version 3 is still widely used.

While in Geekbench 3 we had a difference in single core, here in version 5 the performance is quite identical and it is our kit of the day gets a score of 2013 points.

Finally, the last score of our benchmark series with a total of 19463 points for our GSKill Trident Z5 RGB 6400 MT/S CL32 kit. Again to give you a benchmark score in DDR4, our best score was 11179 points.
In short, as you can see in this series of tests, our sample of the day performs well, but despite its 6800 MT/s frequency, the more relaxed primary timings do not always ensure second place in our rankings.
[nextpage title=”Overclocking on our Z790 APEX: “]
Choosing your DDR5 kit based on memory chips:
As it was already the case for DDR4, if you want to clock your memory, some brands will have a better potential. Currently, the kits announced by the various brands benefit either from Micron chips or Hynix chips or Samsung chips. The latter two brands will be the most interesting. Our GSKill Trident Z5 RGB 6400 MT/s CL32 kit is equipped with Hynix chips as you can see. But be careful, there are Hynix M-die chips, the first ones that came out, but especially today Hynix A-die chips that allow to go up in frequency more easily.
We can not totally make a generalization, but in most cases, the kits between 6000 and 6400 MT/s are in Hynix M-die and from 6600 MT/s, they are almost all Hynix A-die. As you can see, our kit is a model with M-die chips.
DDR5 “key” voltages:
For memory overclocking, there are 5 key voltages. These are the voltages that will have an impact on the overclocking and therefore on the frequency rise or the tightening of the timings. These are the CPU System Agent Voltage (SA), the DRAM VVD Voltage, the DRAM VVDQ Voltage, the Memory Controller Voltage and the IVR Transmitter VVDQ Voltage. Here is where these voltages are located in the BIOS of our ROG Maximus Z690/Z790 APEX.


Attention, depending on the type of memory chips (Micron, Hynix and Samsung), the balance between these different voltages is different. Don’t panic, we will come back to this in our guide on overclocking Alder Lake and DDR5. If your PMIC module is not locked, by activating ” High DRAM Voltage Mode “, you will have access to voltages up to 2 volts. Let’s go for the overclocking of this DDR5 from GSKill.
Step 1: change processor and motherboard
Why? Simply because the IMC(Integrated Memory Controller) of my 13900KS is much better than the one of my 12900K. Now integrated in the processor, the IMC allows a more direct and faster management of the RAM than when the memory controllers were on the motherboard. As with overclocking, there is a “lottery” and some processors benefit from a better IMC that allows them to handle higher memory frequencies. Since in overclocking we are going to increase the frequency, we might as well take the best CPU at this game.
We will also do a performance test with the XMP profile and our i9-13900KS on this APEX Z790 in order to have a basis for comparison for our overclocking results.
Step 2: Baseline scores on the APEX Z790
Let’s start with a baseline score. It is very important because it will allow us to judge the gain of our different modifications. When you need to fine-tune your overclocking, don’t modify several subtimings at the same time because you might not know which one is the problem if your configuration is not stable.


We have our two reference scores, we can start overclocking!
Step 3: 7400, 7600 and 7800 MT/s
Good news as our GSKill Trident Z5 RGB 6400 MT/s kit is very docile. For once we did not use the memory profiles available in our BIOS since they are less interesting than the basic XMP profile. Also beware, the overclocking settings of a Hynix M-die kit are not identical to those of a Hynix A-die kit.
We start calmly with a frequency of 7400 MT/s CL32 and timings and subtimings that have been optimized to improve performance. Concerning the voltages, we go from 1.40 to 1.60 volt.


As expected, the speed in Aida64 explodes as well as the memory score in Geekbench3 which goes from 11676 to 14666 points. We continue the rise in frequency with 7600 MT/s while keeping the same voltages.


It’s a rolling business with a memory score that passes the 15K mark. In order to pass the 7800 MT/s we will have to push our voltage to 1.65 volt.


Here too, it passes very easily in Geekbench3. The kit seems to have more under its belt and even if the 8000 MT/s CL32 is not stable, it would still take some work to reach it without too much difficulty, but we could already detect an excellent potential for GSKill kit.
[nextpage title=”The last word: “]
Even if with the arrival of high frequency kits equipped with Hynix A-die chips, our attention was focused on them, the fact remains that this GSKill Trident Z5 RGB 6400 MT/s CL32 kit proves to be very interesting and very efficient for the price. It is one of the best kits we have had in our hands in M-die thanks to its 6400 MT/s frequency and its tight timings.
The quality of the GSKill chipset is well known and this sample is no exception. If you have an entry-level or even mid-range Intel motherboard, this kit will definitely be an excellent choice. Kits with frequencies higher than 7000 MT/s can sometimes cause stability problems. Even if we have not demonstrated it in this article, it is possible to focus on a frequency of 6800 MT/s and to tighten the timings and subtimings even more in order to increase the scores without having to resort to a memory frequency increase. We are also working on M-die profiles applicable to so-called “entry-level” motherboards.
GSKill Trident Z5 RGB 6400 MT/s CL32 :
We liked:
- The look of the heatsinks with an aesthetically pleasing RGB even if we prefer the black ones
- The quality of finish of the memory modules
- The most powerful DDR5 kit we have had in our hands!
- The excellent overclocking potential of the Hynix B-die chips and the BIOS of our APEX
- A voltage of 1,40 volt which is still very correct
- The lifetime warranty
We would have liked :
- Still a little tighter pricing, but that should happen in the coming weeks
 GSKill offers with this Trident Z5 RGB at 6400 MT/s CL32, a very interesting kit with an excellent overclocking potential even with M-die chips. The price of DDR5 continues to fall, so this is a great deal at $189 or 265 euros. The performance with the XMP profile is already very good thanks to the 6400 MT/s frequency and the tight timings. Depending on your motherboard, it will be a piece of cake to go over the 7000 MT/s mark to boost the results even more.
A special thanks to GSKill for making this kit available to us.