
[nextpage title=”Introduction:”]
Now it’s time to tell you about our copy of the MSI B850 MPOWER motherboard, which we managed to get via MSI France, whom we’d like to thank. So why do we say “managed to get” it? Because this micro-ATX motherboard was originally intended for the Asian market only, and is not yet available here. Let’s be honest, this MSI B850 MPOWER motherboard is certainly one of the boards we’ve been waiting for the longest at the editorial office, ever since the first announcements were made at Computex 2025! It’s finally here, in our lab, to our great delight.
As you’ll see from our article, this card has been announced at a very attractive price for those wishing to build a configuration around the B850 chipset, while at the same time having a board geared towards memory overclocking! As you’ll have gathered, this is a micro-ATX model with just two memory slots.
@overclocking.com Voici la magnifique #msi B850 MPOWER ! Une carte à retrouver bientôt en test sur notre site ! #gaming #hardware #techtok #overclocking #pcgaming #computer #unboxingvideo #amd @msigaming_france @msi
At the time of publishing this article, another model in the “MPOWER” series has just been announced by MSI, with the B760 MPOWER. In September last year, we tested the MSI Z790 MPOWER on the Intel chipset.
[nextpage title=”MSI B850 MPOWER:”]
Let’s start with a trip down memory lane. Older users may remember the arrival of the very first MPOWER motherboard based on the Z77 chipset. This series was aimed at overclocking and featured a yellow and black PCB and heatsink. In the end, MSI put an end to this series with the MSI MPOWER Z270 Gaming Titanium, which ensured the transition by coming in black and gray. So, after many years, MSI seems determined to revive this series, as no less than three new models have been announced since last year, although we’ll have to keep a close eye on their arrival in Europe.


This B850 MPOWER bundle :
A quick look at the MSI B850 MPOWER bundle to see if it comes with any special accessories. Considering that this board is priced at $220, we don’t expect to benefit from a substantial bundle. And yet, we are going to enjoy an “EZ DashBoard”. This is a piece of PCB with several functionalities: a Debug Code LED, a Clear CMOS button, a Reset button and a motherboard power button.
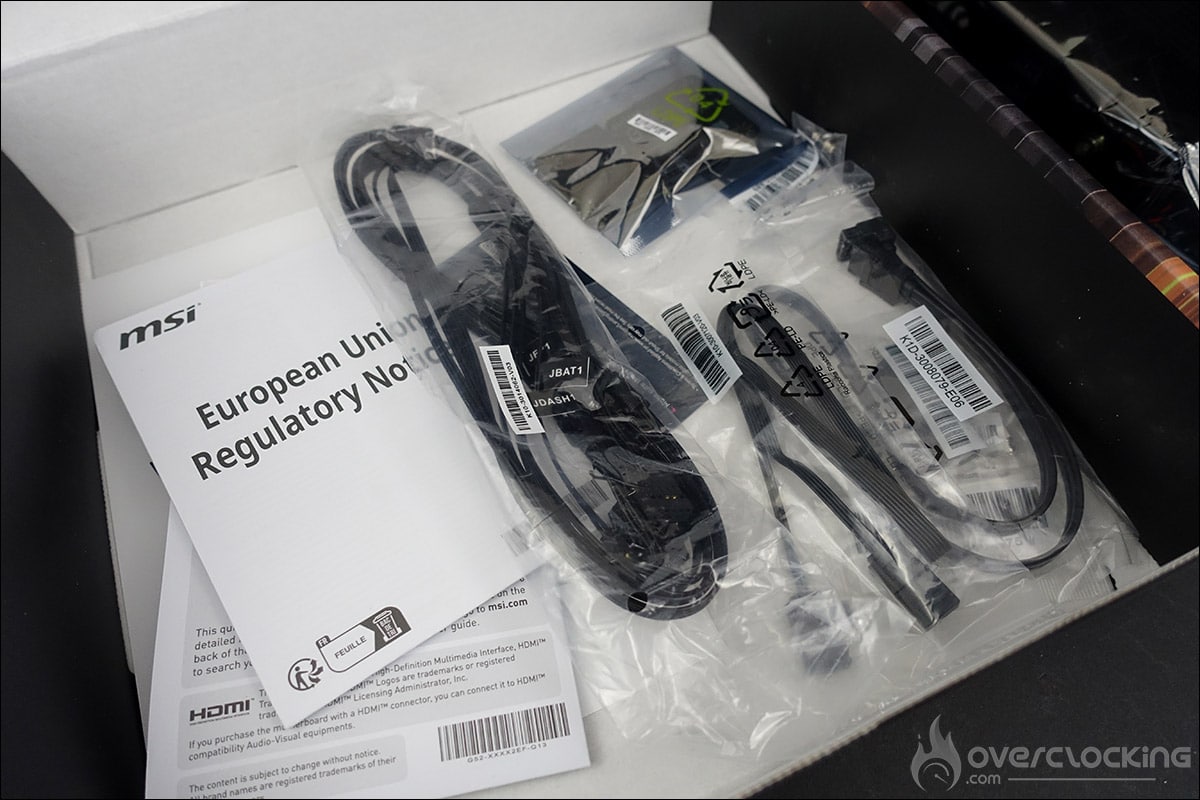

This will connect to the motherboard via a special cable included in the box. You’ll need to connect the cable to the EZ DashBoard and to the motherboard at the JDASH1, JFP1 and JBAT1 connectors. Once identified on your PCB, it’s easy to connect.
Apart from that, our B850 MPOWER box includes: a quick installation guide, a SATA 6 Gb/s cable, an EZ Dashboard cable, a Wi-Fi antenna set, a pack of EZ M.2 clips (1 set/pack), a pack of M.2 screws and spacers (1 set/pack) and a set of cable stickers.
Architecture:
A quick word about the box. It doesn’t really follow the color code of the MPOWER series, nor that of the motherboard. The front panel features gray, orange and slightly yellow colors. We would have expected the main colors to be yellow and black. The bottom right-hand zone states compatibility with AMD Ryzen AM5 and the motherboard chipset, namely the B850.


The MSI B850 MPOWER is built around AMD’s B850 chipset. This motherboard retains the socket of the previous generation, i.e. AM5. AMD continues to use this socket, and has announced that it will remain compatible until at least 2027. Farewell to the AM4 PGA (Pin Grid Array) socket in which you used to mount your processor, and make way for the LGA (Land Grid Array) socket. The change has been made since the AMD Ryzen 7000 processors, due to the greater number of pins on the Ryzen 7000 (1718). The format of our MSI B850 MPOWER is 243.84 x 243.84 mm, corresponding to the micro-ATX (mATX) format.
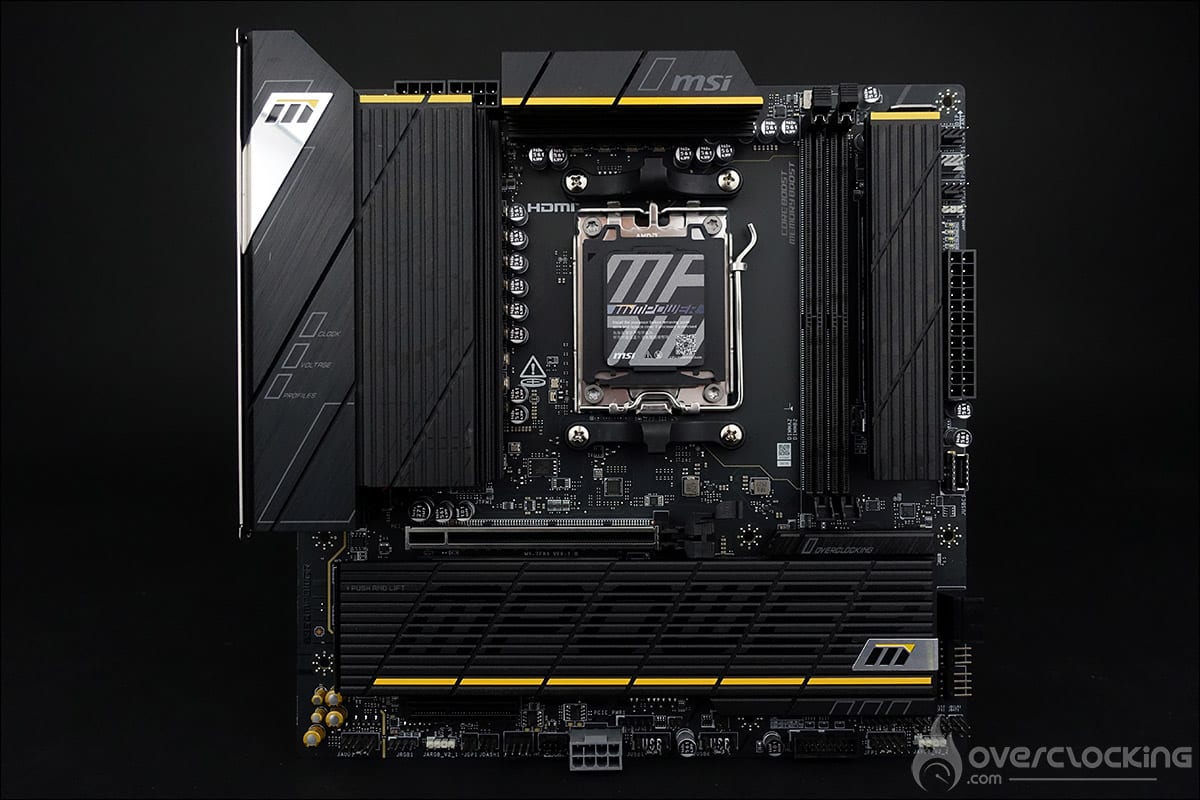

AMD, with socket AM5, retains a backplate already present on socket AM4. The 4 external holes that hold the retention system to secure your cooling system are still present. The center-to-center distance between these 4 holes is identical to that of socket AM4, so you’ll still be able to use your cooling system.
AMD goes one step further and adds 4 additional holes to hold the AM5 socket in place, as well as the backplate. As a result, the backplate no longer needs to be removed, as was the case with the previous generation. The locking mechanism features a reinforcement frame, a force frame and a latch. Once your Ryzen 7000/9000 has been positioned correctly, simply close the latch to hold it in place.
The different heat sinks :
The dominant colors on the PCB are black and yellow, so MSI is going back to basics with this color code. If you still have any doubts about its overclocking vocation, just take a look at the various inscriptions on the different heatsinks: ” Overclocking “, ” Frequency “, ” MHz “, ” Voltage “, etc. Let’s start with the heatsinks, of which there are three. First, the two heatsinks on the top of the motherboard, which surround the socket and cover the power supply stage. These two heatsinks are independent, and are not connected by a heat pipe.


The third one covers the chipset and is low enough to easily accommodate graphics cards. As you’ll have gathered, there’s no RGB backlighting on this B850 MPOWER, and we’d like to say, “so much the better!
Four M.2 SSD slots and PCIe 5.0 support:
The front panel features three slots for your storage devices. Access is easy: a simple press of the finger removes the heatsink. There are two PCIe 5.0 x4-compatible slots and two PCIe 4.0 slots, as a fourth port is located at the rear of the PCB. No screws here, just unclip the heat sinks to insert your SSD.


There are two PCIe ports, the first wired in PCIe 5.0 x16 (x16 or x8/x8) and the second in PCIe 4.0 x16. MSI has provided an additional handle on the notch for removing your motherboard, to make it easier to press.
Support for DDR5 and higher frequencies :
While DDR5 support has been assured since the arrival of AM5 motherboards, it’s now getting better: thanks to the new BIOS, MSI has announced support for memory kits up to 8400 MT/s (OC) and for a total of 128 GB. We’ll have a chance to evaluate this in our overclocking tests.


We had already seen the arrival of “EXPO” technology on the previous generation. This is an alternative to the XMP profile on INTEL models. As a reminder, this profile allows you, via the BIOS, to automatically activate the characteristics of your memory kit: frequency, timings and voltage.
[nextpage title=”PCB and connectors: “]
Tools for clocking:
Let’s start with the elements inserted on the PCB, which can prove to be interesting tools for overclockers. There are not many of them on this model, and they are mainly found on the EZ DashBoard.
- The power button: powers up the motherboard.
- The reset button: restarts the motherboard in the event of failure. The button can now be assigned to another task via the BIOS.
- CMOS CLR: clears BIOS settings to return to default.
- Debug Code LED: displays a code corresponding to the component responsible for the boot error.
The absence of a dual BIOS is regrettable, but quite logical given the price range of this MSI B850 MPOWER.
PCB:
Our MSI B850 MPOWER is based on a 12 (VCORE) + 2 (SOC) + 1 (MISC) phase power supply and features an 8-layer PCB. The part in charge of the CPU is made up of 12 phases, and on this model there is no doubler, but the phases are placed in parallel, so there are really 6 of them. The controller is an MPS MP2857 chip.
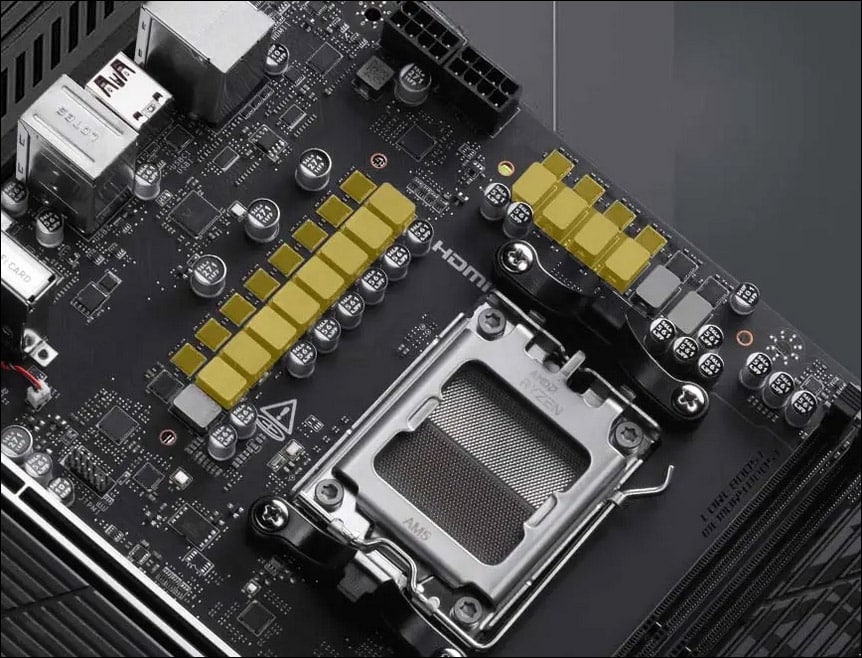
The 12 mosfets are all 60A MPS MP87661s. The mosfets in the power stages generate the most heat, as they are responsible for voltage conversion and delivery to the CPU from the EPS 12-volt connector. There’s also an external BCLK generator based on the Renesas RC26008, called the “OC Engine”.
Connectors :
The rear panel features the following. There’s a Clear CMOS button, a button for flashing the BIOS via a USB key, an HDMI port, a 5G LAN connector, three USB 10Gbps Type-A ports, one USB 10Gbps Type-C port, one USB 20Gbps Type-C port and four USB 5Gbps Type-A ports. Finally, there are connectors for Wi-Fi antennas and audio outputs.


Finally, to power our motherboard, we find a 24-pin connector and two 2 x 8-pin CPU connectors. Now that we’ve had a look at the board, let’s move on to the BIOS.
[nextpage title=”The BIOS:”]
As far as the BIOS is concerned, at first glance you’ll recognize that this is MSI. Those familiar with the brand will have no trouble finding their way around. As a reminder, the tab that will interest us most is “Overclocking”. Before we start, we’d like to remind you that it’s essential to regularly update your BIOS. For our tests, we tested several versions.
Flash BIOS of this MSI B850 MPOWER :
As we’ve said, the first thing to avoid unpleasant surprises is to update your BIOS. We’d like to remind you of the simple procedure for flashing your BIOS, which is essential if you want to maintain a perfectly stable configuration.
Go to the MSI website and the page for your motherboard – in our case, the B850 MPOWER – to download the latest BIOS. We place it on a key and insert it into a USB port on the motherboard. Restart the PC, press and hold the “DEL” or “Suppr” key to access the BIOS parameters. Go to the “M-Flash” tab. Your PC will reboot before giving you access to the flash interface. Choose the BIOS location on your flash drive and you’re ready to update your BIOS.
The inner workings of the BIOS :
The first page to appear is EZ Mode, the simplified BIOS mode. It contains the main parameters a novice might need. There’s no voltage here, but you can choose your boot sequence, activate the EXPO profile with a single click, choose your processor management profile, activate a profile, flash your BIOS and even set your fan parameters.
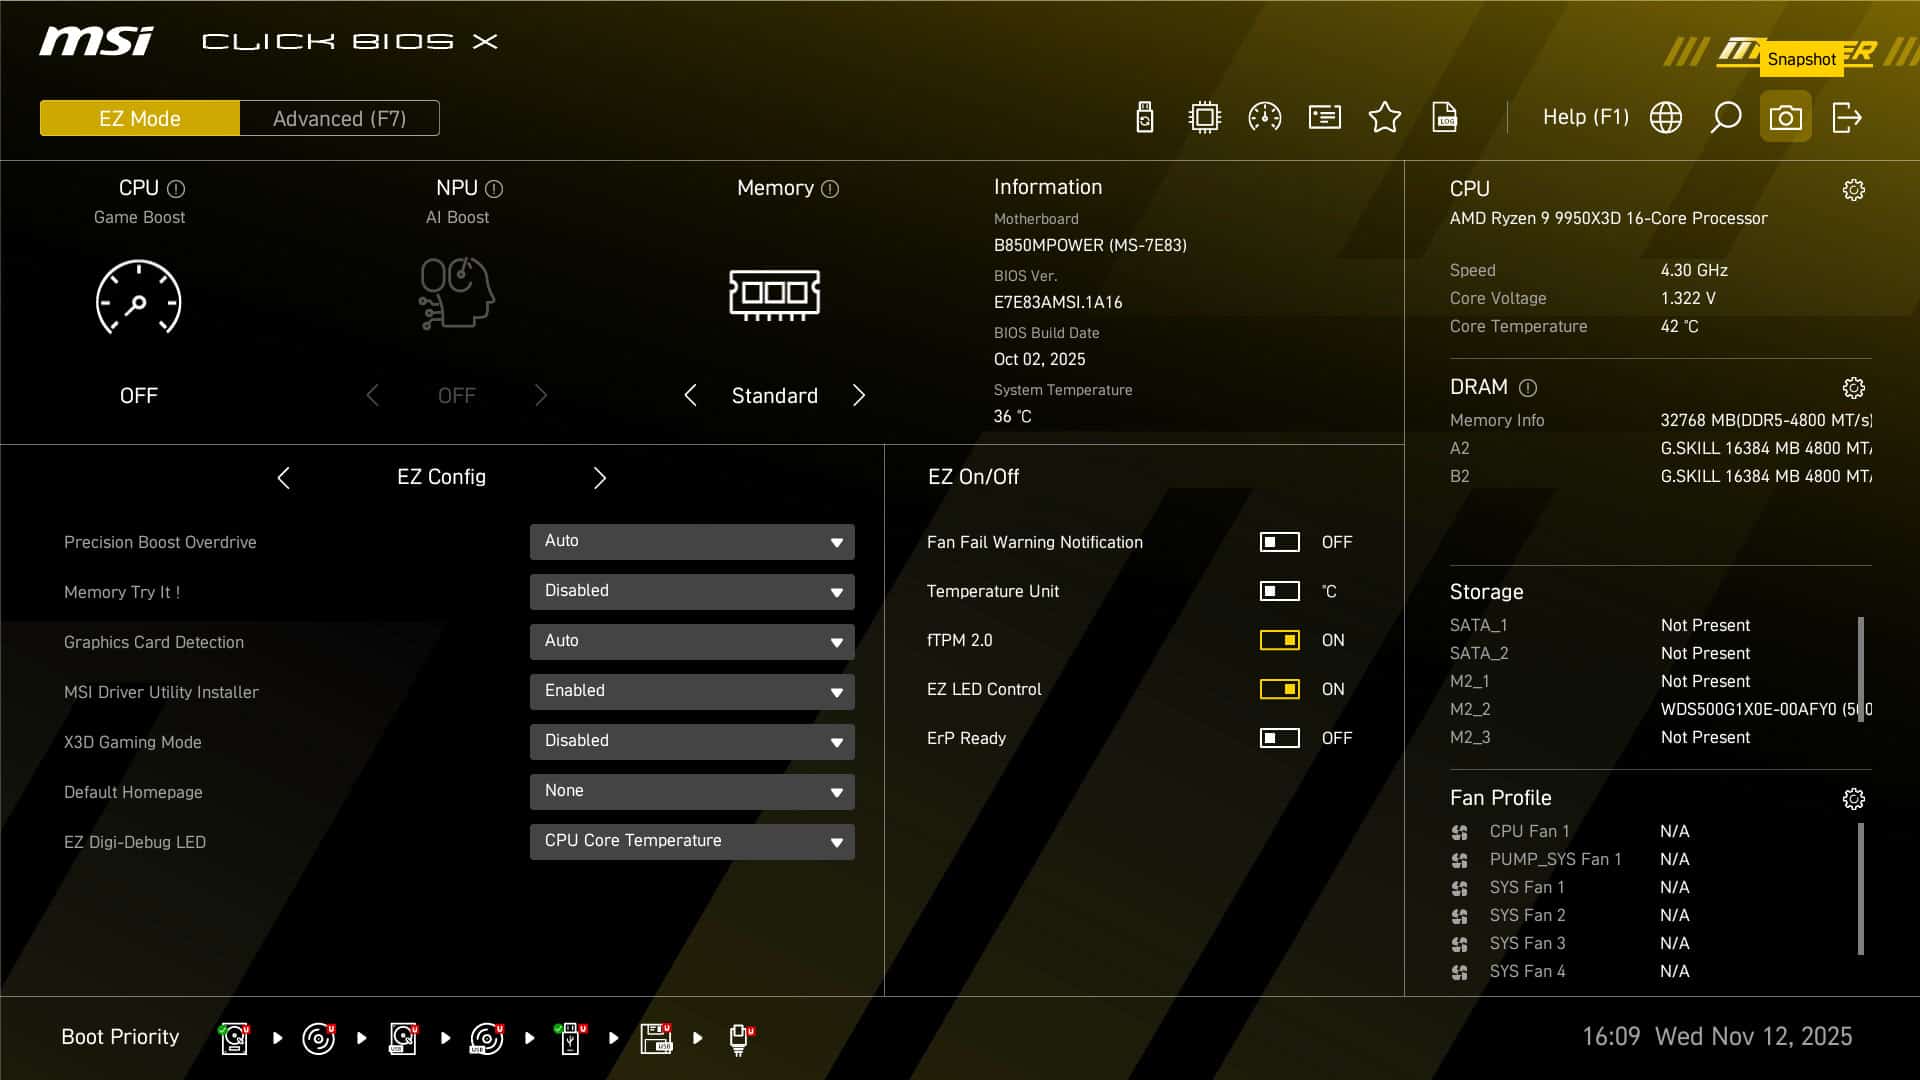

Press the “F7” key to access all BIOS parameters. They are divided into six different categories: System Status, Advanced, Overclocking, Security, Boot and Save & Exit. The one we’ll be using most often is the ” Overclocking ” tab. This is where you’ll find most of the settings. The ” System Status ” tab gives you an overview of the various peripherals connected to your motherboard. The second, ” Advanced “, lets you configure the motherboard’s various connectors (PCIe, USB, Thunderbolt, NVMe, etc.).
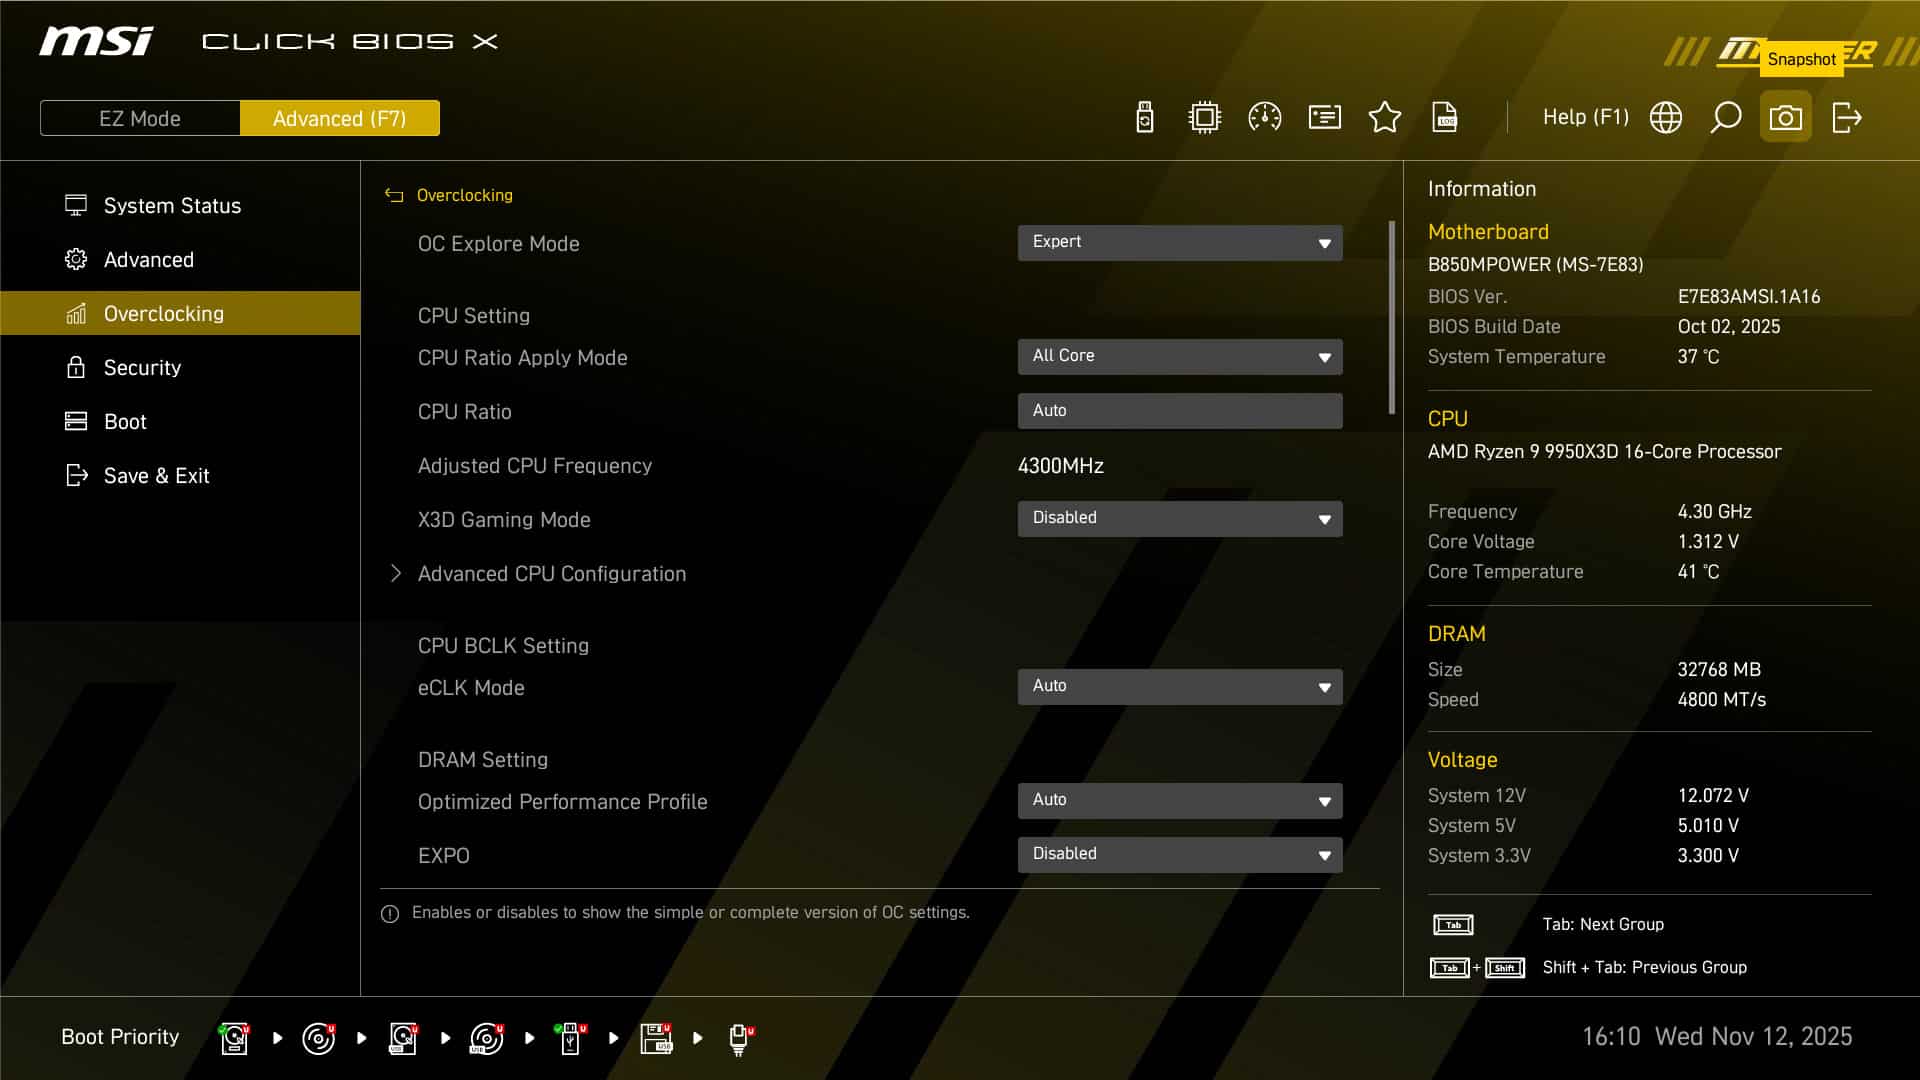
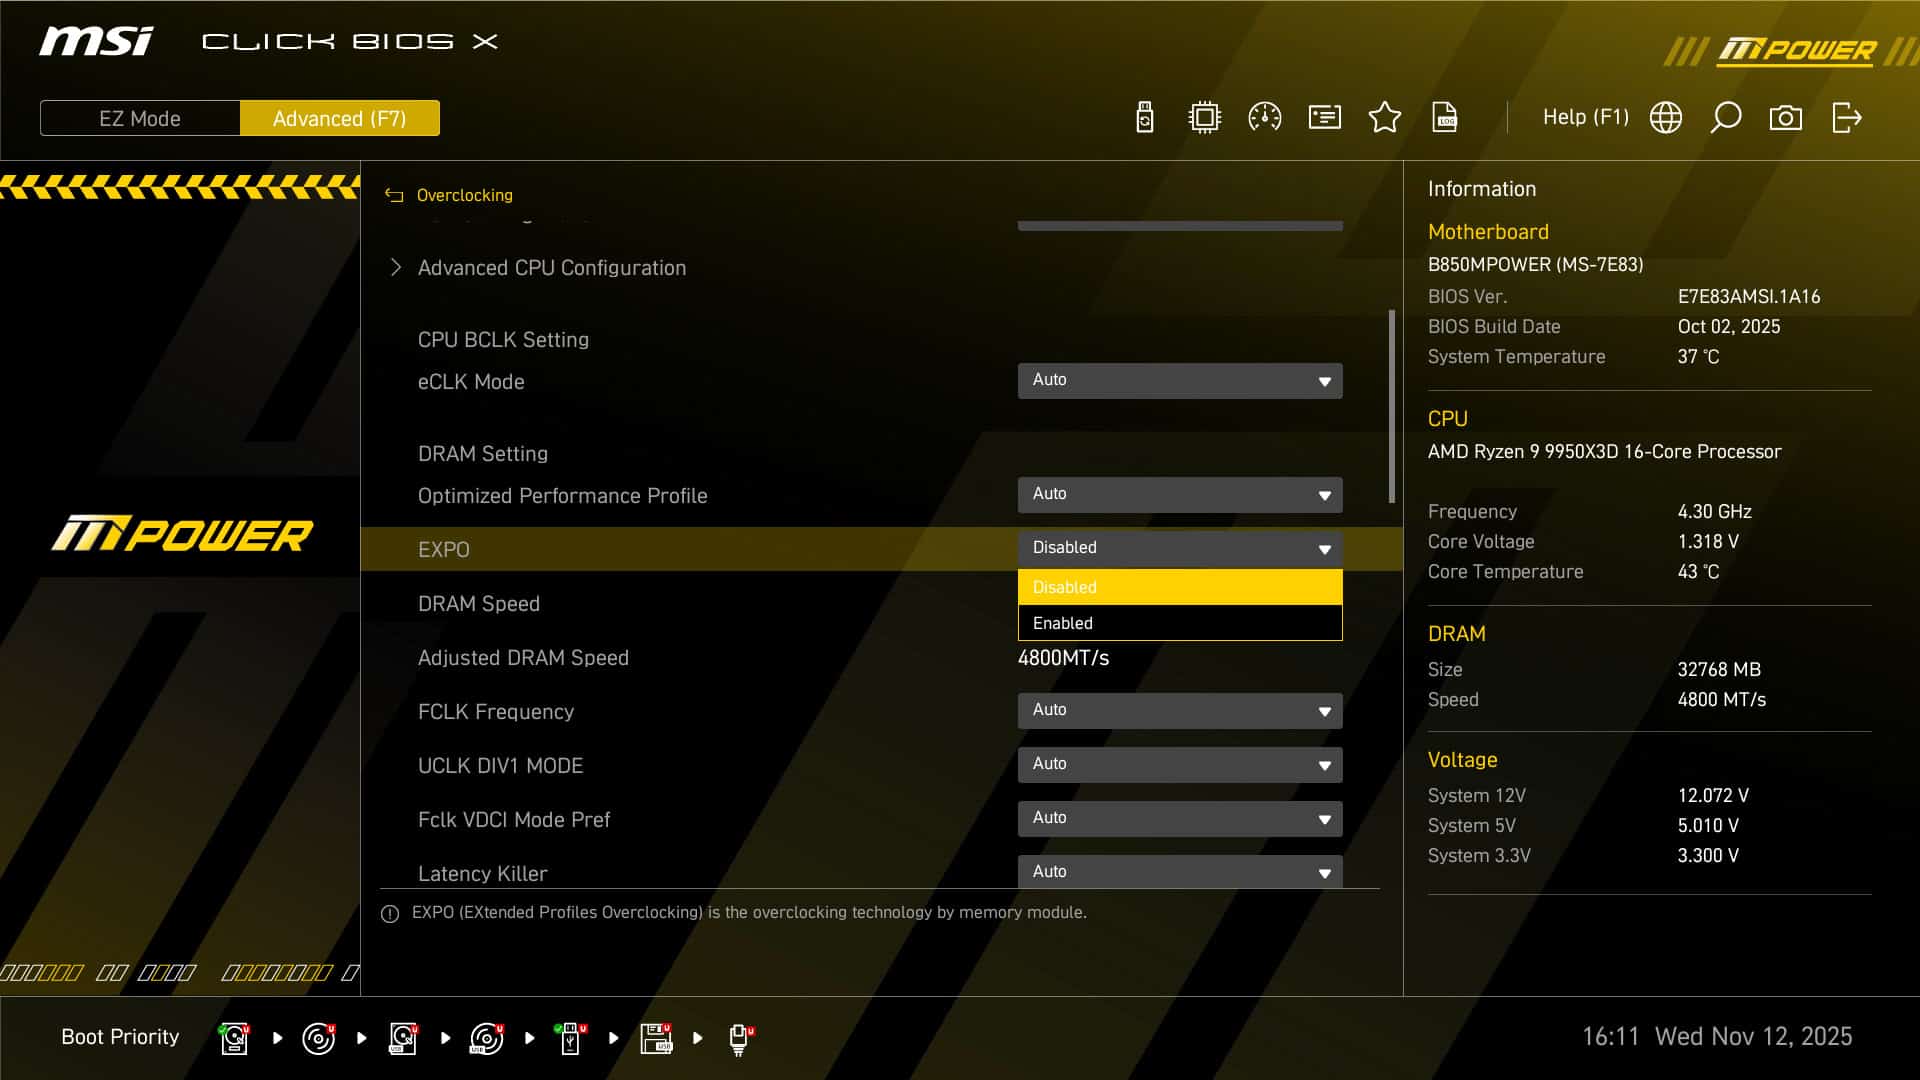
Now we come to the most important section for us, ” Overclocking “. Make sure you’re in ” Expert ” mode. Don’t forget to activate your kit’s EXPO profile. In the “Memory Try It!” section, you’ll find a series of memory profiles, which is excellent news and a real plus compared to other motherboards. We’ll talk more about this in the overclocking section, as well as the Latency Killer, High-Efficiency Mode and Memory Timing Preset parameters.
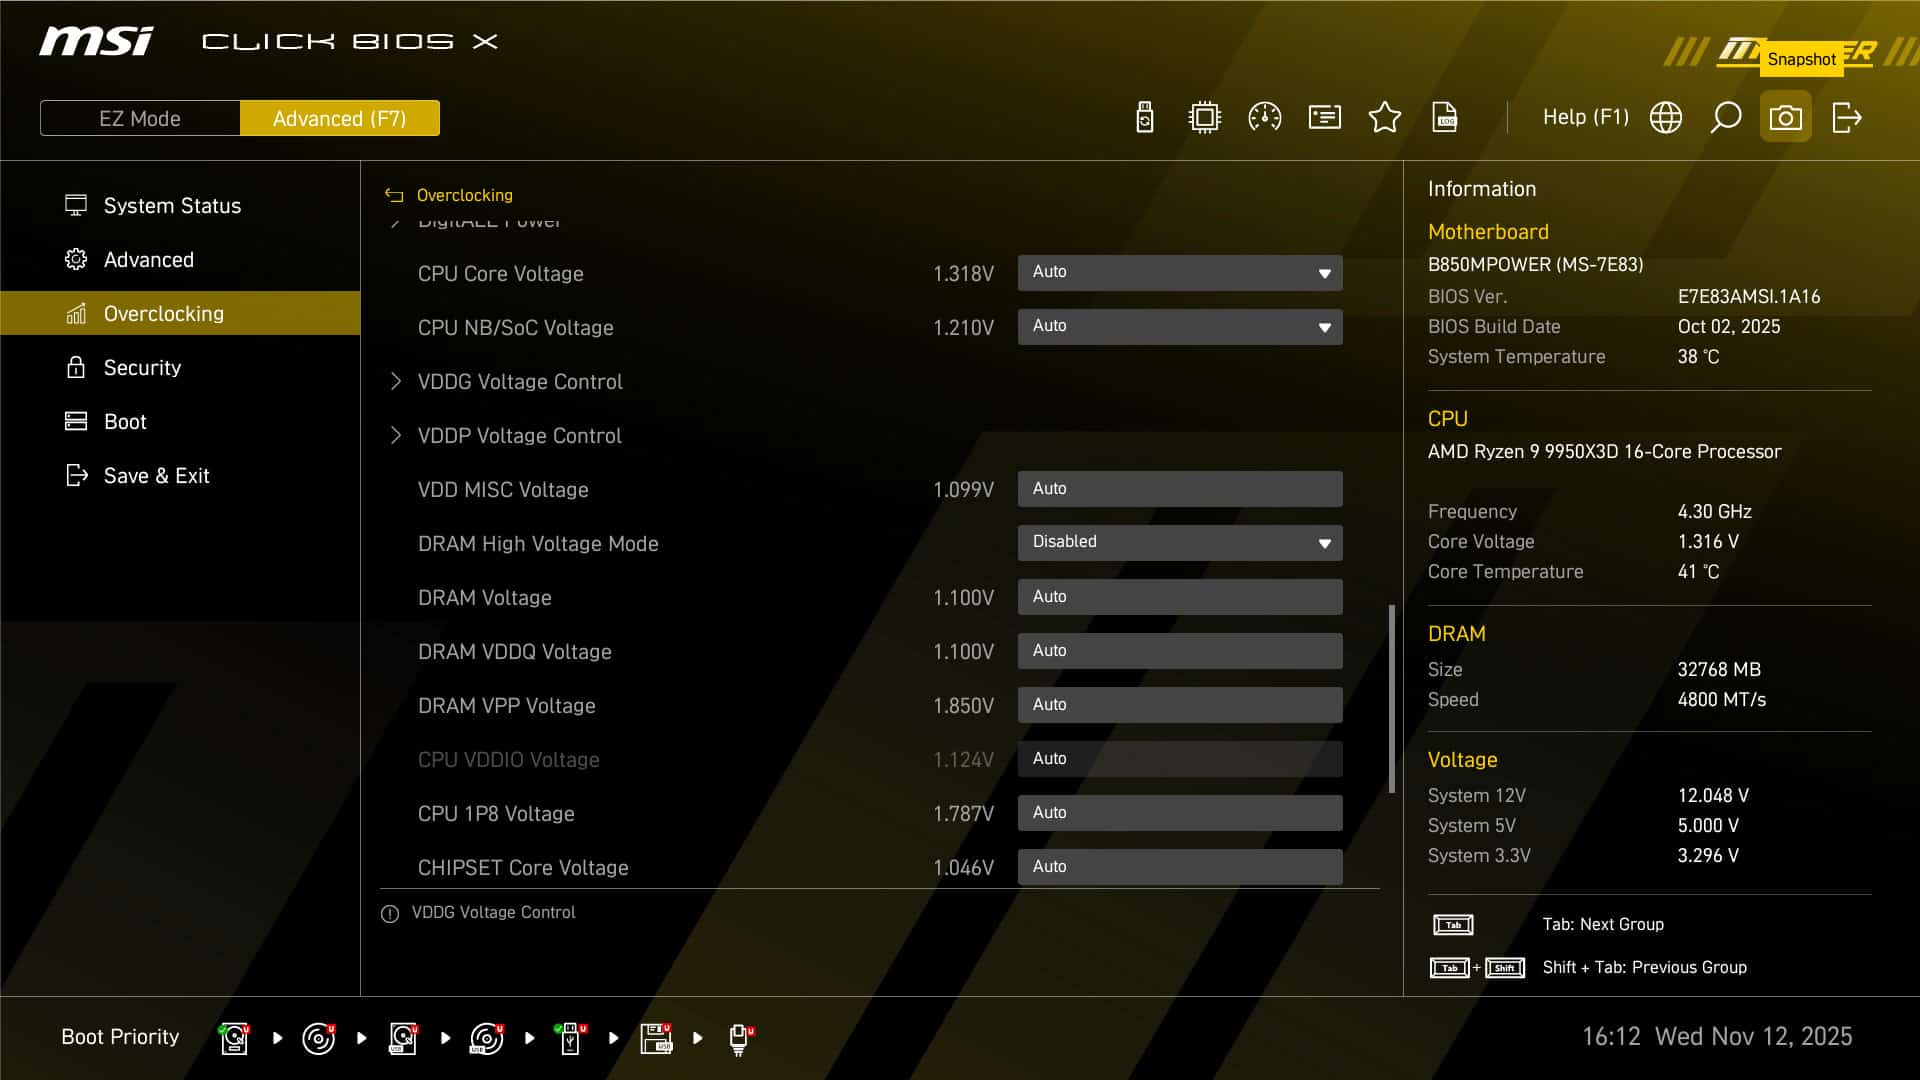
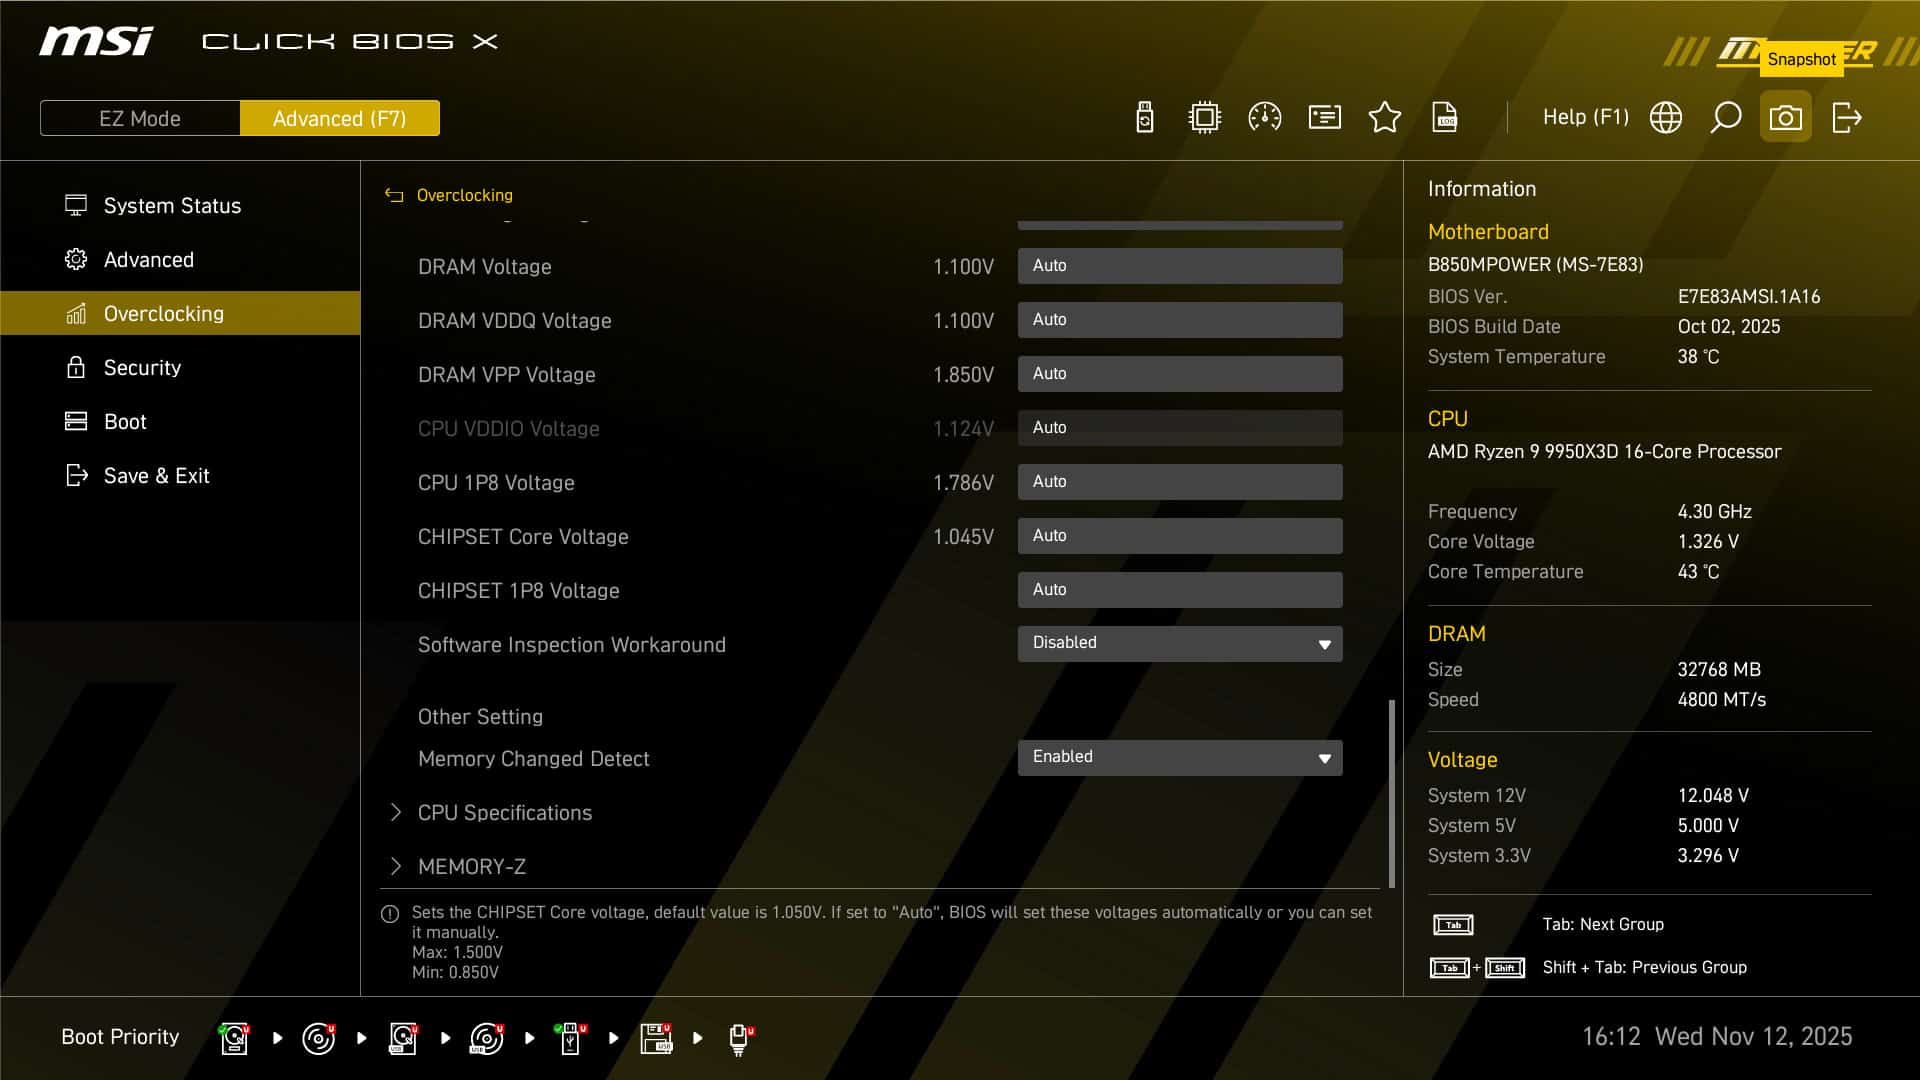
Next come all the voltages that can be adjusted. Some will adjust automatically according to the profile you have activated.
Don’t forget to save your profiles:
Finally, saving profiles is highly recommended when you’re running tests. It saves time. You can also save them on a USB key. Don’t hesitate to do this regularly to keep track of the potential of your components, which will always come in handy at some point.


Finally, you can access the BIOS Log Review at any time. This shows you the changes you have made. For example, if you activate a memory profile via Memory Try It! to test it, you can check the BIOS Log Review to see all the changes that have been made to your original profile.
[nextpage title=”First tests: “]
Here’s the configuration that will be used to test this MSI B850 MPOWER. For the publication of these tests, I’ve used the latest BIOS, even if it’s a version received directly from a contact at MSI. Here’s our configuration for this first series of tests:
- Motherboard: MSI B850 MPOWER
- Processor : AMD Ryzen 9 9950X3D
- Memory: 32 G.SKILL Trident Z5 NEO RGB 6000 MT/s CL26(test)
- Graphics card: MSI GT710
- Cooling system: waterblock Optimus Signature V3 chiller Alphacool Eiszeit 2000
- SSD: WD Black SN770 500 GB PCIe 4.0
- Power supply: Corsair AX1600i
- Operating system: Windows 11 64-bit

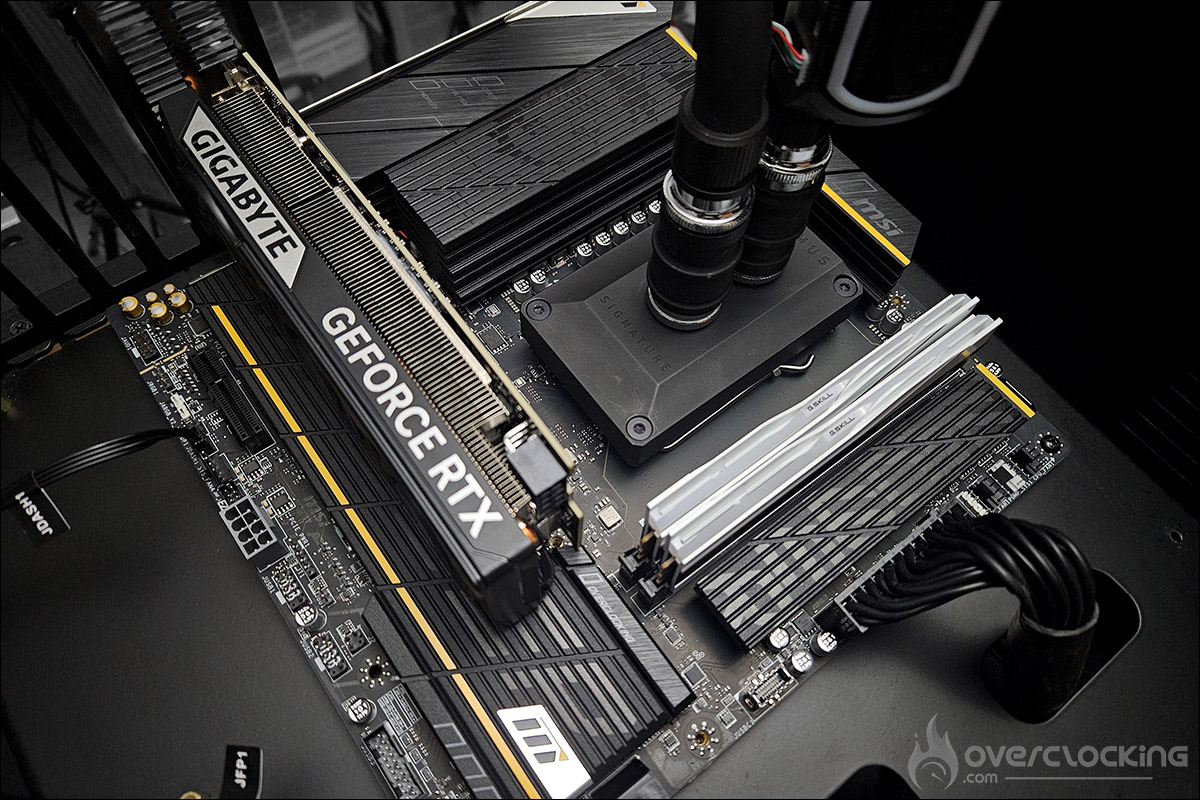
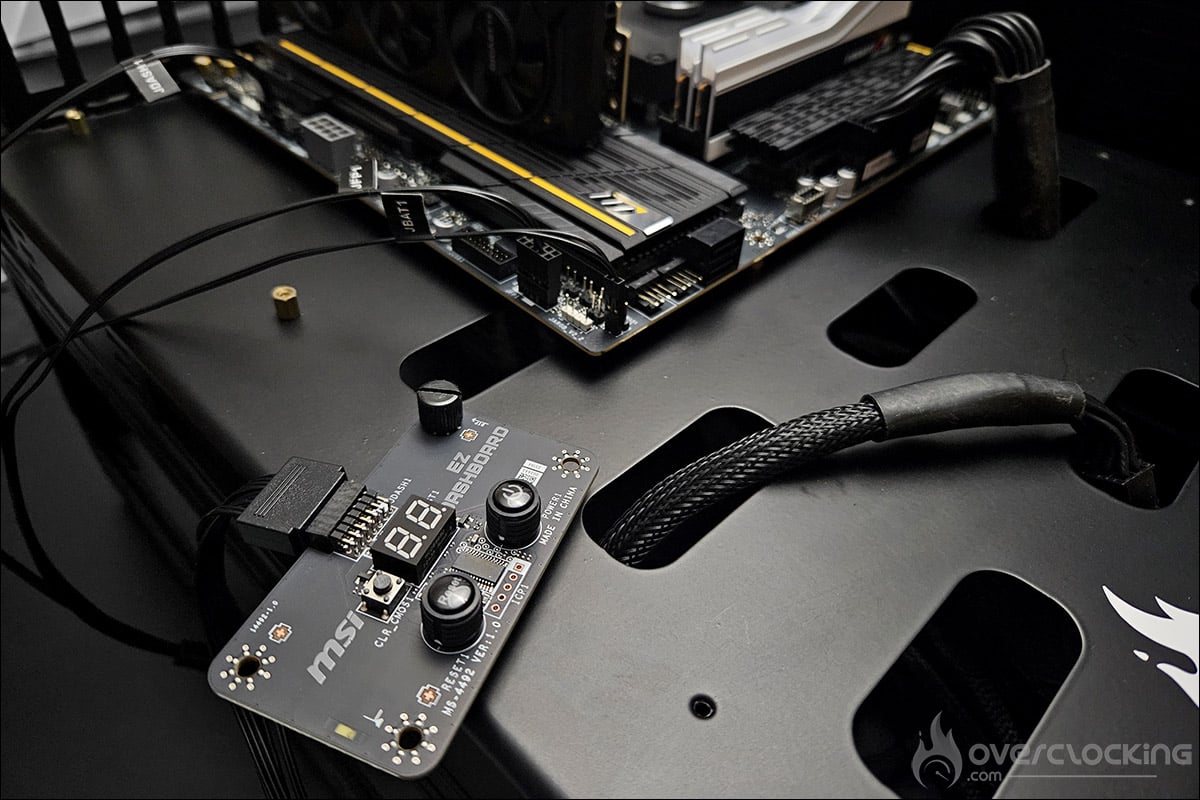
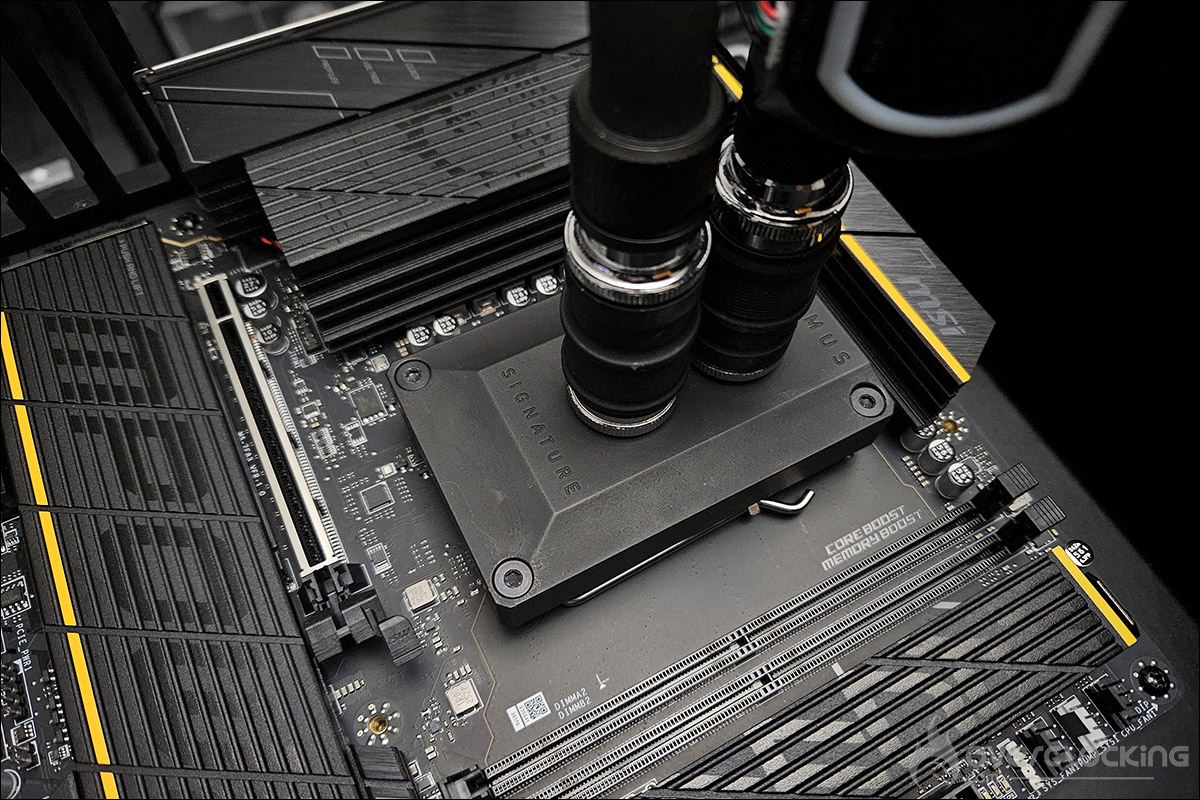
We’ve had the opportunity to test several different BIOS, and at the time of posting this article, we’ve just received another new version, proof that MSI seems attached to this model and is actively working on it!
[nextpage title=”Memory overclocking:”]
For once, we’re going to start our overclocking tests with the memory. As this card is mainly dedicated to memory, we shouldn’t have any trouble overclocking our Ryzen 9 9950X3D.
Installing the G.SKILL 6000 MT/s CL26 kit :
It’s when it comes to memory overclocking, of course, that we should see differences, thanks to the unique presence of two memory slots compared with four for “traditional” models. For this series of tests, we’ve decided to use the best kit currently available to us, the G.SKILL Trident Z5 NEO RGB 6000 MT/s CL26. We’d like to pause for a moment before beginning our tests. To get the best results, two other components are equally important. Your processor must have a good IMC to support high frequencies, and a memory kit with excellent chips. Both are equally important for memory overclocking!
Profiles in the MSI BIOS :
Within the BIOS, there are a number of options available to everyone, which allow a certain gain in memory. The first is the “Optimized Performance Profile”, which will vary according to the chips in your memory kit…

Unfortunately, with our G.SKill kit clocked at 6000 MT/s CL26, it’s hard to beat this. It is therefore not worth activating this option here, but depending on your memory kit, it could prove interesting.

Other options are also available, including “Latency Killer”, “High-Efficiency Mode” and “Memory Timing Preset”, which, once activated and set to Tightest for the latter, will give you better performance. You can see below, on the left, the original performance and, on the right, the performance after modifying these three options.
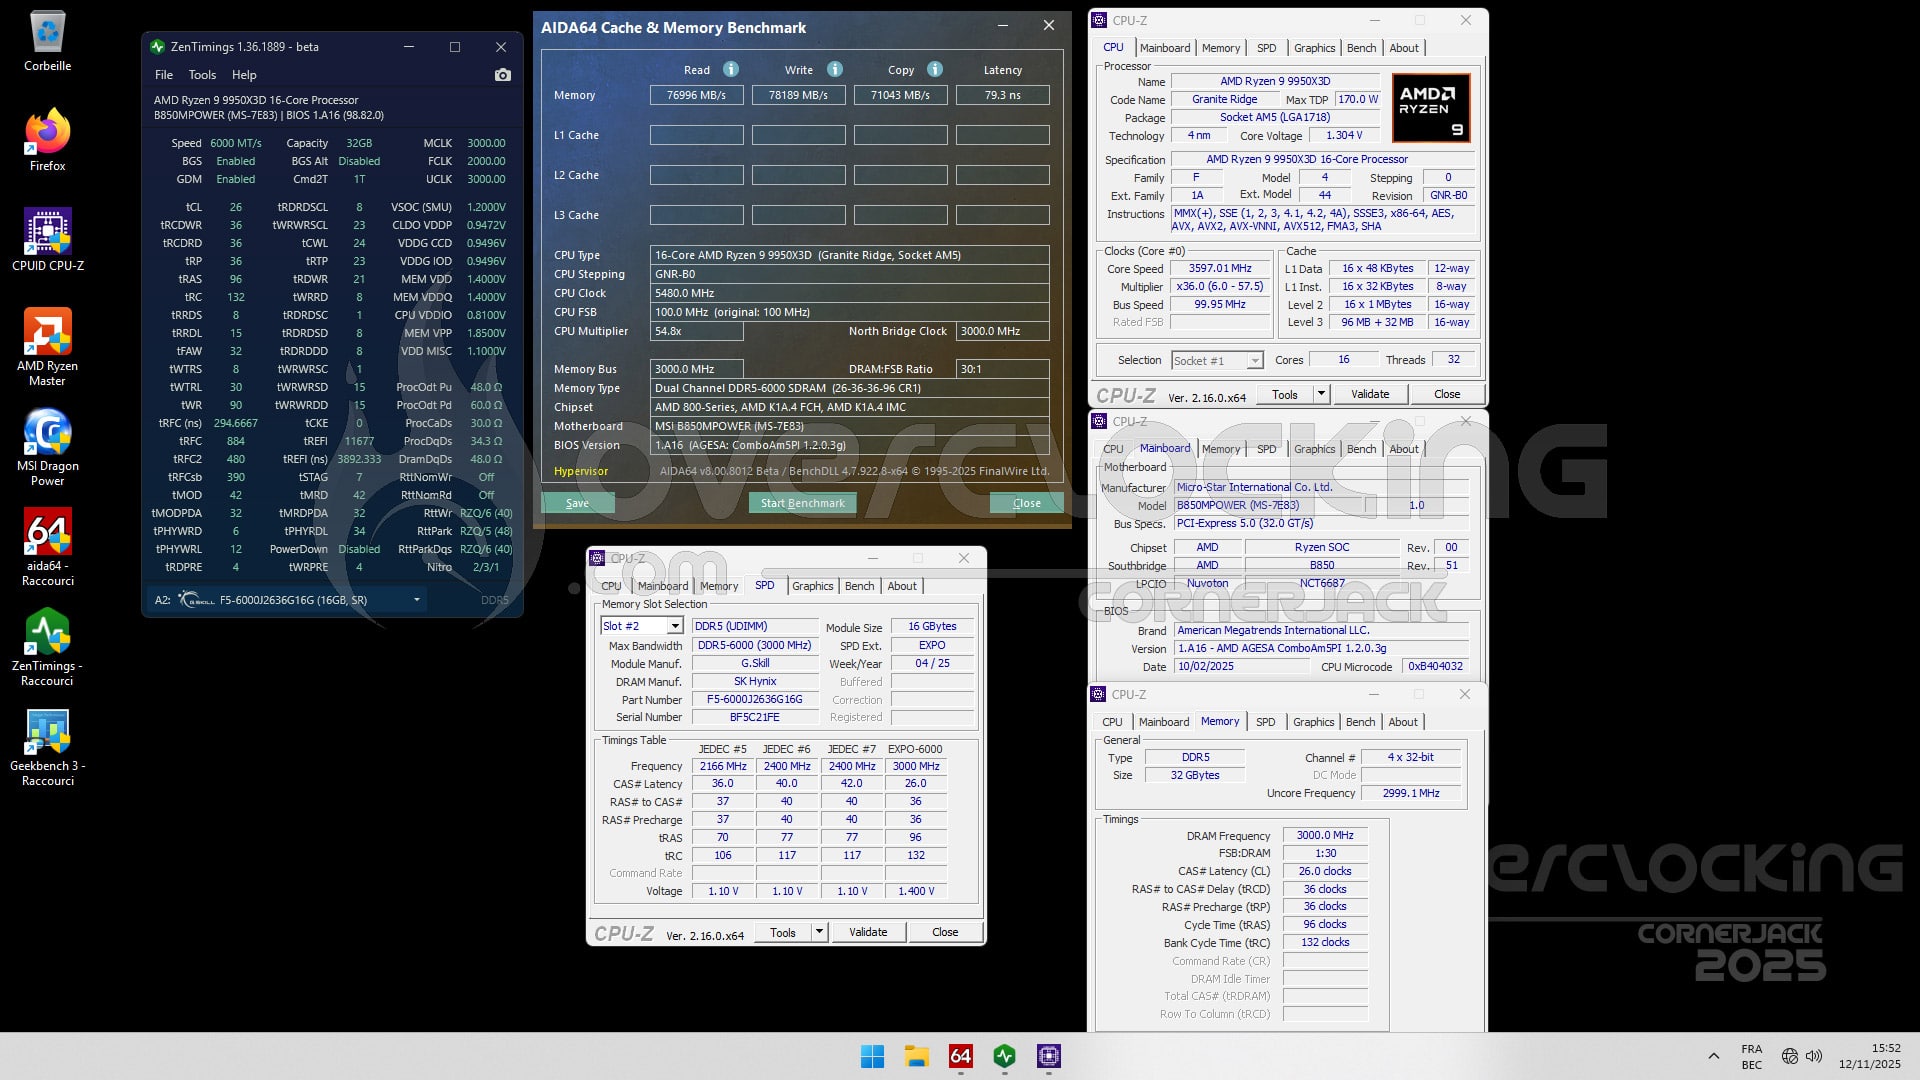
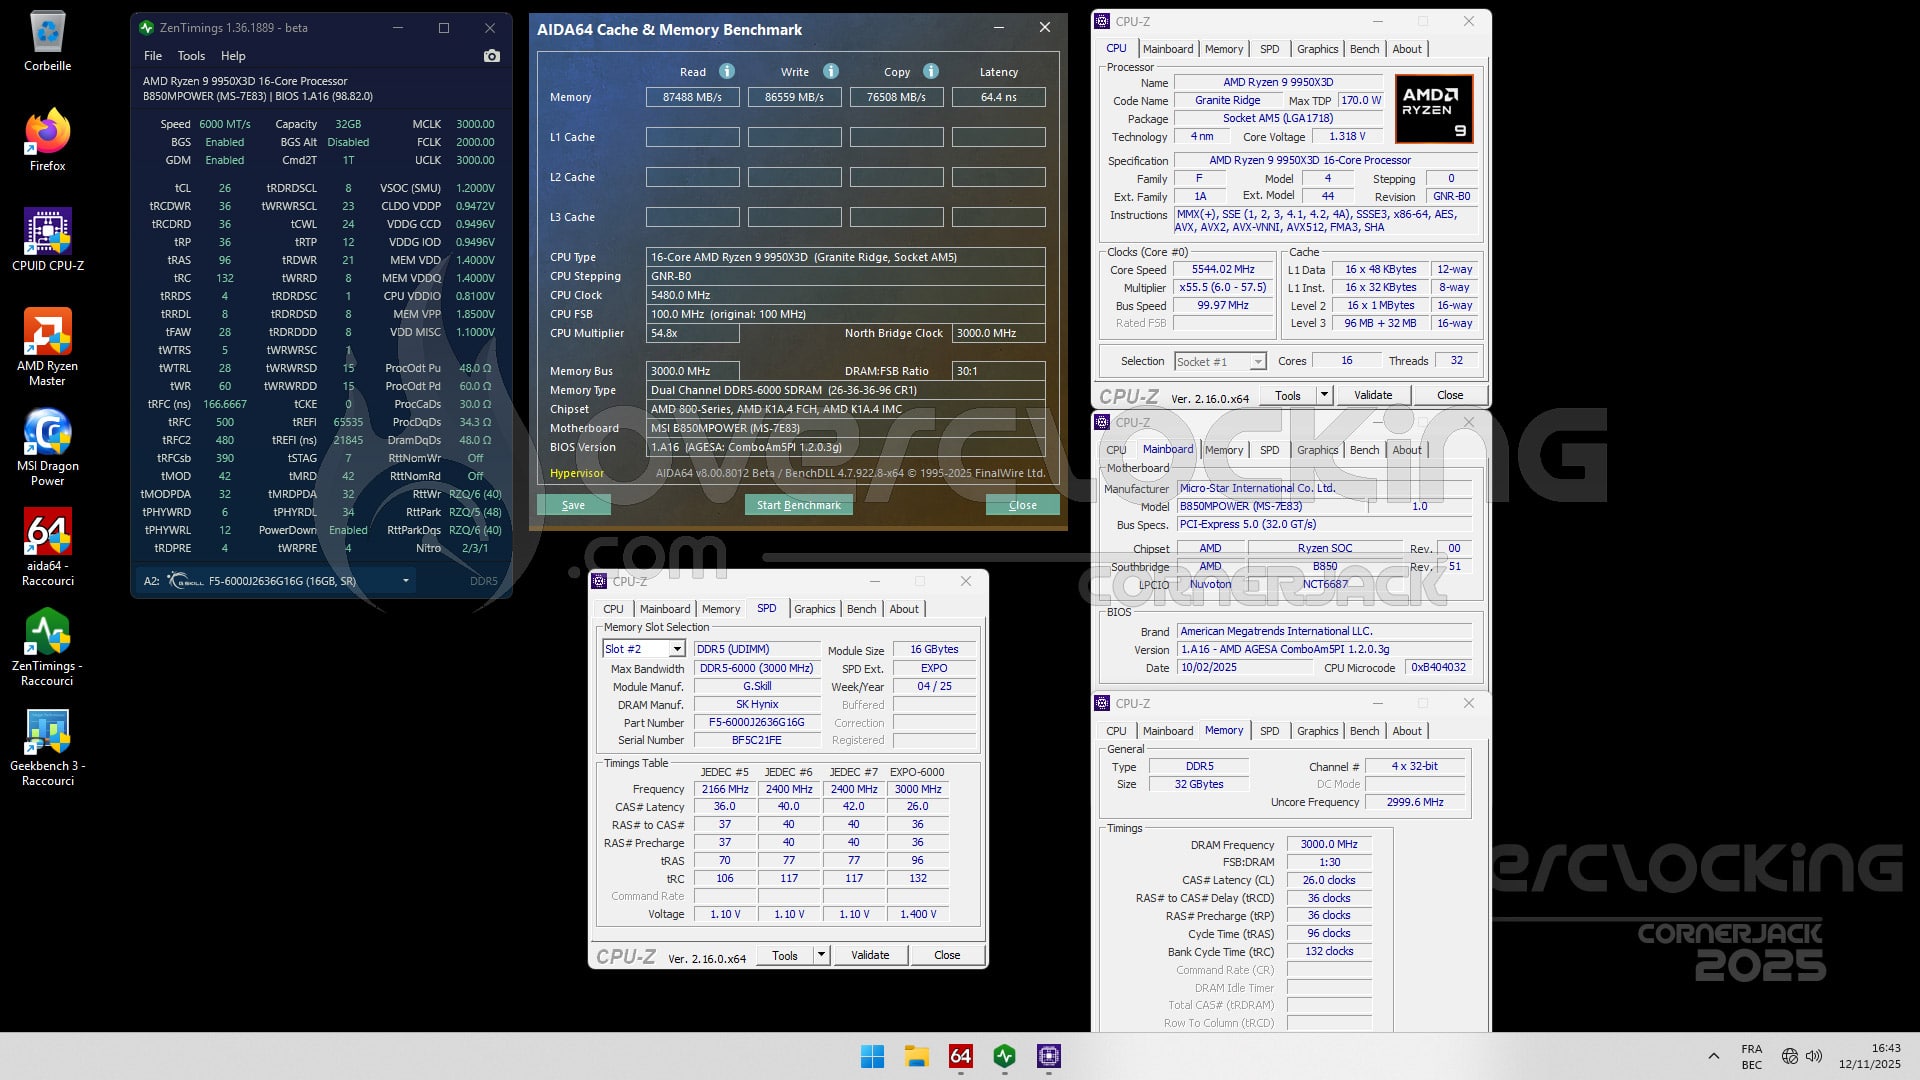
Finally, MSI also offers several profiles via the “Memory Try It!” option, but the only one we tested at 8800 MT/s didn’t pass muster. As for 6000 MT/s, there are two CL28 profiles which could prove interesting for users with kits with higher timings.
Aida 64:
This is a program that can provide you with a wealth of information about your configuration, but above all it has a memory benchmark. This calculates the read, write and copy speeds, as well as the latency, of your memory kit. It is often used to compare memory kits. It’s an excellent tool if you want to compare the performance of your memory kit with those we’ve already tested.
We were able to overclock our memory kit to 8600 MT/s in CL32 and with a 2167 MHz FCLK, as was the case with the ROG Crosshair X870E APEX motherboard. Here’s the performance gain under AIDA64 Memory Benchmark.

As you can see, throughput has improved significantly. We could have further optimized latency via the BIOS option. At present, we’ve managed to reach 8700 MT/s, but without being able to pass benchmarks.
We will now evaluate performance under Geekbench 3. As a reminder, only the memory kit is overclocked, while the processor is still at its original frequencies.
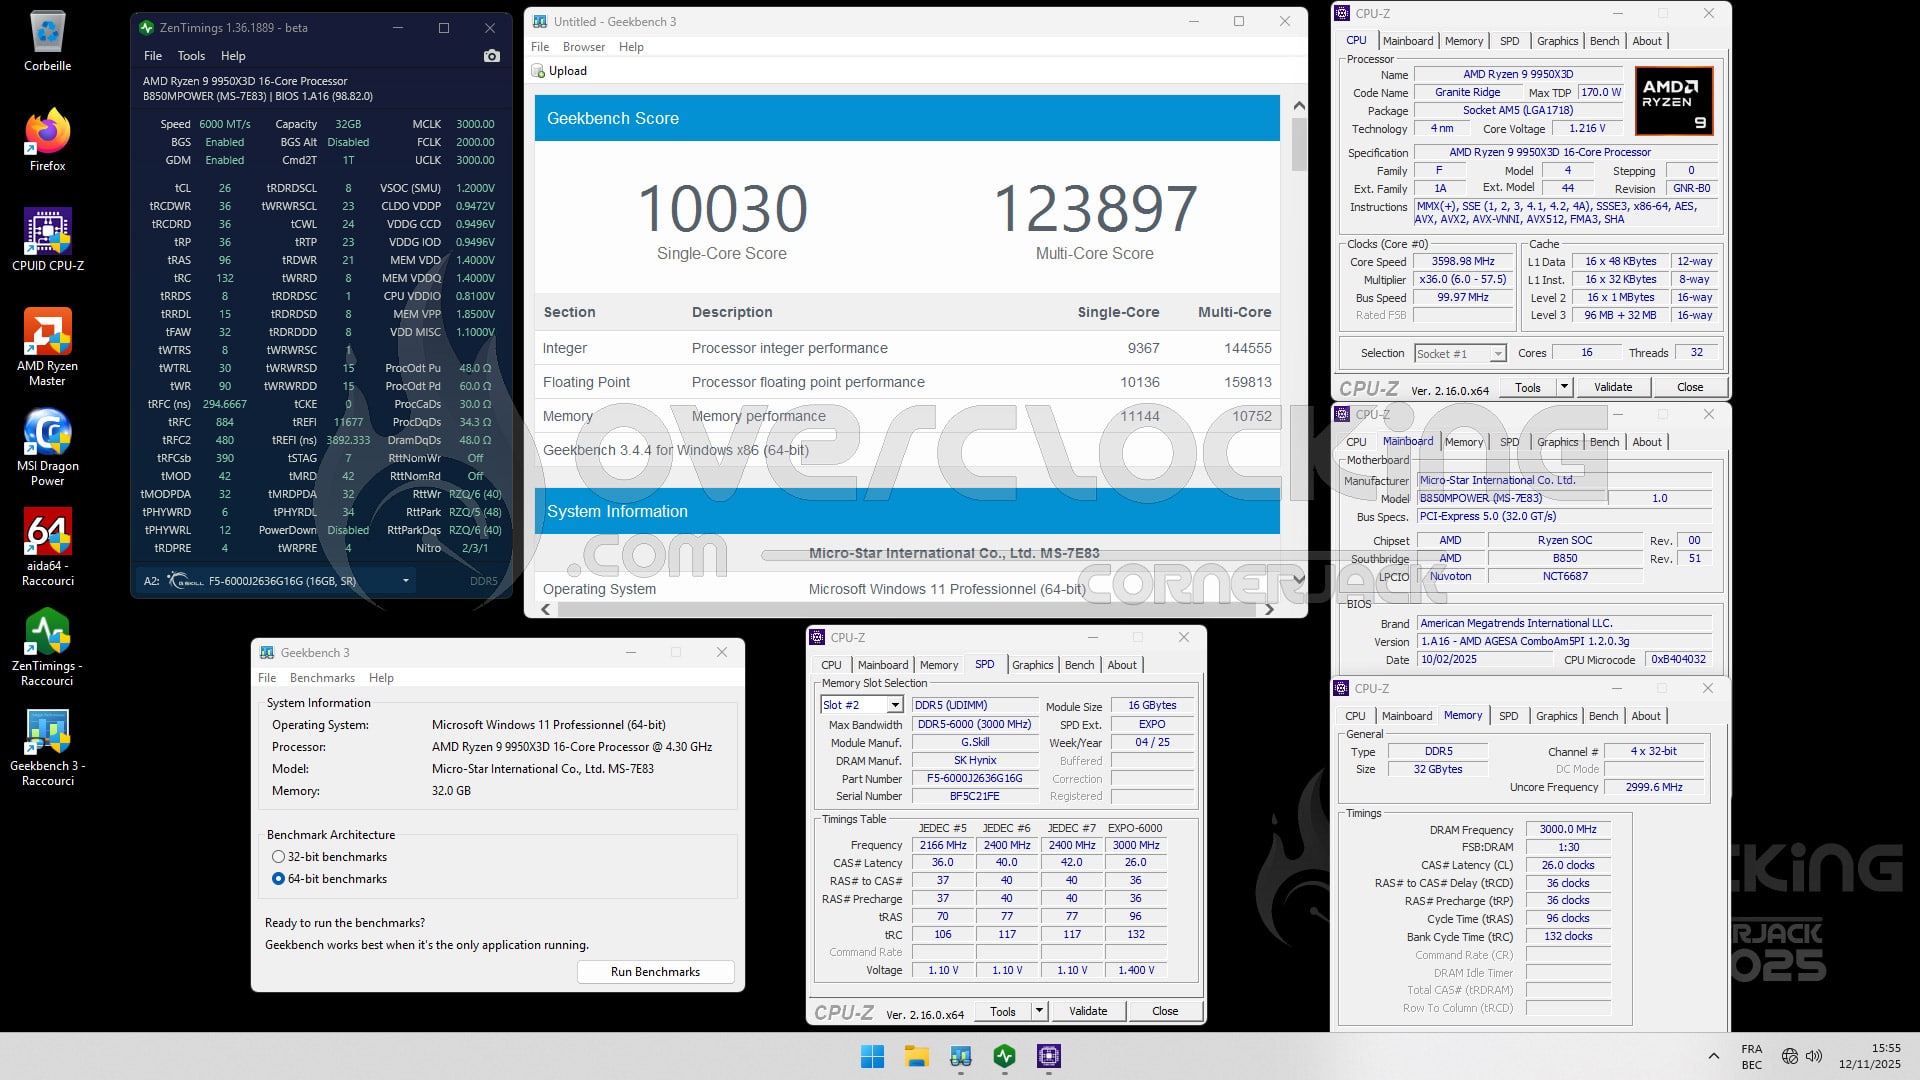
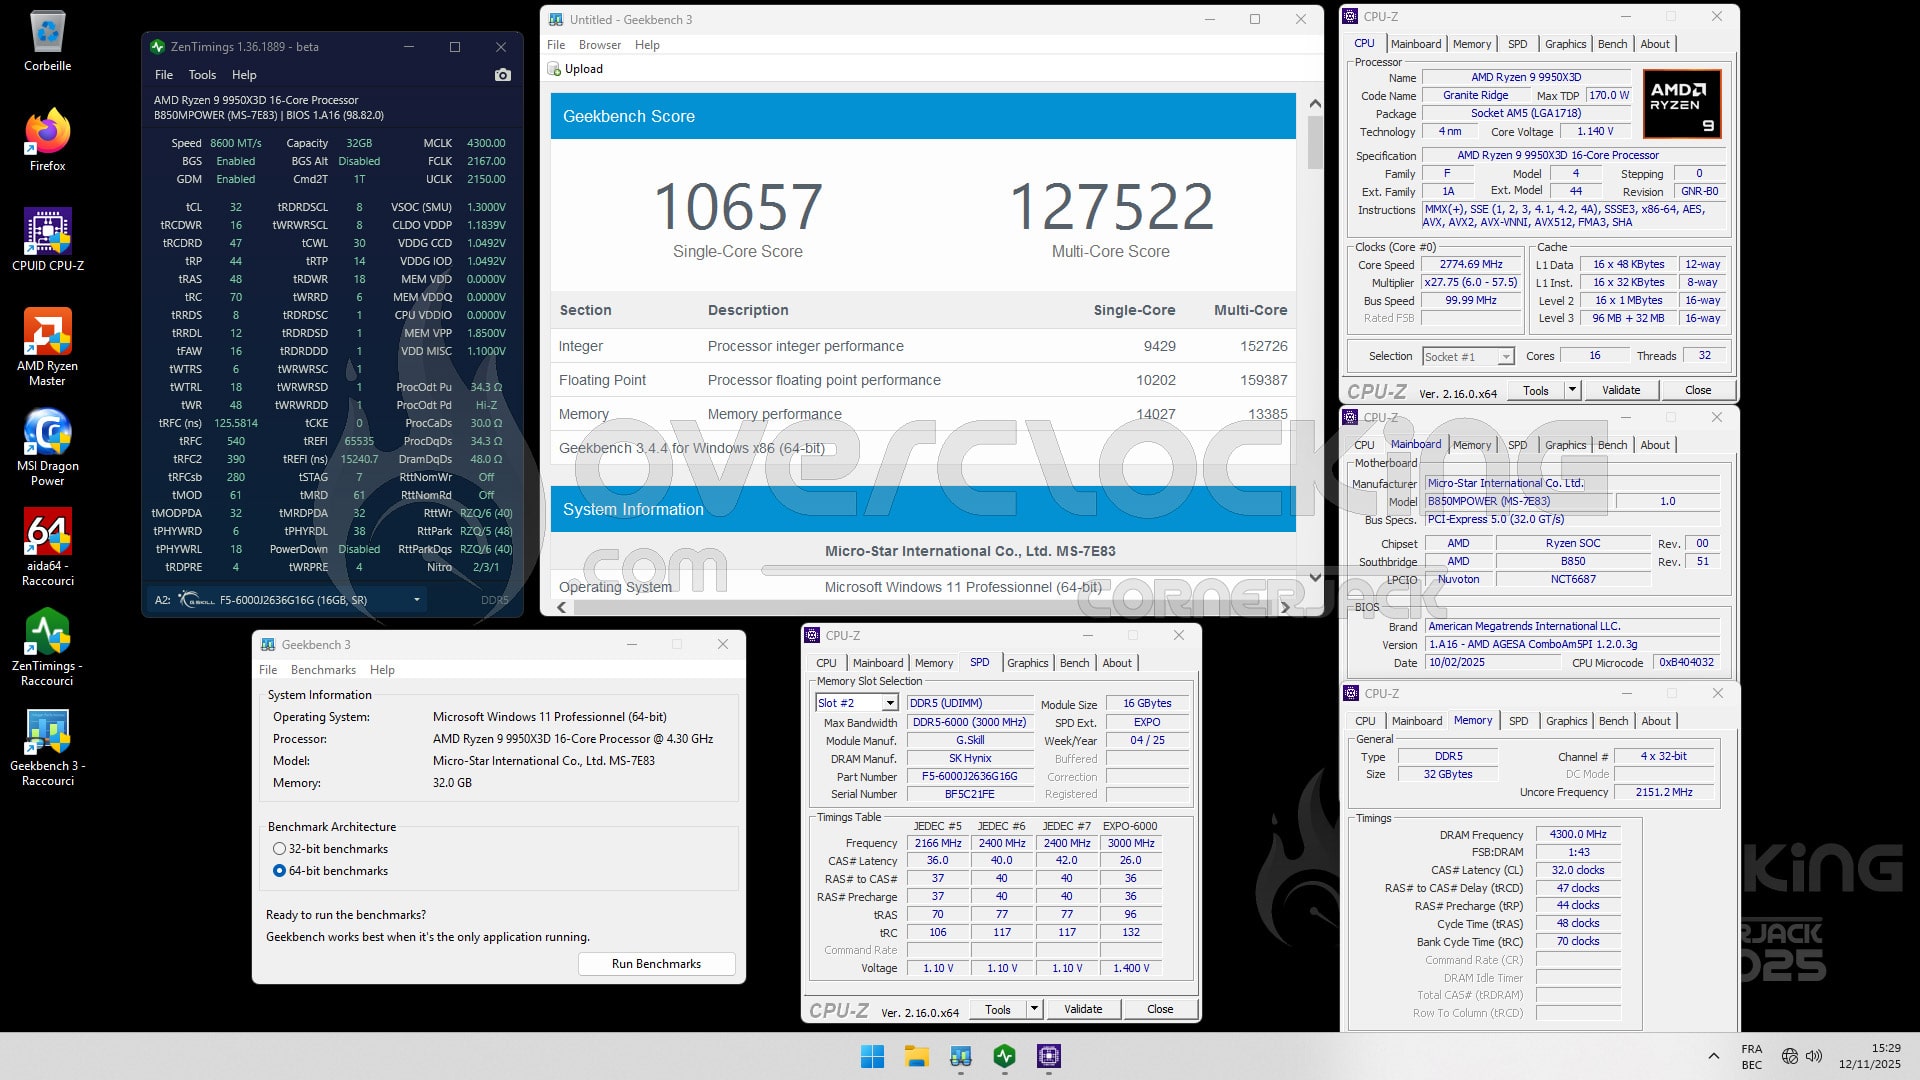
There’s a noticeable gain in both single and multi-score. The memory score has also improved. The idea here is to highlight the qualities of our MSI B850 MPOWER in terms of memory overclocking. This will be particularly useful for those taking part in overclocking competitions on Hwbot, for example. Ordinary users won’t need it.
[nextpage title=”CPU overclocking: “]
Currently, to overclock an AMD processor, you can either do it directly via the BIOS or via the AMD Ryzen Master software. We chose the latter solution for our first tests. As our processor is cooled by an Alphacool Eiszeit 2000 chiller , we’ll be in exactly the same cooling conditions as during our previous tests with this Ryzen 9 9950X3D. What’s more, now that temperatures are starting to drop, we’ll also be able to lower its operating temperature.
Protocol:
Before you start, you need to have one or more reference scores with your processor at the original frequencies. It’s also very important to have a sheet of paper handy, so that you can keep a record of all the tests you’re going to carry out, as well as any results or failures. Personally, I have hundreds of test sheets to which I sometimes return to find out how the processor behaved on a particular motherboard or in a particular test condition. My own little bible.
For H24 overclocking, you’ll of course need to take more time to fine-tune the voltage to the minimum necessary, but you’ll also need to set each core independently if you want to enjoy the best performance.

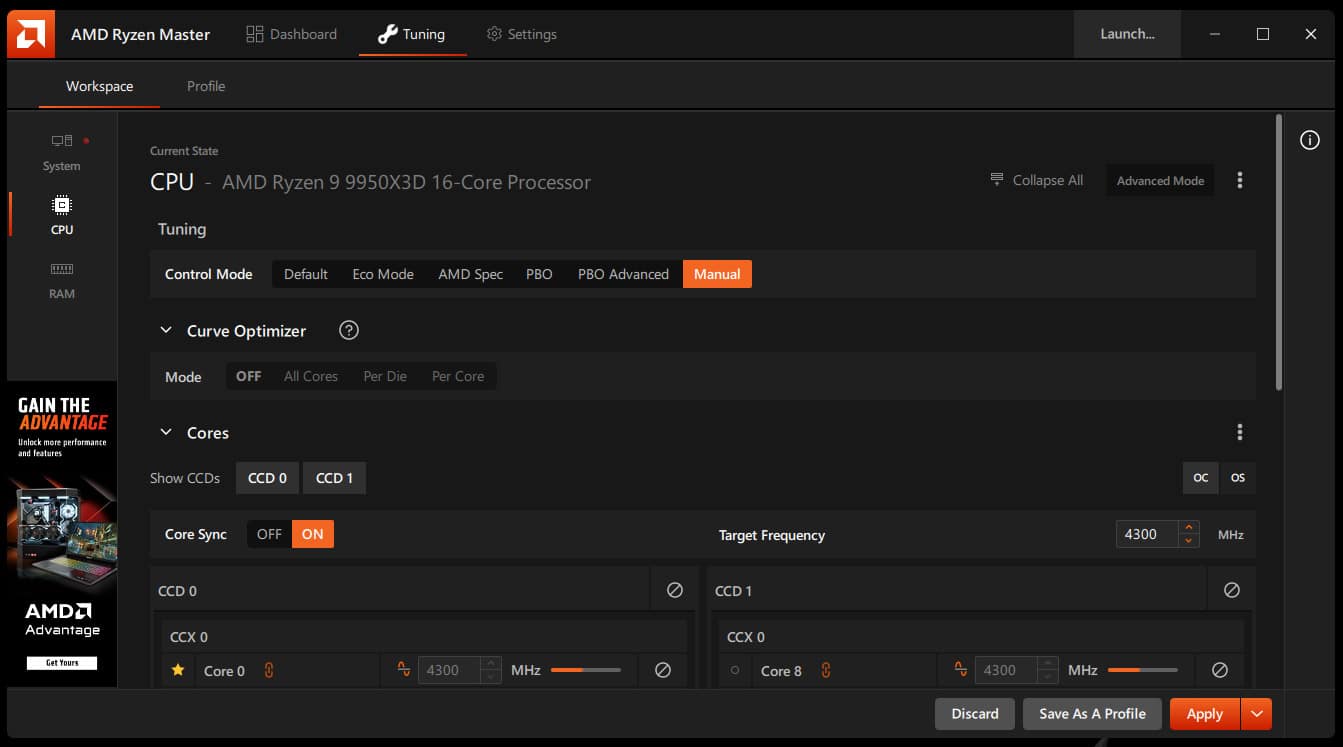
The Ryzen 9 9950X3D features two CCDs. Each CCD has a single CCX with 8 cores. In the case of our 9950X3D, none of the CCX cores are disabled, so that each CCD has 8 cores, for a total of 16. The idea is to see how the CCDs behave when all the cores are activated. We know from our own experience that CCD1 performs better than CCD0 in terms of frequency. It will therefore be possible, via Ryzen Master, to try to push this one higher than the other.
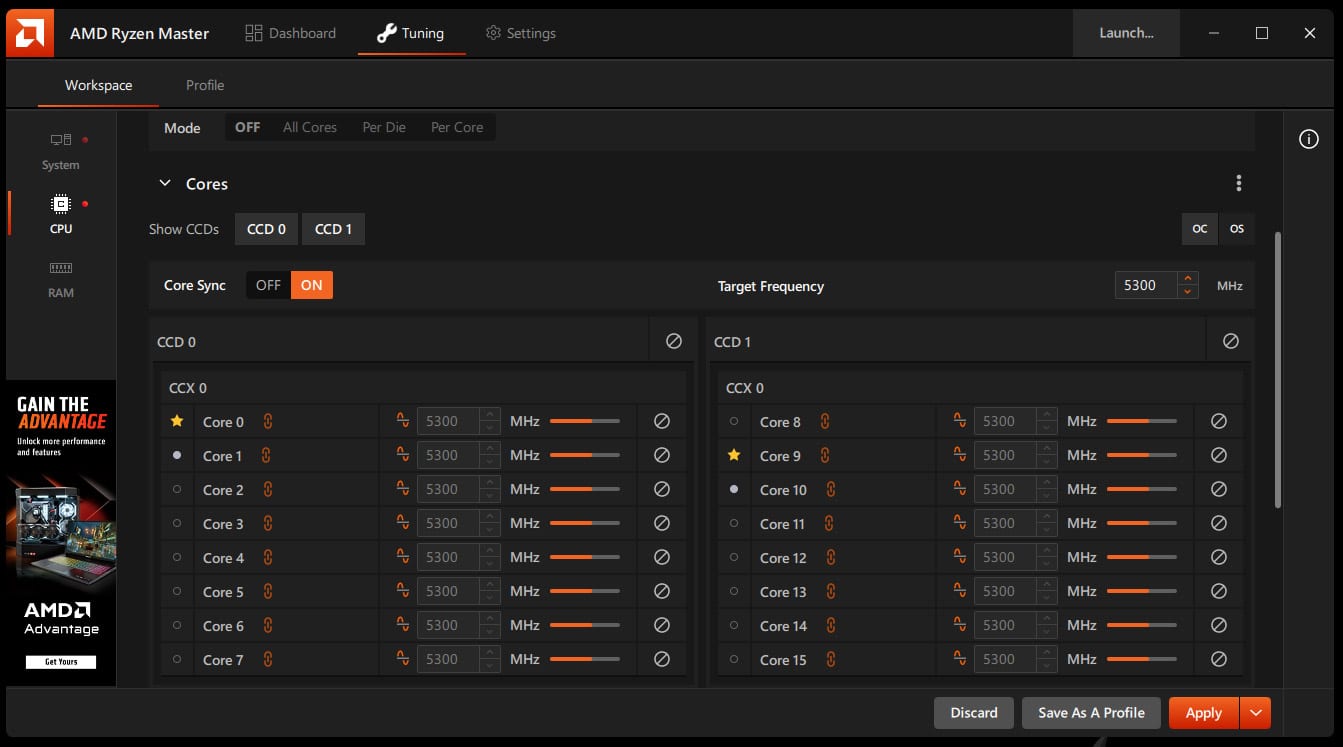

Ryzen Master has undergone a facelift, as well as an overhaul of some parameters within the software, as you can see from our various screenshots, but it’s still as easy to get to grips with as ever.
Overclocking our Ryzen 9 9950X3D :
Of course, we’ve already tested our Ryzen 9 9950X3D to see what it can do. The idea now is to check whether we can achieve the same performance when overclocking this MSI B850 MPOWER.

Please note that, as mentioned above, the two CCDs do not behave in the same way. The CCD0’s 8 cores are pushed to 5450 MHz and the CCD1’s 8 cores to 5600 MHz, giving us a score of 48524 points. Note that our overclocked memory profile remained active during our tests.
[nextpage title=”The last word:”]
What do we think of this MSI B850 MPOWER?
This test took us longer than expected, since the card isn’t (really) available in Europe yet, so we had to seek out the latest BIOS and information via our contacts in Taiwan, whom we’d like to thank as well as MSI France for making this copy available. We’re continuing to test new BIOS, with a new revision received a few hours ago, and very much focused on overclocking.
This motherboard is optimized for memory overclocking and has been designed with this objective in mind. Let’s not forget the collaboration that MSI has set up with a number of Chinese memory kit manufacturers, admittedly, but proof of their desire to revive this series. Let’s hope that its arrival in Europe is now a foregone conclusion, especially as it could land for under 200 euros. Now, is this really the best motherboard for memory overclocking? Personally, it’s one of the models that offered us the best performance, and above all, for a price of $220. The overclocking of our copy of the Ryzen 9 9950X3D, the flagship of the AMD range, went perfectly and the power stage can handle it perfectly.
 Of course, we’d still like more, with the presence of a dual BIOS and more specific profiles for memory chip types. The EZ DashBoard, while not indispensable, is very useful for overclocking sessions , so that the Debug Code LED, Clear CMOS, Reset and power button are all within easy reach! And as we hinted, after the MSI Z790 MPOWER, this MSI B850 MPOWER, MSI has a forthcoming MSI B760 MPOWER in the pipeline! The conclusion is clear: if this card arrives in Europe at a price close to 200 euros, it will be a model we can recommend with our eyes closed! This model, built around the B850 chipset, is a real Editor’s choice (coup de coeur).

