
[nextpage title=”The outdoor CH560 Digital”]
DeepCool also offers PC cases, including the CH560 Digital. This is a mid-tower and mid-range reference with a digital display. Clearly, this is an airflow-oriented reference, but is it a good one? Let’s put it to the test!

CH560 Digital exterior:
Here, we find a classic mid-tower enclosure. Its dimensions don’t suggest any particular interior layout. In fact, its dimensions are quite classic, measuring 230 mm wide, 458 mm deep and 471 mm high. At 7.5 kg, it weighs about average.
As you can see, the design is clearly sober. This model features a large mesh panel with numerous square openings on its front face. This design is reminiscent of what NZXT has to offer, notably with its H7 Flow, whose design is in the same spirit.
On the side, however, we can see a side panel in glass mixed with mesh over the first third of its height.
The control panel:
 The connectivity part of the case is located on the top. Unfortunately, this part remains rather basic, featuring :
- A power button
- USB-C port
- An audio jack
- USB-A 3.0 port
- A button for aRGB fan LED management
In itself, the panel remains functional, although a second USB-A would have been welcome. As it is, you won’t be able to plug in more than two USB flash drives simultaneously, which isn’t practical for sending a file to a friend, for example.
The underside :
 The underside of the case is classic, with four feet. These are foam-covered, allowing the case to slide easily. This simplifies assembly: there’s no need to lift the case if you want to access the front and then the rear.
On the other hand, there’s a red card for the power supply filter, which takes the form of a mesh inserted into the casing. A rigid model held in place by a sliding system would have been more appreciable.
Rear:
 At the rear, the layout could not be more classic. We can guess that the motherboard will be placed at the very top, as suggested by its I/O shield slot. Next to it is the 120/140 mm fan slot. Moving down a notch, we find seven openwork expansion slots juxtaposed with a ventilation grid. Finally, at the very bottom is the power supply slot.
Top :
 The top of the case also remains fairly classic, with a long grille covered by a magnetic filter. On the front, however, you can see the DeepCool brand logo.
[nextpage title=”Inside the CH560 Flow”]
Inside the DeepCool CH560 Digital :
The classic way to get inside is to remove the side panels. While the solid panel is held in place by two screws, the glass pane benefits from a magnet system that can be secured with a screw.
The frame :


Once inside, we immediately face the motherboard tray. This is relatively spacious, and will accommodate E-ATX, ATX, micro-ATX and even mini-ITX motherboards.
As you can see, the tray is surrounded by a number of cable entries. The two on the side are rubberized in that they feature rubber covers. This hides the cables just behind them as well as possible. Otherwise, at the top, two bulkhead passes are present, ditto at the bottom at the level of the power supply cover.
Storage slots:


In this CH560 Digital, there are two types of storage unit support. On the one hand, under the power supply cover, we have an HDD cage for mounting two units. This could be used to mount two 3.5″ units or a 3.5″ hard disk coupled with a 2.5″ SSD, for example. Alternatively, there are two 2.5″ slots on the rear of the motherboard tray.
Power supply slot:

For the power supply, we have a basic slot at the bottom of the case. The latter features four foam studs to attenuate stray vibrations, and you don’t need to ask for much more than that. However, that’s four more foam studs than in the NZXT H6 Flow you might say.
Cooling options :
As far as cooling is concerned, the CH560 Digital comes with full ventilation by default. On the other hand, four 140 mm fans are supplied. On paper, they should ensure a powerful flow of air. As for their layout, it’s simple: three of them are front-mounted, while the last one is rear-mounted for extraction. Otherwise, in terms of slots, we have :
- Front: 3x 120/140 mm
- Top: 3x 120/140 mm
- Bottom: 2x 120 mm
- Rear: 1x 120/140 mm
The case therefore offers support for a total of nine fans. What’s even more interesting is the total support for 140 mm windmills.
As for watercooling, this CH560 Digital is compatible with 360 mm radiators at both front and top. Unfortunately, it will not be compatible with 420 mm models, despite the three 140 mm fans supported in the top and front.
If you opt for an air cooler, you’ll need to bear in mind that this model is will mount a heatsink 175 mm high.
The bundle:

As far as the accessories supplied are concerned, we find the following in a resealable plastic bag:
- Assembly instructions
- An aRGB cable for synchronization with the motherboard
- A bag containing all the case screws and bolts
- Three Velcro straps
- Nylon cable ties
Once again, we don’t have an extremely well-stocked accessory section, but the velcro straps are always nice to have. As for the nylon collars, they seem to be supplied in sufficient numbers for assembly. As for screws and bolts, you’ll have to sort through them to find those used for the motherboard, etc.
Small details:


Among the small details/functions offered by this case, the first is the presence of a graphics card support. This is screwed directly onto the motherboard tray, and will prevent your graphics card from tilting. Depending on the card model, GPU sagging can have serious consequences.
There are also a number of Velcro strips to make it easier to attach cables during wiring. This is always handy, especially as the velcro strips are reusable.
Finally, the power supply cover features a digital display. It shows the temperature of your processor and graphics card. The utilization rate is symbolized by a green bar.
To sum up:

With this case, DeepCool offers us a rather well-equipped reference on paper. From the outset, it offers full ventilation and a number of interesting features. These include the graphics card support that comes as standard. For cabling, a trunking system and Velcro strips are also included, while the digital display completes the package.
[nextpage title=”Assembly”]
Assembly
We’re now ready to assemble our configuration inside this pc case from DeepCool Here are the components we’ll be using for assembly:
- Motherboard: NZXT N7 Z790
- CPU: Intel Core i5 14600KF
- Graphics card: ASUS ROG Strix RTX 3050
- Cooler: Noctua NH-U12A chromax.black
- Power supply: NZXT C1000 Gold
Power supply:

We’re now ready to mount our power supply unit, which is simply positioned in its slot on the side of the power supply cover. The latter is secured by four screws from the rear of the case.
Once in place, despite the presence of the HDD cage, there’s still plenty of space to plug in cables afterwards. Nevertheless, if the operation is feasible, it’s not the most spacious thing either. The best thing to do is to connect the cables before installing the power supply in the case.
Installing the motherboard :
 Mounting our motherboard didn’t pose any particular problems, although we did have to readjust the position of the graphics card support, as the swivel rod can get in the way. Otherwise, with the space available, it’s a walk in the park.
Cabling :
The control panel:
Once again, we begin the cabling section by managing the control panel connectors. While the HD_AUDIO, F_PANEL and USB 2.0 (for the screen) connectors pass through the openings in the power supply cover, this is not the case for the others. In fact, the USB-C and USB 3.0 headers go up the trunking, make a loop and are secured with Velcro strips.
Motherboard, graphics card :
As for the EPS12V CPU connector, the cable follows its usual path, i.e. back to the rear of the case and up through the top opening left in the motherboard tray.
As for the 24-pinATX and 8-pin PCIe for the graphics card, these cables run along the motherboard tray, exiting through the rubberized opening at the top. For our part, we used Velcro strips to secure them in place.
Installing the cooler and graphics card:
 Unlike NZXT’s H6 Flow, the power supply will not obstruct the rear of the motherboard, so you can mount/change the heatsink without having to remove the power supply or the motherboard.
The first thing to do is to unscrew the graphics card support slightly, lowering it as much as possible so that it doesn’t interfere with mounting. Next, locate the PCIe brackets where the graphics card will be inserted and remove them. Finally, all that remains is to plug the graphics card into its PCIe slot and screw it to the case. Once done, reposition the GPU bracket and screw it to the back of the case to ensure it stays in place.
Overall :
 Overall, we had no particular problems assembling the configuration inside this CH560 Digital. The space available inside allowed for unhindered assembly, and the same applies to cabling. If you’re a beginner, this is a highly recommendable box!
[nextpage title=”Protocol”]
We’ve updated our test protocol to test the qualities of our PC case. We’ll be evaluating the performance of the different models according to three criteria:
- Insulation
- Original ventilation noise
- Air flow
Here, the configuration changes; you’ll find the details below. As for software, the CPU will run on PowerMax while the graphics card will run on Furmark, both simultaneously. Note that CPU ventilation is forced to 100%, while graphics card ventilation is set to 50%.
In addition, to limit temperature variations due to varying frequency/consumption, we clip the graphics card curve at 1860 MHz, the original boost frequency of the ASUS RTX 3050 Strix.
A warm-up period of 8 to 9 minutes is applied before two 2-minute averaging sessions. The tests are run one after the other, uninterrupted, so as to observe variations in component temperature as a function of case fan speeds. A delta is then applied: component temperature minus ambient temperature.

To add ventilation, we chose to integrate two Riing 14 red fans from Thermaltake. Both taking place in the top of the case in extraction.
Configuration :
- Motherboard: NZXT N7 Z790
- CPU: Intel Core i5 14600KF
- Graphics card: ASUS ROG Strix RTX 3050
- Cooler: Noctua NH-U12A chromax.black
- Power supply: NZXT C1000 Gold
[nextpage title=”Tests”]
Tests
Airflow :
Additional ventilation takes the form of a Fractal Silent Series R2 fan positioned at the rear in extraction and a Riing 14 also positioned in extraction at the top.
CPU airflow, original ventilation then supplemented :
Let’s start with the CPU temperature. We’ll keep the front and top of our test case. Let’s see if the airflow is sufficient to influence the cooling of the Core i5 14600KF.
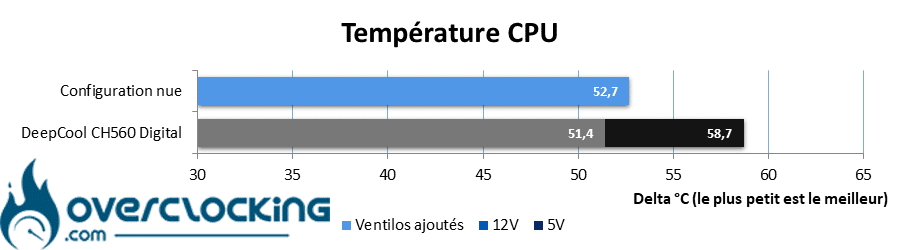
As far as processor temperature is concerned, there’s not much to say, since we obtain a delta of 58.7°C with the case ventilated at low speed. This will tend to decrease as the fan speed increases, dropping to 51.4°C. These results were obtained in a room with an ambient temperature of between 17.6°C and 18.6°C.
Finally, the addition of fans did not reduce the processor temperature, which remained stable. The addition of an extractor fan at the top will therefore have no effect on the temperature of this component.
Original CPU airflow without front panel or top :
In order to ascertain the limiting factor in the story (and by how much), we remove the top covers while mounting the mesh front panel. The aim here is to show the raw performance of the integrated ventilation.
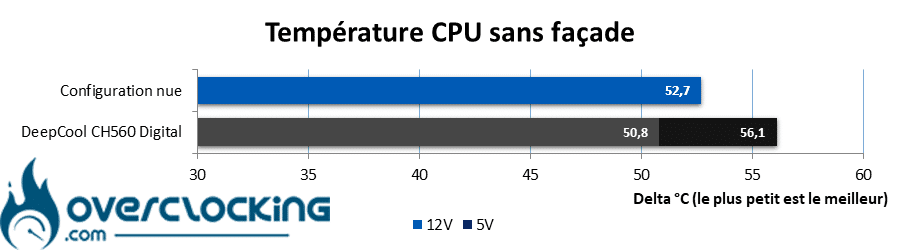
By default, we can say that ventilation is only slightly restricted by the front panel and the top filter. As can be seen, the temperature of our processor decreases, but not drastically. The delta loses 0.6°C with 100% ventilation and 2.6°C with 33% PWM ventilation.
GPU airflow, original ventilation then supplemented :
We repeat the operation, but with measurements taken on the graphics card. Here, we’re testing with original ventilation and supplemented ventilation.

The temperature of our graphics card, an RTX 3050 Strix, is quite good. As you can see, it has a Delta of 34.7°C when the case fan is running at 100%. This tends to increase when the case fan is set to 33% PWM signal. It then registers 40.5°C. The addition of the two fans at the top of the case improves extraction, and the temperature drops to 33.5°C.
Here, no change in ambient temperature was recorded: from 17.6°C to 18.6°C.
Original GPU ventilation airflow without front panel or top:
We repeat the same test, but remove the front and top panels. Let’s see how this affects card temperatures.

In the end, removing the front panel generates very little temperature variation on our graphics card. As can be seen, the card loses 1.5°C at 100% case fan speed, and 1.2°C at 33% PWM. Clearly, the front panel openings are large enough to let the ventilation fully express itself.
Insulation :
Here, we’re simply measuring the noise emitted by our setup when running CPU cooling and GPU cooling very fast.

Mesh isn’t the most insulating material in the world. However, it’s still sufficient to attenuate the noise emitted by our configuration. Compared with the same configuration running under the same conditions on a benchtop, we lose 1.5 dB.
Original fan noise :
This time, we measure the noise emitted by the case’s original fan. To do this, the configuration is run in idle mode ( CPU and GPU ventilation at minimum), while readings are taken successively at 33%, 66% and 100% PWM signal on the case ventilation.

As far as noise levels are concerned, the CH560 Digital is a very good performer: as can be seen, when the fan is running at full speed, it manages just 36.5 dB. As soon as you reduce the speed of its four 140 mm fans, you’re back down to 30 dB, the detection threshold of our sound meter. Suffice to say, you won’t be particularly bothered by this box.
To sum up:
In broad terms, this is a box that will offer an airflow that won’t be restricted by its front panel. As for efficiency, that’s a relative question, and we’ll have to test a few other housings to get an idea of what it’s worth in comparison. On the other hand, we can say that the noise generated by its ventilation remains under control, while its insulation is correct. Here again, we’ll need to test other cases to have a more solid basis for comparison.
[nextpage title=”Conclusion”]
We’ve now come to the end of our test of DeepCool’s CH560 Digital. So, is it a good camera or not? We tell you all about it!
A touch of NZXT?
With this new model, we find a sober case with a perforated front panel. If the look isn’t exuberant, the design is also reminiscent of other well-known models, such as NZXT… However, once you get inside, you’ll find a number of interesting features. These include support for the graphics card, and a digital display showing CPU/GPU temperature and utilization rate.
The finish is also top-notch, with easy-to-open panels, one of which features a magnet system. Last but not least, the four 140 mm fans fitted as standard ensure complete ventilation.
Installation as easy as pie!
Assembling our configuration posed no problems whatsoever, with all components offering ample clearance. The bonus point goes to the graphics card support, which is becoming increasingly essential given the latest graphics cards… It will prevent many a PCB cracking problem (here and there).
As for cabling, there’s no problem either, as there are a number of openings on the motherboard tray. These allow cables to be routed where you want them, especially as rubberized covers are present on some of them. Otherwise, Velcro strips are present to simplify cable clamping and, in the worst-case scenario, nylon cable ties are supplied.
Noise levels under control and temperatures expected to be good:
We won’t dwell too long on the temperatures obtained in this model, since we don’t have enough distance from the competition… However, they behave normally. It’s worth noting that the addition of fans at the top of the extractor will have no effect on the processor, while small gains are felt on the graphics card.
What’s interesting here, however, is the noise generated by this case, which is well under control. The three 140 mm fans make very little noise and become inaudible as soon as they are set to 66% PWM signal.
A case with an interesting quality/price ratio:
As a reminder, the CH560 Digital is a box currently available at around €125/130. Alternatively, there’s always the model without its screen, which will be available for a few euros less. In our opinion, the bill isn’t particularly onerous in the sense that it comes with everything you need to assemble a good configuration, especially as the ventilation is complete from the outset. In short, there’s no need to pay for additional fans, for example!
DeepCool CH560 Digital:
We liked:
- Convincing design
- High-quality finish
- Magnet system for opening the side window
- Velcro strips for easy cable management
- Full ventilation as standard: 4x 140 mm fans!
- GPU support included as standard
- Quiet ventilation
- Air flow not restricted by the front panel
- Consistent price
We didn’t like :
- The digital display, perhaps a bit of a gimmick after all?
 In the end, the Platinum award stands on its own merits, as we have a case with no real flaws. The technical side is well executed, offering plenty of space, full ventilation as standard and unrestricted airflow. The functional side is interesting, notably in terms of GPU support and cabling, which is largely based on Velcro strips. The only difference is the digital display, which we found a little accessory, although a version without it is available for a small saving.
Many thanks to DeepCool !

