


Now it’s my turn to present my optimizations for this PC from the first round of the Tweak League. For those of you who don’t yet know what the Tweak League is, or who need a refresher, this is the place.
Who I am and what I’m aiming for :
Before I start, I’d like to tell you “who I am” so that you can understand my uses. First and foremost, I’m a gamer who’s just passed the age of 18. I started getting interested in hardware when I wanted to equip myself and had to count my pennies to spend them in the best possible way. That’s when I discovered overclocking.com. Although I don’t frequent them in the real world, I must say that I have spent and continue to spend hours with CornerJack, Vertex and Nhu9b tests. Clearly, they taught me everything I know!
My focus: in-game results only
But in this part of the competition, I wanted to focus solely on in-game performance. I can honestly say that I’m not interested in breaking frequency records or anything else if it doesn’t help me in my everyday life 🙂
My little plus: optimize your budget too, to perform better
Of course, we’ve all been looking for ways to improve this machine, drawing on the knowledge and experience of the community. But it’s also important to remember that optimization can also be done from your wallet! And here I’ve got a couple of tips to help you out 😉
The configuration for this first round of the competition is as follows:
- Processor -> Intel 14600KF
- Graphics card -> Asus RTX 4060 DUAL OC
- Motherboard -> Asus TUF B760-PLUS WIFI
- Case -> Deepcool CH560
- Cooling -> Deepcool AK620 DIGITAL
- Storage -> Corsair MP600 1TB
- Memory -> Corsair Vengeance RGB (2x16GB) at 6000MHz
- Power supply (in my case) -> Gigabyte GP-P750GM 80
To find me on social networks and ask me questions :
and of course on the overclocking.com discord
[nextpage title=”My opinion on the components for this PC”]My opinion on the components for this PC
This configuration is, on paper, an excellent gaming PC! And you’ll see that, with a few “trivial” optimizations, you’ll be able to exploit the potential of each component even further and get the most out of your gaming sessions. In my case, this configuration has given me a great deal of satisfaction. Even if my personal equipment is more high-end, I’ve been able to discover other brands.
Before going into detail about the various tweaks I’ve made, I’d like to give a few recommendations to those who want to take inspiration from this configuration to build their next PC.
This configuration isn’t positioned on the entry-level market, but with a price tag of around €1,500, it’s important to understand that analyzing every euro you spend can radically change your results. So, if you want to cut your bill or gain fps “intelligently”, I’ve got a few tips for you!
1- Use your processor to increase your graphics card budget
Firstly, you can lower the price of your PC by choosing a slightly less powerful processor. You could consider the i5-14400F, but this processor is less powerful and more versatile. In my opinion, the right calculation lies elsewhere. Go for the Intel i5-14500!
It does the job perfectly! It’s practically the twin of the i5-14600KF, but with a lower boost frequency (5.0GHz vs. 5.3GHz). Clearly, even at 1080P, gaming performance will be equivalent to that of our base configuration. This would save us around fifty euros, which we could potentially reinvest in a graphics card.
The 14400F option may be considered if you want to lower your budget. However, 4 E-cores will be lost and much lower frequencies (4.7GHz). In my opinion, this is not the best option for gaming and daily use. Moreover, after some research, its performance is clearly far from that of the processor used in my configuration.
What’s more, the choice of one of these two processes is justified by the chipset used in our configuration: the B760. As a reminder, this chipset doesn’t give you a completely free hand when it comes to overclocking a processor. And for a 14600KF, that’s a real shame, even if it does offer higher frequencies, justifying the choice.
So what can we do with the €50-60 we’ve saved?
The RTX 4060 Asus Dual OC surprised me with better-than-expected performance. Just goes to show that extreme or gaming looks are not synonymous with better performance. So, to take things to the next level, let’s stick with an Asus RTX DUAL but reinvest our €50-60 on a higher-end graphics card like the Asus RTX 4060 TI DUAL (you’ll have to find an 8GB version). With the arrival of the new 12GB versions, the “old” 4060Ti are the subject of regular promotions. Perhaps an extra 20-30€ might be in order. At the moment that’s not necessarily the case, if you look hard enough. But there are ways of not having to shell out any money.
2 – Stay with Asus for the B760, but look for other references
I’m sticking with my idea of getting more for the same price. The TUF Gaming B760-Plus Wifi card offered by Asus for this round 1 is magnificent…But have you taken a look at the Asus PRIME B760-Plus? It’s magnificent too, and apart from the loss of the built-in wifi, it’s still a great way to save a few euros without lowering our PC’s performance. Be careful, though, to stick with a DDR5 platform to keep your composites longer. Another €40-€45 saved!
NB: as I said at the start, I’m first and foremost a gamer. Gamers and wifi, logically, don’t mix. A good ping is cable only!
3- Choosing a power supply: be smart but not stingy
A good power supply is the key to your PC’s stability.
It’s the component you really need to pay attention to. Don’t cut corners, but don’t go overboard on watts either. I regularly use Bequiet’s PSU Calculator, an online table that gives you an idea. After my discussions on the Discord, it’s certainly a bit heavy-handed, but it helps us to avoid underestimating our choice. As for me, I was a bit heavy-handed, anticipating a switch to a 4060Ti, and a “serious” overclocking of the GPU and CPU ( 14600K )…. The value I’m given is 601W… Once again, as a precautionary principle when it comes to power supplies, I’m leaning towards a 700W. You see, it’s in power supplies that we get the most price surprises. The prices are therefore more aggressive and the choice more complete by moving up to…750W!
Internet magic: only 15€ separate the cheapest power supply from a fully modular 80 Gold version! In any case, and depending on availability, the choices I report here are all excellent. For my part, I’ve opted for the Gigabyte GP-P750GM 80 Gold and 100% modular for a clean assembly! In our PC Tweak League, the power supply budget was €100. So either way, you’ll be a winner.
And the rest?
I found the rest of the components particularly nice. Nothing to say about the RAM and SSD duo from Corsair. The Ram kit brings a lot to the table, and that’s something not to be overlooked. While everyone immediately thinks of overclocking their graphics card, it’s by optimizing the RAM that you also gain FPS. Choosing the right ram kit is therefore essential, and this one is excellent.
Special mention to DeepCool, a brand I really discovered with the Tweak League. The case is really well designed and the details are meticulous. As for the cooler, it’s just superb and far more efficient than some of the watercooling kits you see everywhere. I think that unless you don’t like the brand’s design (which I find consensual), it’s hard to find an equivalent in terms of price with the same performance and quality. But clearly, these are very personal comments and my tastes may not be yours.
[nextpage title=”Assembly and installation”]PC assembly and installation
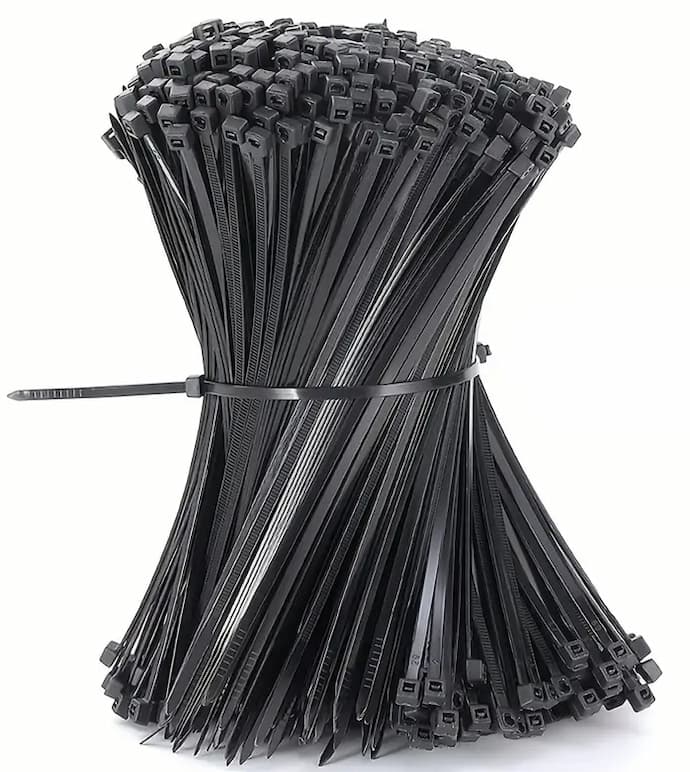
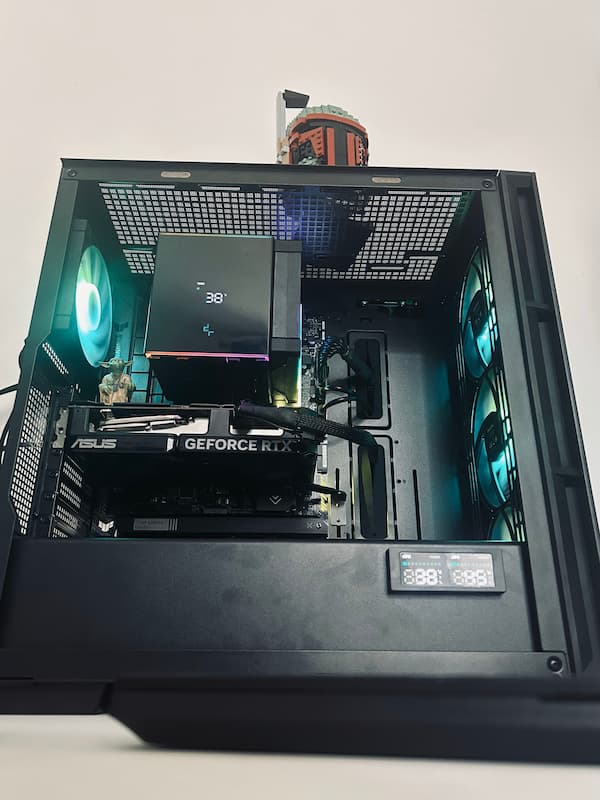
Mounting the PC may seem a simple operation for some, or a tedious one for others. As far as I’m concerned, it’s the very first step required to get a PC up and running. Why is this? Even if this Tweak League PC is well-equipped, without clean assembly and careful layout, you’re already at a disadvantage. Managing the connectors and cable layout will facilitate the flow of air through your machine. This is the basis not only for an optimized machine, but also for a clean, attractive assembly that doesn’t quickly start making noises everywhere. I must confess that I use rilsans without any economy. Even though the DeepCool case is pretty well endowed with tightening solutions, I prefer to add more, always bearing in mind that I could dismantle or change a part. But the main idea is to get clean wiring that doesn’t impede air circulation.


[nextpage title=”My Optimizations”]My Optimizations
Step 1: RAM
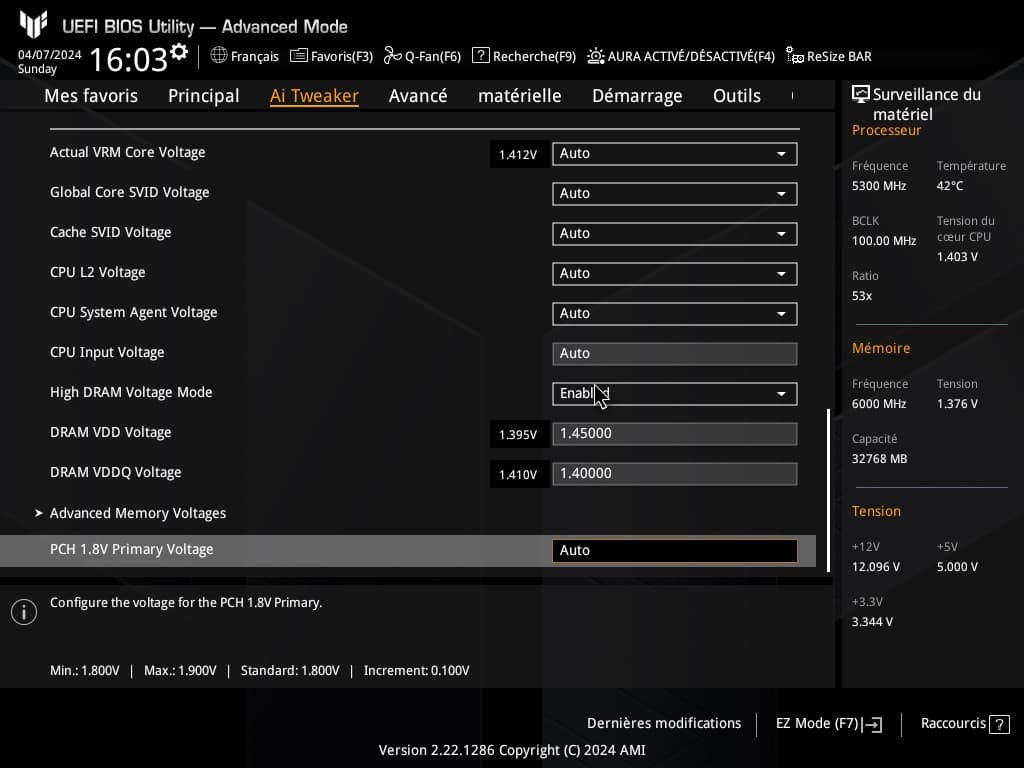
After talking to my colleagues in the Tweak League about the server, I made the same choice as Matusalem and JapWhite, using the 7400MHz frequency. Everything happens in the Bios.
Here, in order, are the main screens for applying the correct settings: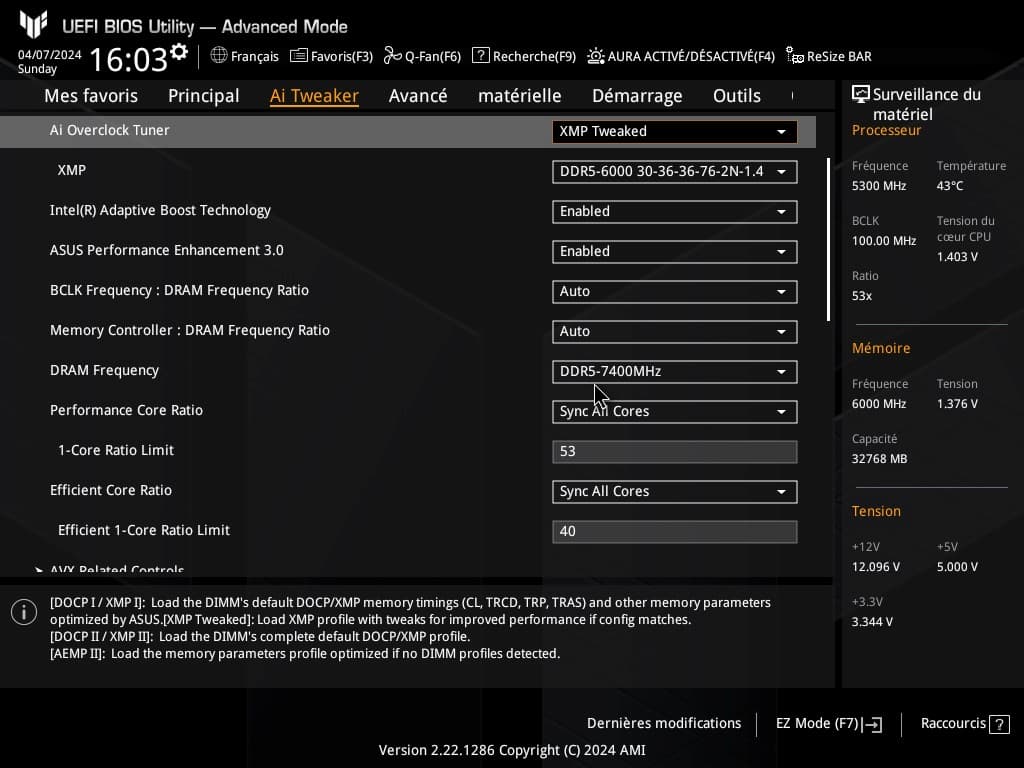
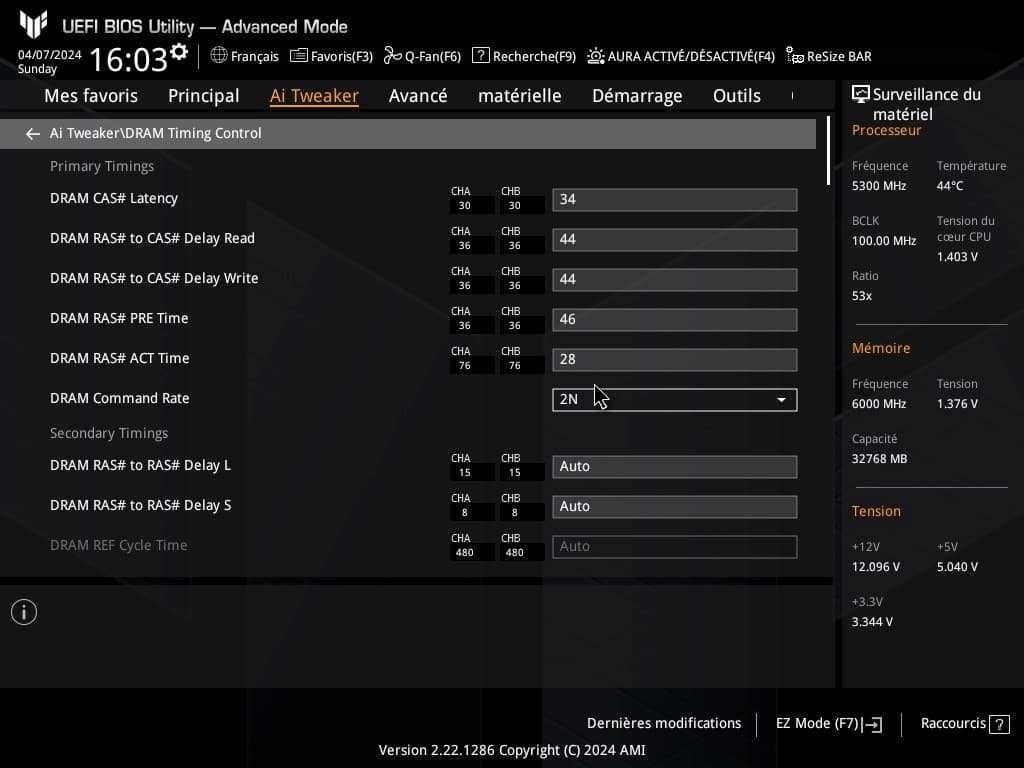
 Data in detail :
| Stock memory: | |||
| Frequency: | 6000 MHz | Timings: | 30-36-36-76 |
| OC memories: | |||
| Frequency: | 6200 MHz | Timings: | 30-36-36-28 |
| Frequency: | 6400 MHz | Timings: | 30-38-38-28 |
| Frequency: | 6600 MHz | Timings: | 30-38-38-28 |
| Frequency: | 6800 MHz | Timings: | 30-40-38-28 |
| Frequency: | 7000 MHz | Timings: | 32-40-38-28 |
| Frequency range: | 7200 MHz | Timings: | 32-42-40-28 |
| Frequency: | 7400 MHz | Timings: | 34-44-42-30 |
I tried to push the system a little more, but soon found that it was no longer stable. Worse, when I managed to stabilize on a higher frequency, performance was simply inferior! In the table, I forget to specify the command rate, which is 2N, and the VDDQ of 1.4V and VDD of 1.45V. I also increase the processor voltage to 1.4V and increase the load line calibration to 6 to avoid voltage drops and allow the processor to be more stable. These are the only tweaks possible at processor level on this chipset.
As you’ll have gathered, not being as comfortable as my comrades, I decided not to touch the secondary timings. In that sense, I haven’t tried to venture into territory I haven’t mastered. These are not, in my view, simple optimizations, and having them handled by an inexperienced person (like me) can lead to PC instability. I therefore recommend that you refer to the work of my comrades with your eyes closed.
As the declared aim of this Tweak League is to give the keys to good optimization for “the average person”, I’ve decided to avoid showing muscles I don’t have!
Step 2: The RTX 4060
To get an idea of this card’s potential, I started with the “classic” 3D Mark. I quickly realized that my copy was probably not the one with the best potential. This is something to remember: a processor, like a graphics card, can, with the same reference, be better born than others. Nevertheless, it’s all part of the game and I’m not unhappy with my winnings.
Afterburner: simple and effective.
I recommend that you get the MSI Afterburner tool. It’s the most widely used, and rest assured it works well with all brands.
- Firstly, I’ve increased the power-limit, which will allow my graphics card to receive more energy, thus consuming more and heating up more. But with these extra “vitamins”, it should also be able to accept higher frequencies.
- I therefore recommend that you raise the maximum temperature slightly, as I did. Once you’ve done this, your graphics card will already be performing better, as it’s getting more energy.
- Next, I started with the GPU and memory frequencies. For the core-clock, I increased from 10MHz to 10MHz before reaching the maximum frequency of 2020MHz, a gain of 190MHz. On the memory side, I went from 50MHz to 50MHz and reached a maximum frequency of 2625MHz before any artifacts appeared.
- Bear in mind that these settings, which are the maximum possible on my model, are not necessarily the case for all 4060s, and as I said, I didn’t come across the best model. But with these values, I was able to keep my card stable by running it for several hours a day.
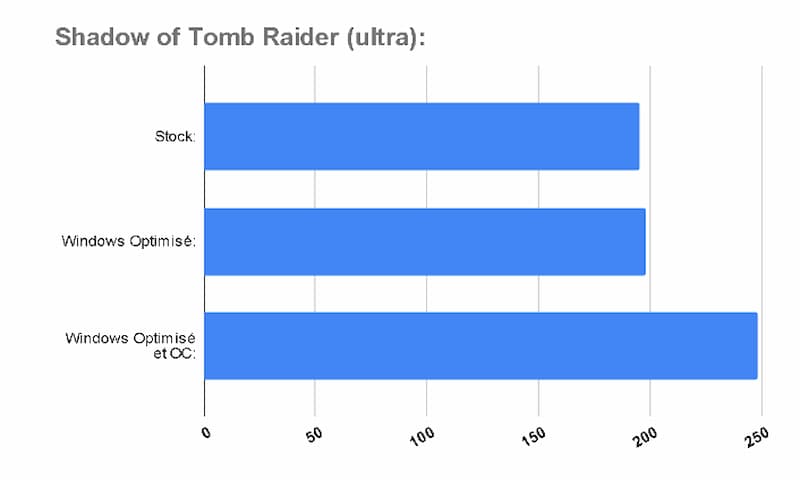
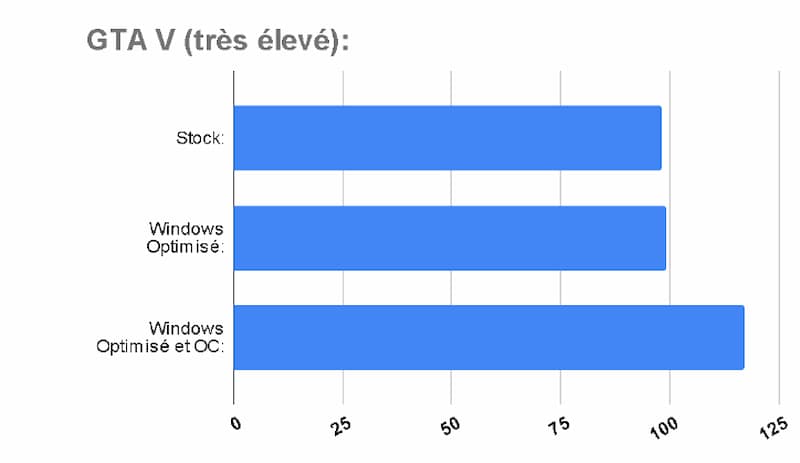
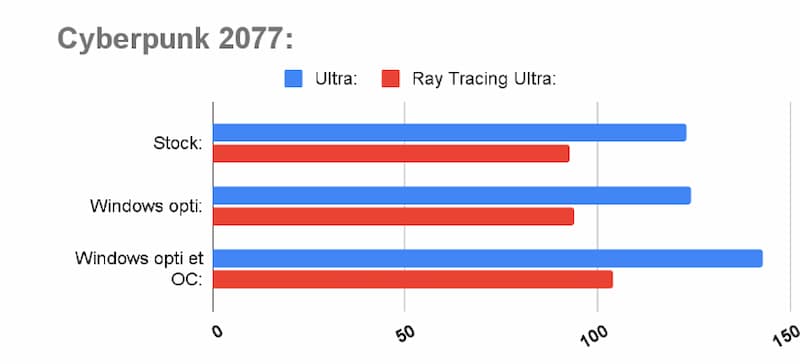
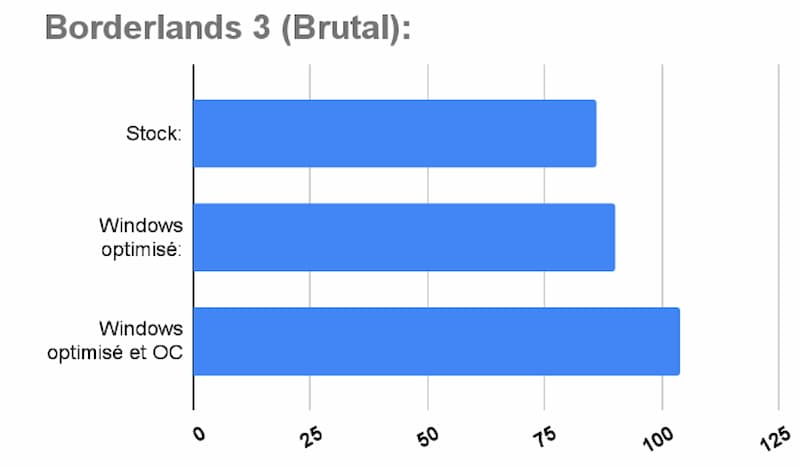
To give you an idea, I was able to test the “before” and “after” on four games with built-in benchmarks. It’s a simple way of seeing the benefits of these tweaks.
All these tests were carried out in 1080P, with full detail. By “Stock” we mean the basic PC set-up, with classic installation, drivers and normal Windows.
Step 3: Windows
I think it’s important to tackle Windows optimization once you’ve found total stability on your hardware. That’s why I’m only dealing with this subject at the end, to avoid multiplying the causes for doubts about instability when modifying RAM – CPU and graphics card parameters.
For this part, I made extensive use of Capet’s tutorials. I’ve been able to experiment with quite a few of these optimizations for some time now, and to exchange views with him on the subject. I’m aware that Capet is a bit “controversial” within the overclocking.com community server, but he’s a gamer like me whose main concern is performance achieved in games, not scores in synthetic benchmarks. I’ve deliberately ignored certain methods that can cause instability.
-> Input Lag
Let’s start with input lag. This is the PC’s latency time. Why optimize input lag? In many games, only fps counts, but there is one area where its value is very important: fast-paced FPS (CS:GO, PUBG, Overwatch, etc.), competitive games and esports games. If you have high input lag, then opponents with lower latency can have a significant advantage over you, they can make a move faster you are therefore penalized.
With a “basic” Windows installation, you have a default setting with fairly high values. But with a few manipulations explained in this video, you’ll get a better response time .
Here’s what you get:
Before: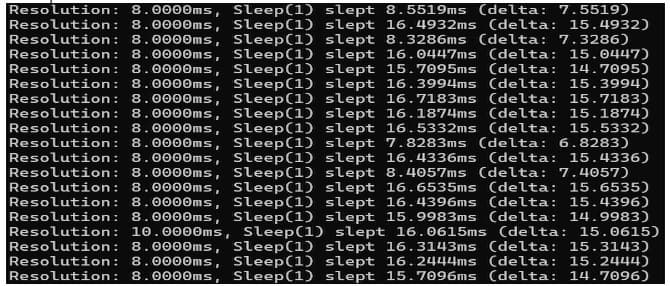
After :
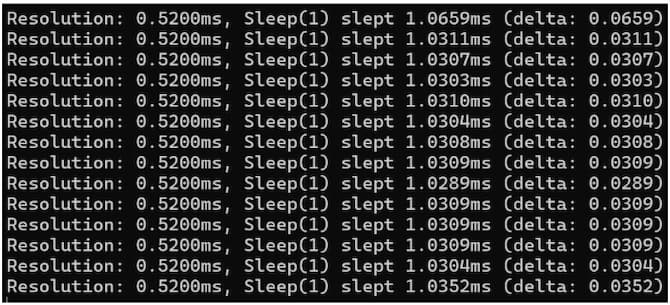
Other Windows optimizations :
Obviously, a “clean” installation of Windows means a PC that isn’t polluted by tasks that eat up resources for no reason.
This time, the video tutorial concentrates on Windows applications, uninstalling Bloatware and keeping to the essentials, with the aim of increasing PC responsiveness for games and lightening the load on the processor.
Finally, in another video, Capet shows us how to optimize graphics card behavior in Windows. To do this, you’ll need to modify a few parameters in the Nvidia control panel, and install software that lets you apply customized settings to your graphics card. Settings such as the graphics card’s power mode in certain key applications could prevent it from accessing its optimum performance. I haven’t applied this method because, personally, I haven’t measured any gains. However, some of my followers have reported good results. So I’m posting the link here for those who want to go further.
There are still a few techniques for optimizing your Windows and freeing up resources for your machine. I’ve stuck to the basics, because with 32GB of Ram, our PC is relatively safe in this respect.
[nextpage title=”My conclusion”]My conclusion
As you can see, I had a lot of fun with this configuration.
As I said at the beginning, good optimization starts with good use of your budget. That’s why I’ve tried to offer you some alternatives to spread your budget as evenly as possible.
I clearly love this Deepcool box and radiator, even though for me, the “DIGITAL” version of the radiator isn’t really useful, since it’s already accompanied by a box with a display that does the same thing.
The Asus graphics card may give rise to doubts. Its size can be frightening, with these new chips releasing quite a lot of power… In the end, the size is perfect. My expectations in terms of cooling and performance have really been met. Which clearly makes me wonder about the much more expensive RTX 4060 models with their enormous cooling systems, which don’t really add anything.
Finally, I hope you’ve enjoyed my advice on this PC and my work. As I’ve already said, without false modesty, I’ve simply applied what I’ve learned through exchanges with the community. I must also thank the other competitors who shared their work without restriction in a great atmosphere. My added value was therefore focused on the feedback and feelings of the gamer that I am.
If you have any questions or even advice on important things I haven’t mentioned or forgotten, you can always ask me on my Twitter, TikTok… I’m pretty responsive!